Volumetric
Super
Storm
01Overview 02Documentation 03Watch 04Team
EN / KO
UE 5.8 · Win64
Team GoroGoro
v1.0.0
Plate 01 — mature state, NewMap2 Shape targets ×2 · RGBA16F Formation 13.0 s · dissolve 10.0 s
Volumetric
Super Storm

One art-directable mesocyclone, solved on the game thread and rendered through Unreal's native cloud volume.

큰 폭풍 하나를 언리얼 볼류메트릭 클라우드에 올립니다. 계산은 게임 스레드에서 돌고, 모양은 에디터에서 직접 만져서 잡습니다.

Get it on Fab →

A storm is a field you solve, bake and light — not a particle system.

액터 하나가 형상부터 모션, 프로파일, 플로우맵, 라이트닝까지 다 들고 있습니다. 셰이프 타깃 두 장은 월드 서브시스템이 관리하는데 입력이 실제로 바뀌었을 때만 다시 굽고, 결과는 클라우드 머티리얼로 넘어갑니다. BP_VolumetricSuperStorm을 끌어다 놓으면 배선은 알아서 되니 머티리얼 그래프를 열 일은 없습니다. 에디터 뷰포트도 같은 경로를 타기 때문에 뷰포트에서 본 그림이 그대로 나갑니다.

The actor owns shape, motion, profile, flow-map and lightning state. A world subsystem owns the two shape targets, re-bakes them through compute only when the inputs actually change, and binds them onto the cloud material. Drop in BP_VolumetricSuperStorm and it wires itself — no material graph work. The editor viewport ticks the same path, so what you tune is what you ship.

Runtime · Shaders · Editor — three modules. Shaders load at PostConfigInit so /VolumetricSuperStormShaders is mapped before anything compiles. Shape bakes are hash-gated — identical inputs never re-bake, and viewport motion previews without entering PIE.모듈은 Runtime, Shaders, Editor 세 개입니다. Shaders가 PostConfigInit단계에서 먼저 올라오니 머티리얼이나 셰이더가 컴파일될 때는 이미 /VolumetricSuperStormShaders경로가 잡혀 있습니다. 셰이프 베이크는 해시를 비교해서 입력이 같으면 건너뛰고, 모션은 PIE에 들어가지 않아도 뷰포트에서 돕니다.
Lightning

The core lights
from inside

An authored timeline: a flash pulse curve, ground strikes resolved against Landscape height, and free-form cues that fire Blueprint events. Hot-white, fill and leak colors reach the material with an HDR core peak. A sample Niagara bolt ships but is not assigned by default — the events are the integration point, and BP_VolumetricSuperStorm carries worked examples of the handlers.

라이트닝 타임라인은 직접 짭니다. 플래시 펄스 커브를 그려 두면 지상 낙뢰는 랜드스케이프 높이를 읽어서 떨어질 자리를 정하고, 원하는 시점에 큐를 심으면 블루프린트로 이벤트가 올라옵니다. 코어와 필, 리크 색이랑 HDR 피크 값은 머티리얼로 바로 넘어갑니다. 샘플 Niagara 볼트가 들어 있지만 기본으로 물려 있진 않습니다. 붙이는 지점은 이벤트고, BP_VolumetricSuperStorm에 그 핸들러 예시가 있습니다.

Play Lightning Sequence
Stop Lightning
On Ground Strike
On Lightning Pulse
On Custom Lightning Cue

Painted, not guessed
Storm profile editor
Plate 01 — vertical profile painter
Flow map editor
Plate 02 — wind flow-map painter
Plate 03 — painted flow driving the body
Plate 04 — upward layer weighting
Brush in Blend or Overwrite; the eraser restores the parametric source rather than clearing to black. Bake to an asset, then reference it from a preset.붓 모드는 Blend와 Overwrite 두 가지고, 지우개는 검게 칠하는 게 아니라 파라미터로 만든 원래 면을 되돌립니다. 다 그렸으면 에셋으로 굽고 프리셋에서 그걸 가리키게 하면 됩니다.

Presets that travel,
profiles that blend

Apply Preset
Profile Sequence
Save Preset As

One preset asset holds the whole storm — shape and motion settings, formation and dissolve durations, the vertical profile and flow-map references, and the complete lightning sequence. A profile asset holds up to sixteen keys, and playback blends between them — driven by the built-in transport or by a curve of your own.

프리셋 하나에 폭풍 설정이 통째로 담깁니다. 형상과 모션, 형성·소멸 시간, 버티컬 프로파일과 플로우맵 참조, 라이트닝 시퀀스가 다 들어갑니다. 프로파일 에셋 하나에 키가 최대 16개 들어가고, 재생하면 그 사이를 블렌드합니다. 내장 트랜스포트로 돌려도 되고 직접 만든 커브에 물려도 됩니다.

Plate 05 — profile key sequence
Plate 06 — the sequence timeline
Bake painter output to an asset before storing the reference in a preset — the preset holds the reference, not the pixels.페인터에서 그린 건 먼저 에셋으로 구워야 합니다. 프리셋에 담기는 건 픽셀이 아니라 그 에셋을 가리키는 참조뿐입니다.

What ships

ModulesRuntime · Shaders · Editor — Win64, DX12, SM6
ActorVolumetric Super Storm Actor with binder, lightning, profile and flow-map components. BP_VolumetricSuperStorm is a reference subclass carrying the bolt wiring
MaterialsM_VolumetricSuperStorm for the storm contract, M_StormMinimalSetup for a storm-only sky, MF_Storm_Global to drop into a cloud material you already have
EditorsVertical profile painter · flow-map painter with undo/redo · preset drawer · motion-ring visualizer
AssetsThree vertical profiles, two flow maps, four presets, Perlin-Worley and curl noise, sample bolt NS_StormLightning
Blueprint75 nodes — 47 callable, 28 pure — and 7 assignable events
DebugStorm-state overlay via VolumetricSuperStorm.Stats, cycle and GPU stat groups, motion-ring influence visualization
Eight compute passes ship: shape, bottom/top/anvil profile builds, profile brush and blend, flow-map clear and brush.컴퓨트 패스는 여덟 개가 돕니다. 셰이프 하나, 바텀·톱·앤빌 프로파일 생성 세 개, 프로파일 브러시와 블렌드, 플로우맵 클리어와 브러시입니다.

Put it over
your level

Get it on Fab → Read the docs →
Documentation / Volumetric Super Storm 1.0.0
Getting started
Requirements
Installation
Your first storm
Authoring
Radial shape curves
Ring motion
Flow map editor
Vertical profile editor
Inner light
Presets
Reference
Storm actor
Components
Core parameters
Blueprint API
Notes
Limitations
Troubleshooting
Changelog
Getting started

Requirements

What the engine, platform and GPU have to provide before the storm will render.

Engine and platform

RequirementValue
Unreal Engine5.8
PlatformWindows 64-bit
RHIDirectX 12
Shader modelShader Model 6 (SM6)
Project typeC++ or Blueprint
Required pluginsNiagara — ships with the engine, enabled by default
Rendering pathNative Volumetric Cloud

DirectX 12 and SM6

DirectX 12 with SM6 is required. The shape, profile and flow-map passes are compute shaders writing RGBA16F UAV render targets, and the shipped cloud material is authored against the SM6 feature set. DirectX 11 and Shader Model 5 are not supported.

Check Edit → Project Settings → Platforms → Windows.

SettingRequired value
Default RHIDirectX 12
D3D12 Targeted Shader Formatsincludes SM6

Changing either setting requires an editor restart and a shader recompile.

Warning — Symptoms of an SM5 or DX11 project
The compute passes produce no output and the cloud renders as an ordinary volumetric cloud. Check the RHI before investigating anything else.

Level setup

The level requires a Volumetric Cloud component. A Sky Atmosphere and a Directional Light are also required for the expected cloud lighting.

ActorRole
Volumetric CloudThe volume the storm renders into
Sky AtmosphereExpected cloud lighting response
Directional LightPrimary light and volumetric shadows

Module loading

ModuleTypeLoading phase
VolumetricSuperStormShadersRuntimePostConfigInit
VolumetricSuperStormRuntimeRuntimeDefault
VolumetricSuperStormEditorEditorPostEngineInit
Note — Load order is not incidental
The shader module loads first so that /VolumetricSuperStormShaders is registered before any material or compute shader compiles.
Installation →
Getting started

Requirements

폭풍이 화면에 나오려면 엔진, 플랫폼, GPU 쪽에서 먼저 맞춰야 할 것들이 있습니다.

엔진과 플랫폼

항목
Unreal Engine5.8
플랫폼Windows 64-bit
RHIDirectX 12
셰이더 모델Shader Model 6 (SM6)
프로젝트C++ 또는 블루프린트
필수 플러그인Niagara — 엔진 기본 포함, 기본 활성
렌더링 경로네이티브 Volumetric Cloud

DirectX 12와 SM6

DX12에 SM6가 필요합니다. 셰이프·프로파일·플로우맵 패스가 RGBA16F UAV 렌더 타깃에 쓰는 컴퓨트 셰이더고, 배포되는 클라우드 머티리얼도 SM6 기준으로 만들어졌습니다. DX11과 SM5는 지원하지 않습니다.

Edit → Project Settings → Platforms → Windows에서 확인하세요.

설정필요한 값
Default RHIDirectX 12
D3D12 Targeted Shader FormatsSM6 포함

둘 중 하나라도 바꾸면 에디터를 다시 켜고 셰이더를 다시 컴파일해야 합니다.

주의 — SM5나 DX11 프로젝트에서 나타나는 증상
컴퓨트 패스가 아무것도 내놓지 않고 구름이 그냥 평범한 볼류메트릭 클라우드로 보입니다. 다른 걸 뒤지기 전에 RHI부터 확인하세요.

레벨 구성

레벨에 Volumetric Cloud 컴포넌트가 있어야 합니다. Sky Atmosphere와 Directional Light도 있어야 의도한 구름 라이팅이 나옵니다.

액터역할
Volumetric Cloud폭풍이 그려지는 볼륨
Sky Atmosphere구름 라이팅 반응
Directional Light메인 라이트, 볼류메트릭 섀도우

모듈 로딩

모듈타입로딩 단계
VolumetricSuperStormShadersRuntimePostConfigInit
VolumetricSuperStormRuntimeRuntimeDefault
VolumetricSuperStormEditorEditorPostEngineInit
참고 — 로딩 순서에는 이유가 있습니다
머티리얼이든 컴퓨트 셰이더든 컴파일되기 전에 /VolumetricSuperStormShaders 경로가 이미 잡혀 있어야 합니다. 그래서 셰이더 모듈을 가장 먼저 올립니다.
Installation →
Getting started

Installation

Getting the plugin into a project and confirming the three modules came up.

Copy the plugin into the project

01
Close Unreal Editor. Module DLLs are locked while it runs.
02
Copy the VolumetricSuperStorm folder into the project’s Plugins directory. Create it if the project does not have one.
03
Regenerate project files when the project uses C++ — right-click the .uproject and choose Generate Visual Studio project files.
04
Reopen the project and accept Unreal’s module rebuild prompt, or build the editor target from your IDE first.
YourProject/
  YourProject.uproject
  Plugins/
    VolumetricSuperStorm/
      VolumetricSuperStorm.uplugin
      Source/
      Shaders/
      Content/
      Resources/

An engine-wide installation under Engine/Plugins/Marketplace/ also works, but a project-local installation is easier to version with the project.

Note — Folder name and display name differ
The plugin folder and its content root are named VolumetricSuperStorm — that is the internal module name. It appears in the editor as Volumetric Super Storm.

Enable the plugin

Open Edit → Plugins, search for Volumetric Super Storm, and confirm it is enabled. Restart the editor if you had to enable it manually.

Show plugin content

In the Content Browser open Settings and enable Show Plugin Content. The VolumetricSuperStorm content root becomes available in the source panel. Without it, M_VolumetricSuperStorm and BP_VolumetricSuperStorm are invisible and the quick start cannot be followed.

Shipped content

Asset areaPurpose
Materials/M_VolumetricSuperStormPrimary Volumetric Cloud material implementing the storm contract
Materials/M_StormMinimalSetupReady-made cloud material for a storm-only sky. Assign it to the Volumetric Cloud to skip wiring the storm into an existing cloud material
Materials/FunctionsStorm density, lighting and utility functions
Materials/TextureProfile, curl and volume-noise textures
Blueprints/BP_VolumetricSuperStormReference subclass of the storm actor: Niagara component plus the On Ground Strike handler that positions a bolt
VerticalProfileDefault profile assets and profile preview materials
FlowMapsSaved three-layer flow-map assets
PresetReusable storm presets
← Requirements Your first storm →
Getting started

Installation

플러그인을 프로젝트에 넣고 모듈 세 개가 잘 올라왔는지 확인하는 과정입니다.

플러그인 복사

01
에디터를 닫습니다. 켜져 있으면 모듈 DLL이 잠겨서 복사가 안 됩니다.
02
VolumetricSuperStorm 폴더를 프로젝트의 Plugins 디렉터리로 복사합니다. 폴더가 없으면 만드세요.
03
C++ 프로젝트면 .uproject 우클릭 → Generate Visual Studio project files.
04
프로젝트를 다시 열고 모듈 리빌드 요청에 예를 누릅니다. 아니면 IDE에서 에디터 타깃을 먼저 빌드하세요.
YourProject/
  YourProject.uproject
  Plugins/
    VolumetricSuperStorm/
      VolumetricSuperStorm.uplugin
      Source/
      Shaders/
      Content/
      Resources/

Engine/Plugins/Marketplace/ 아래 엔진 전역으로 깔아도 돌아갑니다. 다만 프로젝트 안에 두면 소스 관리에 같이 묶여서 버전 맞추기가 편합니다.

참고 — 폴더 이름과 표시 이름이 다릅니다
폴더와 콘텐츠 루트는 VolumetricSuperStorm입니다. 내부 모듈 이름이죠. 에디터에는 Volumetric Super Storm으로 뜹니다.

플러그인 켜기

Edit → Plugins에서 Volumetric Super Storm을 찾아 체크가 되어 있는지 봅니다. 직접 켰다면 에디터를 다시 시작하세요.

플러그인 콘텐츠 표시

콘텐츠 브라우저 Settings에서 Show Plugin Content를 켜면 VolumetricSuperStorm 콘텐츠 루트가 소스 패널에 나타납니다. 이걸 안 켜면 M_VolumetricSuperStormBP_VolumetricSuperStorm이 보이지 않아 다음 단계를 진행할 수 없습니다.

포함된 콘텐츠

에셋용도
Materials/M_VolumetricSuperStorm스톰 파라미터 계약을 구현한 메인 클라우드 머티리얼
Materials/M_StormMinimalSetup폭풍만 있는 하늘용 완성 머티리얼. 볼류메트릭 클라우드에 이걸 지정하면 기존 머티리얼에 배선할 일이 없습니다
Materials/Functions밀도, 라이팅, 유틸리티 함수
Materials/Texture프로파일, 컬, 볼륨 노이즈 텍스처
Blueprints/BP_VolumetricSuperStorm스톰 액터의 참고용 서브클래스. Niagara 컴포넌트와 볼트 위치를 잡는 On Ground Strike 핸들러 포함
VerticalProfile기본 프로파일 에셋, 프리뷰 머티리얼
FlowMaps저장된 3레이어 플로우맵 에셋
Preset재사용 가능한 스톰 프리셋
← Requirements Your first storm →
Getting started

Your first storm

From an empty level to a turning storm — including how the storm plugs into a cloud material you already have.

1. Prepare the sky

Add a Directional Light, a Sky Atmosphere and a Volumetric Cloud. The storm renders through the existing Volumetric Cloud component; it does not create a separate volumetric renderer.

2. Place one storm actor

There are two ways to place the storm, and a level uses one of them.

OptionWhat it isUse it when
Volumetric Super Storm ActorThe native C++ actor class, placed from the Place Actors panel.Default choice. Drag it into the level and continue.
BP_VolumetricSuperStormA Blueprint subclass of that actor, kept as a reference for the Blueprint event API — its ground-strike and formation handlers are worked examples. Under VolumetricSuperStorm Content/Blueprints once Show Plugin Content is enabled.You want a starting point for hanging your own VFX, audio or gameplay off the storm’s events.
Warning — Do not place both
BP_VolumetricSuperStorm derives from Volumetric Super Storm Actor — they are the same actor class, so placing both puts two storm actors in the world. A world registers one; the second is rejected and renders nothing. If a storm will not respond to any setting, look for a duplicate before investigating anything else.

Place the native actor unless you have a reason not to. Every component, the lightning component included, is created by the native actor — the Blueprint adds example event wiring, not functionality. Building your own subclass is fully supported, and the same one-actor rule applies to it.

3. Bind the cloud material

Tip — If you only want the storm
To drop the storm into the level without any other clouds, replace the Volumetric Cloud’s material with the bundled M_StormMinimalSetup and skip the rest of step 3.

Otherwise open the volumetric cloud material you want to plug the storm into, and locate the MF_Storm_Global material function.
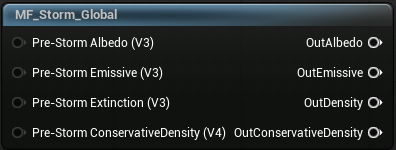
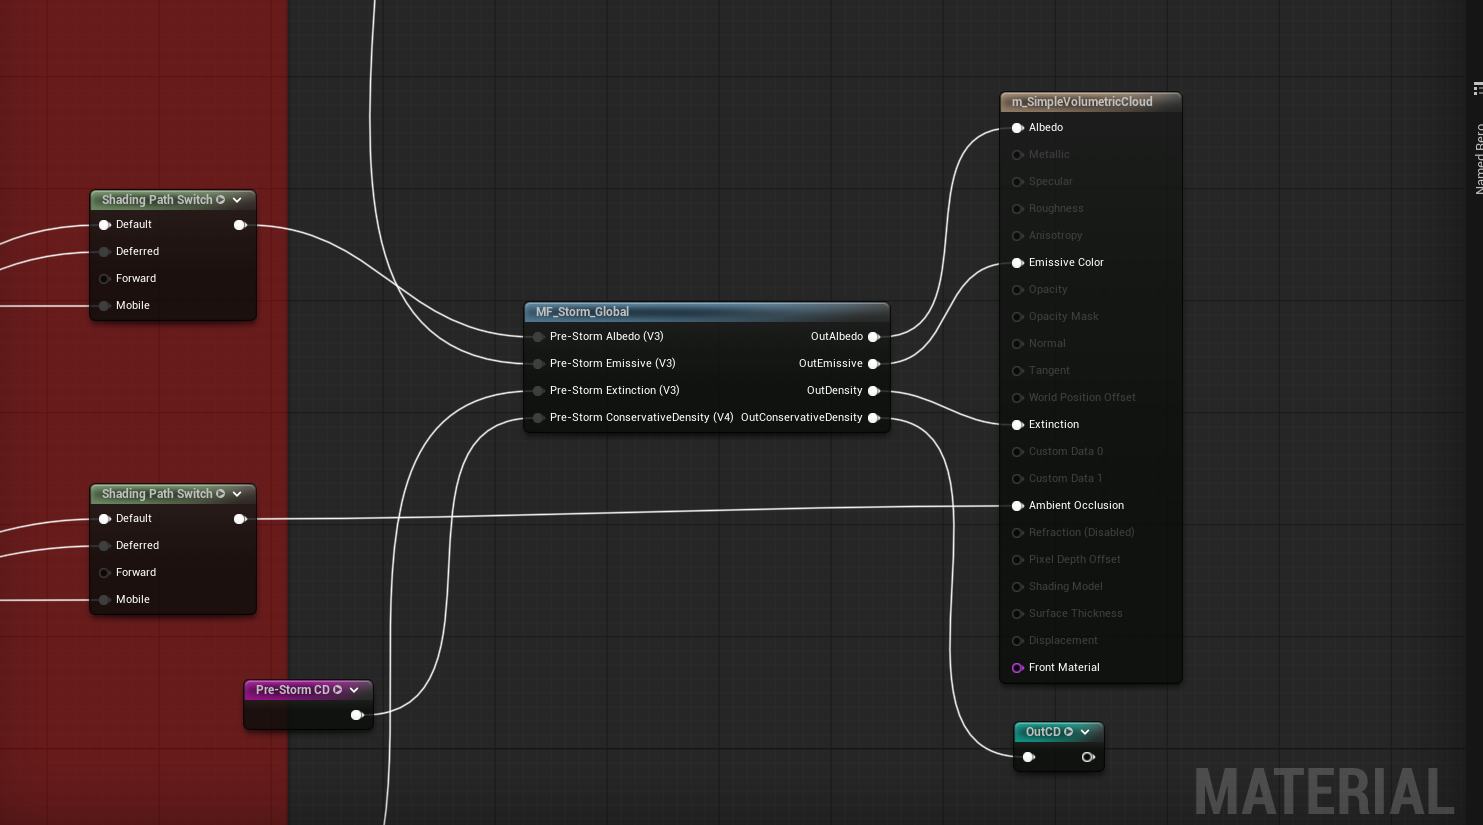
MF_Storm_Global — four Pre-Storm inputs on the left, four Out pins on the right

The inputs take the cloudscape you already have.

InputTypeWhat it carries
Pre-Storm Albedofloat3Albedo of the existing cloudscape
Pre-Storm Emissivefloat3Emissive of the existing cloudscape
Pre-Storm Extinctionfloat3Extinction — the density of the existing cloudscape
Pre-Storm ConservativeDensityfloat4Conservative density of the existing cloudscape

The outputs carry the same channels back out, with the storm composited in.

OutputTypeWire it to
OutAlbedofloat3Albedo on the material output node
OutEmissivefloat3Emissive Color on the material output node
OutDensityfloat3Extinction on the material output node
OutConservativeDensityfloat4ConservativeDensity on the Volumetric Advanced Output node

The analogy: the material function intercepts the existing connections to Albedo, Emissive Color and Extinction on the material output node, and does the same for conservative density on the Volumetric Advanced Output node.

Here is a working example, where the base material is UE 5.8’s native m_SimpleVolumetricCloud.
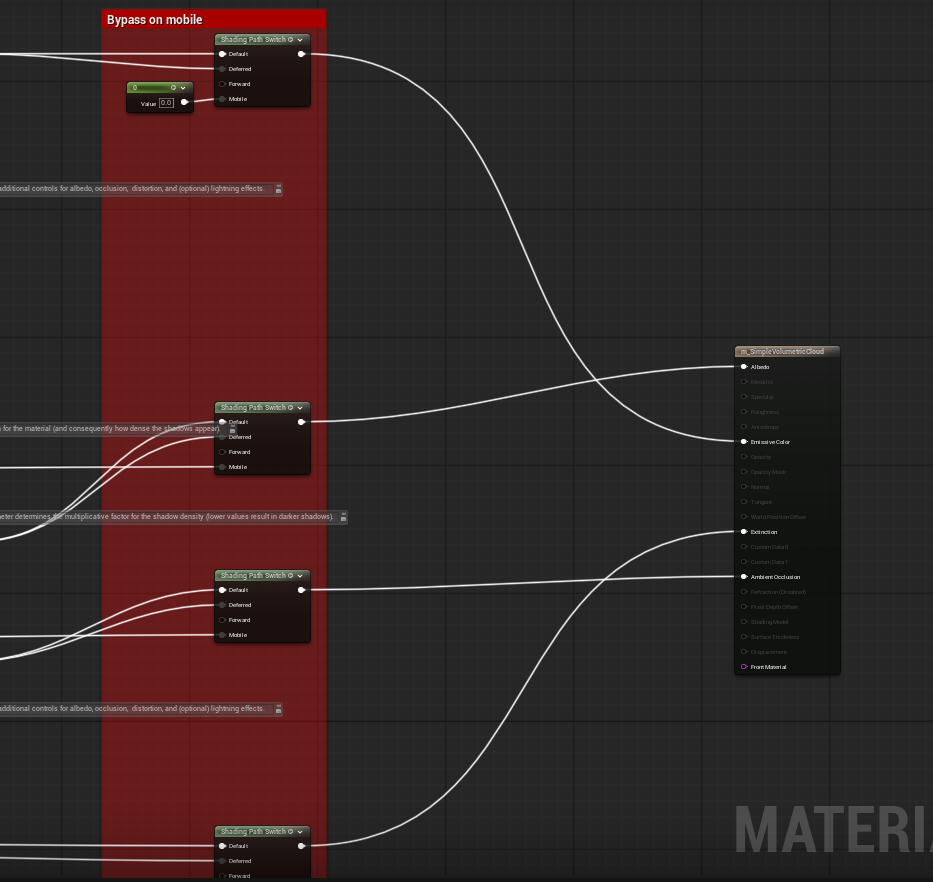
Before — Shading Path Switch nodes wired straight into the output node
After — MF_Storm_Global sits between them and the output node

Conservative density is wired using named reroute nodes. It does not require manual wiring on either the input or the output, but wiring it as shown buys some ray-marching performance.
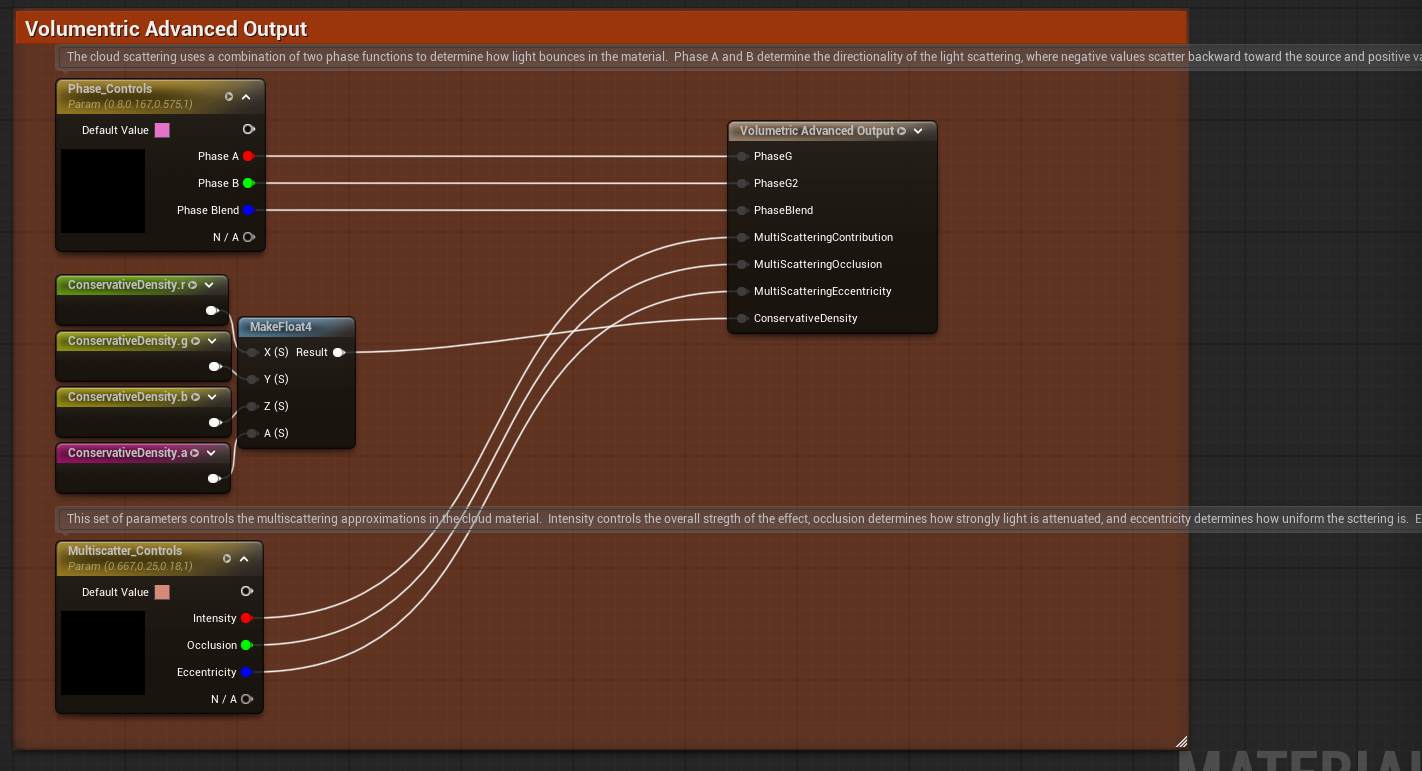
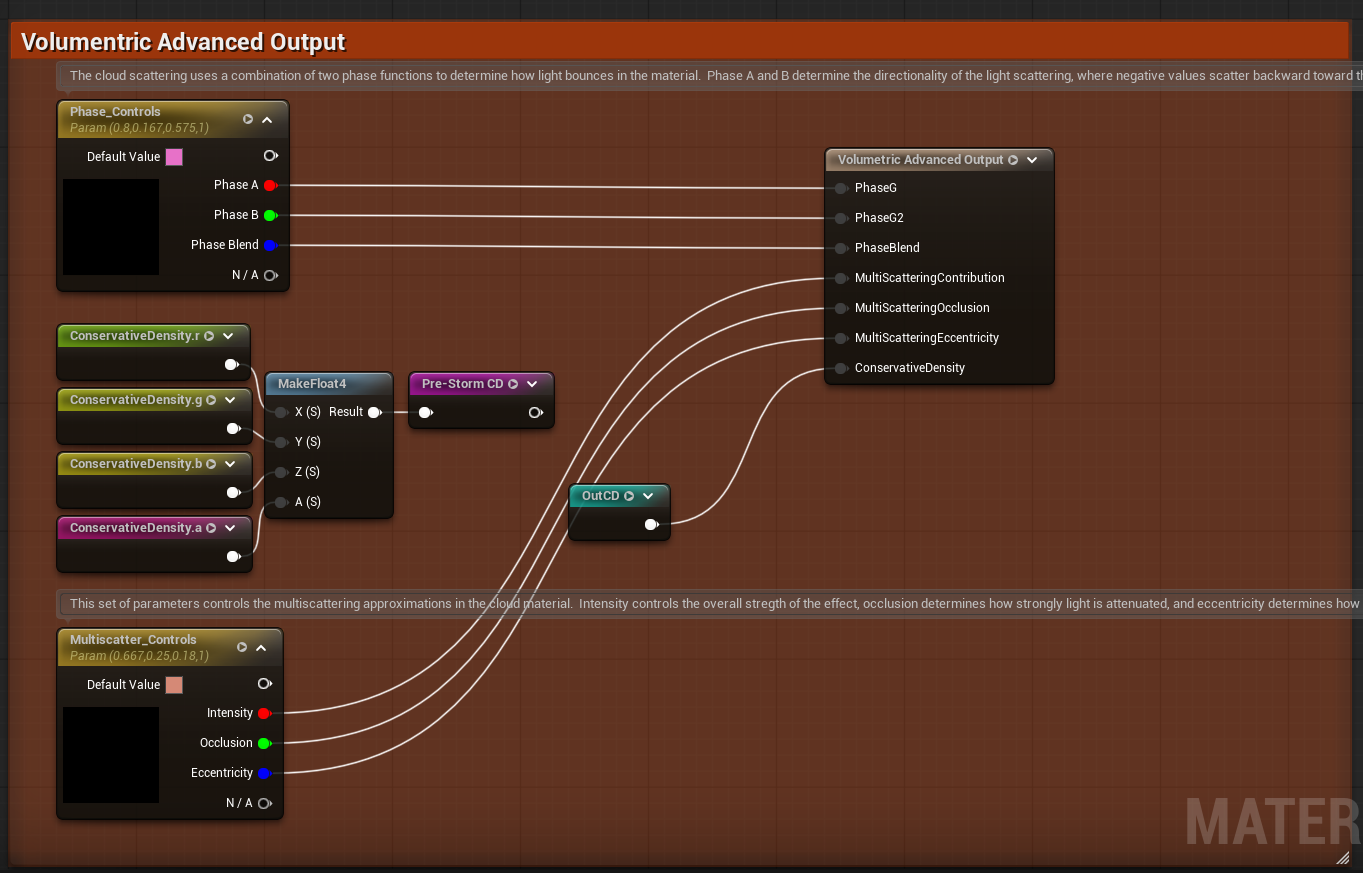
Before — a MakeFloat4 feeds ConservativeDensity directly
After — Pre-Storm CD and OutCD reroutes carry it to and from the function

3+. Manual fallback

Note — MF_Storm_Global uses a Material Parameter Collection
Unreal allows a maximum of two Material Parameter Collections per material, including any material function it references. If you have already hit that limit, this section is the way around it.

If the limit does not apply to you, skip this section. The fallback bypasses MPC capacity by overriding the Volumetric Cloud material with a Material Instance Dynamic.

Same step as above, but locate MF_Storm_MID instead. Its pins are identical, so refer to the tables above for wiring.
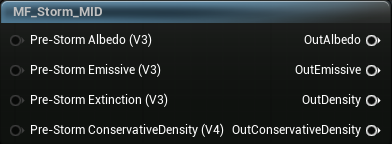
MF_Storm_MID exposes the same pins as MF_Storm_Global

One extra step here. Select the storm actor and locate the MaterialBinder component in its Details panel.
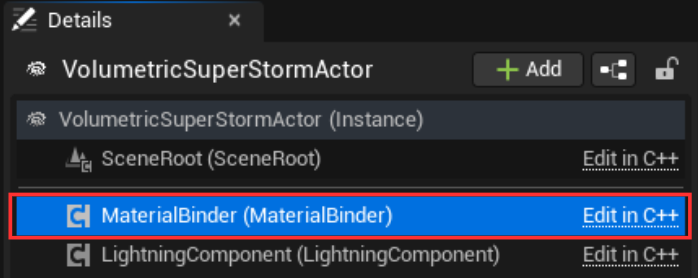
The MaterialBinder component on VolumetricSuperStormActor

Under Storm | Material, set Binding Backend to Dynamic Material Instance. The binder defaults to Global MPC, and the two properties below are hidden until you switch it.

Then set the cloud to update in Target Cloud Reference, and the material to override in Base Cloud Material.
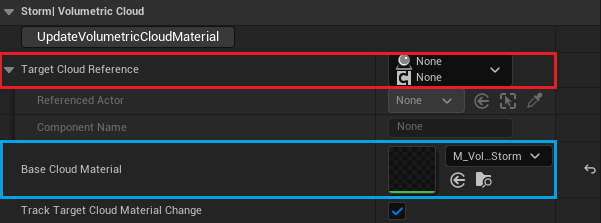
Target Cloud Reference (red) and Base Cloud Material (blue)
TARGET CLOUD REFERENCE (RED) AND BASE CLOUD MATERIAL (BLUE)
Warning — Base Cloud Material must have MF_Storm_MID wired in
In the usual case this is the material you just wired. The storm will not appear otherwise. Note that MF_Storm_Global is not the function to use here.

4. Shape the storm

GroupPurpose
Shape SettingsRadius, extent, anvil, radial curves, density, lighting and wind
Motion SettingsRing rotation, masks, height range and frequency-band motion
LightningSequence, repeat delay and ground-strike probability
FormationFormation and dissolution duration

Useful first adjustments: Radius changes horizontal size, Anvil Coverage the complete outer radius, Anvil Strength the anvil contribution, Density and HF Strength the body density and erosion detail, Underside Visibility the lower lighting response.

Static shape changes schedule a shape rebake. Motion and lifecycle changes use frame-level material uploads.

5. Animate formation

Use Create Storm, Dissolve Storm, Show Mature Storm and Hide Storm Immediately. Formation and dissolution completion events are exposed on the actor.

6. Author profiles and flow

·Open the vertical profile painter to edit bottom, top and anvil profiles.
·Open the flow-map editor to paint lower, middle and upper flow layers.
·Save painter output to assets before storing those references in a preset.
← Installation Radial shape curves →
Getting started

Your first storm

빈 레벨에서 폭풍이 돌기까지. 이미 쓰고 있는 클라우드 머티리얼에 폭풍을 넣는 방법까지 다룹니다.

1. 하늘 준비

Directional Light, Sky Atmosphere, Volumetric Cloud를 놓습니다. 폭풍은 이미 있는 클라우드 컴포넌트에 그려집니다. 렌더러를 따로 만들지 않습니다.

2. 스톰 액터 하나 배치

배치 방법이 두 가지인데, 레벨에는 둘 중 하나만 놓습니다.

방법정체쓰는 경우
Volumetric Super Storm Actor네이티브 C++ 액터. Place Actors 패널에서 놓습니다.기본 선택. 끌어다 놓고 넘어가면 됩니다.
BP_VolumetricSuperStorm그 액터의 블루프린트 서브클래스. 블루프린트 이벤트 API 참고용이고, 지상 낙뢰와 형성 핸들러가 예시로 들어 있습니다. Show Plugin Content를 켜면 VolumetricSuperStorm Content/Blueprints 아래에 있습니다.폭풍 이벤트에 VFX·사운드·게임플레이를 직접 붙일 출발점이 필요할 때.
경고 — 둘 다 놓지 마세요
BP_VolumetricSuperStorm은 Volumetric Super Storm Actor를 상속합니다. 같은 액터 클래스라서 둘 다 놓으면 월드에 스톰 액터가 두 개가 됩니다. 월드는 하나만 등록하고 두 번째는 거부되어 아무것도 그리지 않습니다. 어떤 설정을 만져도 반응이 없다면 다른 걸 뒤지기 전에 중복 액터부터 찾으세요.

특별한 이유가 없으면 네이티브 액터를 놓으세요. 라이트닝을 포함한 컴포넌트는 전부 네이티브 액터가 만듭니다. 블루프린트가 더하는 건 기능이 아니라 이벤트 배선 예시입니다. 직접 서브클래싱하는 것도 지원하고, 하나만 놓는다는 규칙은 그대로입니다.

3. 클라우드 머티리얼 바인딩

팁 — 폭풍만 필요하다면
다른 구름 없이 폭풍만 놓을 거라면, 볼류메트릭 클라우드의 머티리얼을 M_StormMinimalSetup으로 바꾸면 끝입니다. 3단계 나머지는 넘어가세요.

기존 클라우드 머티리얼에 폭풍을 넣으려면 그 머티리얼을 열고 MF_Storm_Global 머티리얼 함수를 찾습니다.

MF_Storm_Global — 왼쪽 Pre-Storm 입력 4개, 오른쪽 Out 출력 4개

입력은 지금 쓰고 있는 클라우드스케이프를 받습니다.

입력타입담기는 값
Pre-Storm Albedofloat3기존 클라우드스케이프의 알베도
Pre-Storm Emissivefloat3기존 클라우드스케이프의 이미시브
Pre-Storm Extinctionfloat3기존 클라우드스케이프의 익스틴션, 즉 밀도
Pre-Storm ConservativeDensityfloat4기존 클라우드스케이프의 컨서버티브 덴시티

출력은 같은 채널을 폭풍이 합성된 상태로 되돌려줍니다.

출력타입연결할 곳
OutAlbedofloat3머티리얼 출력 노드의 Albedo
OutEmissivefloat3머티리얼 출력 노드의 Emissive Color
OutDensityfloat3머티리얼 출력 노드의 Extinction
OutConservativeDensityfloat4Volumetric Advanced Output 노드의 ConservativeDensity

쉽게 말하면 이 함수가 Albedo·Emissive Color·Extinction으로 가던 연결을 중간에서 가로채고, 컨서버티브 덴시티도 Volumetric Advanced Output 쪽에서 같은 일을 합니다.

UE 5.8 기본 머티리얼 m_SimpleVolumetricCloud에 넣은 예시입니다.

배선 전 — Shading Path Switch가 출력 노드로 바로 들어갑니다
배선 후 — MF_Storm_Global이 그 사이에 들어갑니다

컨서버티브 덴시티는 named reroute 노드로 연결했습니다. 입력이든 출력이든 직접 배선하지 않아도 되지만, 아래처럼 연결하면 레이마칭 성능에서 이득이 있습니다.

배선 전 — MakeFloat4가 ConservativeDensity로 직접 들어갑니다
배선 후 — Pre-Storm CD와 OutCD reroute가 함수로 값을 오갑니다

3+. 수동 대체 경로

참고 — MF_Storm_Global은 MPC를 씁니다
언리얼은 머티리얼 하나가 참조하는 머티리얼 함수까지 합쳐 Material Parameter Collection을 최대 2개까지만 허용합니다. 이미 한도에 걸렸다면 이 절을 보세요.

한도에 안 걸렸으면 이 절은 넘어가도 됩니다. 이 경로는 볼류메트릭 클라우드 머티리얼을 Material Instance Dynamic으로 덮어써서 MPC 용량을 우회합니다.

바로 위 단계와 같은데 MF_Storm_Global 대신 MF_Storm_MID를 찾아 넣습니다. 핀이 똑같으니 배선은 위 표를 그대로 보세요.

MF_Storm_MID — MF_Storm_Global과 핀이 같습니다

여기서 한 단계가 더 있습니다. 스톰 액터를 선택하고 Details 패널에서 MaterialBinder 컴포넌트를 찾습니다.

VolumetricSuperStormActor의 MaterialBinder 컴포넌트

Storm | Material에서 Binding BackendDynamic Material Instance로 바꿉니다. 기본값이 Global MPC이고, 아래 두 프로퍼티는 백엔드를 바꾸기 전까지 숨어 있습니다.

그다음 갱신할 볼류메트릭 클라우드를 Target Cloud Reference에, 덮어쓸 머티리얼을 Base Cloud Material에 지정합니다.

Target Cloud Reference(빨강)와 Base Cloud Material(파랑)
TARGET CLOUD REFERENCE(빨강)와 BASE CLOUD MATERIAL(파랑)
경고 — Base Cloud Material에 MF_Storm_MID가 들어 있어야 합니다
보통은 방금 배선한 그 머티리얼입니다. 아니면 폭풍이 안 나옵니다. MF_Storm_Global은 여기 쓰는 함수가 아닙니다.

4. 형상 잡기

그룹내용
Shape Settings반경, 범위, 앤빌, 방사 커브, 밀도, 라이팅, 바람
Motion Settings링 회전, 마스크, 높이 범위, 주파수별 모션
Lightning시퀀스, 반복 딜레이, 지상 낙뢰 확률
Formation형성과 소멸 시간

먼저 만져 볼 값들: Radius로 가로 크기, Anvil Coverage로 바깥 반경, Anvil Strength로 앤빌 기여도, Density와 HF Strength로 본체 밀도와 침식 디테일, Underside Visibility로 아래쪽 라이팅.

형상 값을 건드리면 셰이프를 다시 굽습니다. 모션과 라이프사이클은 리베이크 없이 프레임마다 올라갑니다.

5. 형성 애니메이션

Create Storm, Dissolve Storm, Show Mature Storm, Hide Storm Immediately 이 네 개로 라이프사이클을 돌립니다. 형성과 소멸이 끝나면 액터에서 이벤트가 옵니다.

6. 프로파일과 플로우 작업

·버티컬 프로파일 페인터에서 바텀·톱·앤빌 프로파일을 편집합니다.
·플로우맵 에디터에서 하단·중단·상단 레이어를 그립니다.
·에셋으로 저장해야 프리셋에서 가리킬 수 있습니다.
← Installation Radial shape curves →
Authoring

Radial shape curves

Six named curves that decide how the storm changes from its centre to its outer edge.

Reading the axes

Six named float curves control how the storm changes from its centre to its outer edge. One row, one visible result.

CurveControls
Body CoverageDensity support inside the main storm body
Anvil FillDensity support inside the anvil footprint
Bottom SoftnessStrength of the bottom-profile fade
Top/Anvil Profile CoordinateWhich horizontal column of the Top and Anvil profiles is sampled
Layer BottomLower boundary of the storm’s available vertical slab
Layer TopUpper boundary of that slab

The curves do not tint the cloud. Their values are packed into internal shape lookup tables when the storm is baked, and colour channels no longer need to be selected or interpreted in the Details panel.

·X is normalized radius from 0 to 1. 0 is the storm centre.
·Y is the value the curve produces. The shape bake clamps it to 0–1.
·The curve is sampled into a 256-entry lookup table. Keys outside X 0–1 are not used.

Most curves use the main body radius, where X 1 is the actor’s numeric Radius. Anvil Fill is the exception: its X axis spans the complete wind-aligned anvil footprint, so X 1 is always the anvil’s outer boundary.

For Bottom Softness, Top/Anvil Profile Coordinate, Layer Bottom and Layer Top the radius is clamped at the body edge, so the outer anvil continues using each curve’s value at X 1.

Tip — Block out the shape with Linear interpolation
Frame X and Y from 0 to 1 in Unreal’s curve editor and begin with Linear. Cubic and Auto tangents can overshoot; the shape bake then clamps the result and the overshoot appears as an unexpected flat plateau.

Body Coverage

Controls how much of the low-frequency cloud carrier survives inside the main body. It changes density support, not the geometric radius.

·1 preserves the carrier and produces the fullest result.
·Lower values raise the cutoff, erode more of the carrier and reduce its maximum contribution.
·0 removes body coverage at that radius.

The default curve keeps a broad, dense shoulder and erodes the edge.

XBody CoverageResult
0.000.98Dense centre
0.550.98Wide, solid shoulder
1.000.58Eroded body edge

Move the middle key left to begin breaking up the body earlier, right for a wider solid core. Lower only the centre value for an eye-like, sparser middle without shrinking the footprint.

Anvil Fill and Anvil Coverage

Anvil Fill does the same density-support job inside the anvil. Its X axis is normalized across the complete anvil ellipse, so the X 1 key always controls the outer rim even when numeric Anvil Coverage changes the anvil’s physical size.

·Keep the middle high and lower the edge for a solid shelf with a soft rim.
·Use a steadily falling curve for an anvil that thins continuously outwards.
·Lower the centre only when the inner shelf should be more open.
Warning — Anvil Fill cannot enable the anvil by itself
Anvil Strength must be greater than zero. Anvil Depth 01, the Anvil Profile, Layer Bottom and Top, and the shape footprint must also allow density at the sample.

The numeric Anvil Coverage property and the Anvil Fill curve are different things: the first changes horizontal reach, the second changes density support inside that reach.

Anvil outer scale = 1 + Anvil Coverage

The editor range 0.2 to 1.0 produces a nominal scale of 1.2 to 2.0 body radii. The footprint is wind aligned rather than circular; for a numeric Anvil Coverage value C the extents from the storm centre are approximately:

DirectionExtent in body radii
Downwind1 + C
Upwind1 + 0.30 × C
Crosswind1 + 0.65 × C

The upper flow map steers this direction when enabled; otherwise the actor’s Wind Direction is used.

Use the anvil controls in this order
01
Set numeric Anvil Coverage for horizontal reach.
02
Set Anvil Strength for how strongly the anvil participates.
03
Shape Anvil Fill for the shelf’s internal fill and outer rim.
04
Use Anvil Depth 01 and the Anvil Profile for vertical depth and form.

Bottom Softness

Controls the strength of the bottom-profile fade. It is not a density amount.

·0 approaches a hard lower boundary, because the effective bottom fade width approaches zero.
·1 uses the complete Bottom Fade width and gives the strongest wispy underside response.
·Values between them blend smoothly.

A value near 0.2 at the centre and 1.0 at the edge produces a firm core with a softer, more ragged underside around the outside.

Top/Anvil Profile Coordinate

A lookup coordinate, not cloud amount. It selects the horizontal X column sampled from both the Top and Anvil profile textures.

Its visual effect therefore depends on the Vertical Profile Curve, Anvil Profile Curve or painted profile currently loaded. With the default keys:

Physical positionCoordinateProfile column sampled
Centre, radial X 01Profile X 1
Body edge, radial X 10Profile X 0

This reversal allows the usual profile to be authored from outer edge to centre. A constant 0.5 makes every radius sample the middle profile column; an oscillating curve reuses different columns in radial rings and can produce visible concentric steps.

The outer anvil keeps using the value at body radial X 1.

Tip — Diagnosing a coordinate edit
Temporarily make the Top or Anvil profile visibly different at profile X 0, 0.5 and 1. The radial curve then becomes easy to read, because it is choosing among those columns. Restore the intended profile once the mapping is correct.

Layer Bottom and Layer Top

These two define the vertical slab available to the storm before the vertical profile is applied. Both use normalized height across the complete Volumetric Cloud layer — 0 is the layer bottom, 1 the layer top.

At each radius, local profile height is remapped into this slab:

Local height = (Cloud layer height − Layer Bottom)
             / (Layer Top − Layer Bottom)
EditEffect
Move Layer Bottom and Top togetherMoves that radial part vertically
Raise Layer Top onlyMakes the available column taller
Raise Layer Bottom onlyLifts the base and makes the column thinner

Keep Layer Bottom below Layer Top at every radius. If they meet or cross, the shader forces the top to be only a tiny amount above the bottom, so the column collapses instead of turning inside out.

Because the radius input is clamped at the body edge, the outer anvil inherits both height values at X 1. Keep that edge pair suitable for the shelf as well as the body.

Note — The height slab and Vertical Profile have different jobs
Layer Bottom and Top place and size the available vertical slab. The Vertical Profile then carves the top, bottom and anvil inside it. If a profile looks vertically stretched or compressed, inspect the two Layer curves first.

A predictable workflow

Change one curve family at a time.

01
Set Layer Bottom and Layer Top to simple constants, such as 0.08 and 0.95.
02
Keep Body Coverage nearly flat and high, and set Anvil Strength to zero. Establish the body first.
03
Shape Layer Bottom and Layer Top into the required cross-section.
04
Adjust Bottom Softness for the underside.
05
Adjust Top/Anvil Profile Coordinate while watching the loaded profile.
06
Enable the anvil: numeric Anvil Coverage for size, Anvil Fill for density support, then depth and profile.
07
Add Cubic or Auto tangents only after the key positions work with Linear interpolation.
Baseline keys
Named curveKeys (X, Y)
Body Coverage(0, 0.98), (0.55, 0.98), (1, 0.58)
Anvil Fill(0, 0.98), (0.55, 0.98), (1, 0.58)
Bottom Softness(0, 1), (1, 0)
Top/Anvil Profile Coordinate(0, 1), (1, 0)
Layer Bottom(0, 0.08), (1, 0.12)
Layer Top(0, 1), (1, 0.96)

Shape recipes

Starting points rather than complete Presets. Noise, profiles, the flow map and the Volumetric Cloud layer still affect the final result.

Tall domed body
·Layer Bottom: (0, 0.06), (1, 0.14)
·Layer Top: (0, 1.00), (0.70, 0.88), (1, 0.62)
·Body Coverage: keep the centre and shoulder near 0.95, then fall to about 0.45 at the edge.
Flat shelf
·Keep Layer Bottom almost constant.
·Keep Layer Top almost constant so the anvil anchor does not slope down sharply.
·Increase numeric Anvil Coverage for reach.
·Keep Anvil Fill high through the middle, then lower it near the outer edge.
Sparse eye
·Lower Body Coverage near X 0, raise it through the middle, and lower it again at X 1.
·Leave Layer Bottom and Top simple until the radial opening reads correctly.
·This changes density support; it does not create a geometric hole in the footprint stencil.

Internal packing and common surprises

The named float curves retain the existing shape-texture packing internally. Useful when debugging a material or render target, not needed for normal curve editing.

Named curveGenerated data
Body CoverageShapeRT.R
Bottom SoftnessShapeRT.G
Top/Anvil Profile CoordinateShapeRT.B
Layer BottomShapeRT2.R
Layer TopShapeRT2.B
Anvil FillShapeRT2.A
SymptomCheck
Anvil size does not changeEdit numeric Anvil Coverage, not Anvil Fill
Anvil size changes but it remains emptyRaise Anvil Strength, then inspect Anvil Fill, depth and the Anvil Profile
A bottom edit changes hardness rather than densityBottom Softness controls fade width, not cloud amount
Top or anvil changes seem unrelated to the curve valueTop/Anvil Profile Coordinate selects profile X — inspect the loaded profile
The edge becomes a very thin sheetLayer Bottom has met or crossed Layer Top near X 1
The outer anvil has an unexpected height or profileIt inherits the profile-coordinate and Layer values at body radial X 1
A curve has broad flat regionsA Cubic tangent probably overshoots and is being clamped
← Your first storm Ring motion →
Authoring

Radial shape curves

폭풍이 중심에서 바깥으로 가면서 어떻게 변할지를 정하는 커브 여섯 개입니다.

축 읽기

커브 여섯 개가 폭풍 중심에서 바깥 끝까지 어떻게 변하는지를 정합니다. 한 줄이 눈에 보이는 결과 하나씩 담당합니다.

커브담당
Body Coverage본체 안쪽 밀도 지지
Anvil Fill앤빌 발자국 안쪽 밀도 지지
Bottom Softness바텀 프로파일 페이드 세기
Top/Anvil Profile CoordinateTop·Anvil 프로파일에서 어느 가로 열을 읽을지
Layer Bottom폭풍이 쓸 수 있는 세로 구간의 아래 경계
Layer Top같은 구간의 위 경계

구름 색과는 상관없습니다. 베이크할 때 셰이프 룩업 테이블로 들어가는 값이고, 이제 Details 패널에서 컬러 채널을 고르거나 해석할 일은 없습니다.

·X는 정규화된 반경 0에서 1. 0이 폭풍 중심입니다.
·Y는 커브가 내놓는 값. 베이크가 0~1로 클램프합니다.
·커브는 256칸 룩업 테이블로 샘플됩니다. X 0~1 밖의 키는 쓰이지 않습니다.

대부분은 본체 반경 기준이라 X 1이 액터의 Radius입니다. Anvil Fill만 예외로, 바람 정렬된 앤빌 발자국 전체를 쓰기 때문에 X 1은 항상 앤빌 바깥 경계입니다.

Bottom Softness, Top/Anvil Profile Coordinate, Layer Bottom, Layer Top은 반경이 본체 끝에서 클램프됩니다. 그래서 바깥 앤빌은 X 1 값을 그대로 이어 씁니다.

팁 — 블록아웃은 Linear로
언리얼 커브 에디터에서 X와 Y를 0~1로 맞춰 놓고 Linear로 시작하세요. Cubic이나 Auto 탄젠트는 값이 튀고, 베이크가 그걸 클램프하면 의도하지 않은 평평한 구간으로 보입니다.

Body Coverage

본체 안에서 저주파 캐리어가 얼마나 살아남는지를 정합니다. 밀도 지지를 바꾸는 값이고 반경 자체는 건드리지 않습니다.

·1이면 캐리어를 그대로 남겨서 가장 꽉 찬 결과가 나옵니다.
·값을 내리면 컷오프가 올라가 캐리어가 더 깎이고 최대 기여도 줄어듭니다.
·0이면 그 반경에서 본체 커버리지가 사라집니다.

기본 커브는 넓고 두꺼운 어깨를 유지하다가 끝을 깎습니다.

XBody Coverage결과
0.000.98중심이 두껍게
0.550.98넓고 단단한 어깨
1.000.58깎인 본체 끝

가운데 키를 왼쪽으로 옮기면 본체가 더 일찍 부서지기 시작합니다. 오른쪽으로 옮기면 단단한 코어가 넓어집니다. 중심 값만 내리면 발자국은 그대로 두고 눈처럼 비어 보이게 할 수 있습니다.

Anvil Fill과 Anvil Coverage

Anvil Fill은 앤빌 안에서 같은 밀도 지지 역할을 합니다. X 축이 앤빌 타원 전체에 정규화되어 있어서, 숫자 Anvil Coverage로 앤빌 물리 크기를 바꿔도 X 1 키는 항상 바깥 테두리를 담당합니다.

·가운데를 높게 두고 끝만 내리면 단단한 선반에 부드러운 테두리가 됩니다.
·꾸준히 내려가는 커브는 바깥으로 계속 얇아지는 앤빌이 됩니다.
·안쪽 선반을 더 열고 싶을 때만 중심을 내리세요.
경고 — Anvil Fill만으로는 앤빌이 켜지지 않습니다
Anvil Strength가 0보다 커야 합니다. Anvil Depth 01, 앤빌 프로파일, Layer Bottom과 Top, 셰이프 발자국도 그 지점에서 밀도를 허용해야 합니다.

숫자 프로퍼티 Anvil Coverage와 커브 Anvil Fill은 다른 물건입니다. 앞은 가로 도달 거리, 뒤는 그 안쪽을 얼마나 채울지입니다.

Anvil outer scale = 1 + Anvil Coverage

에디터 범위 0.2~1.0이면 본체 반경의 1.2~2.0배가 됩니다. 발자국은 원이 아니라 바람 방향으로 늘어납니다. Anvil Coverage 값을 C라 하면 중심에서의 거리는 대략 이렇습니다.

방향본체 반경 배수
바람 아래1 + C
바람 위1 + 0.30 × C
1 + 0.65 × C

이 방향은 상단 플로우맵이 켜져 있으면 플로우맵이, 아니면 액터의 Wind Direction이 정합니다.

앤빌 작업 순서
01
숫자 Anvil Coverage로 가로 도달 거리를 잡습니다.
02
Anvil Strength로 앤빌이 얼마나 참여할지 정합니다.
03
Anvil Fill로 선반 안쪽과 바깥 테두리를 다듬습니다.
04
Anvil Depth 01과 앤빌 프로파일로 세로 깊이와 형태를 잡습니다.

Bottom Softness

바텀 프로파일 페이드의 세기입니다. 밀도 양이 아닙니다.

·0이면 페이드 폭이 0에 가까워져 아래 경계가 거의 딱 끊깁니다.
·1이면 Bottom Fade 폭을 전부 써서 아래쪽이 가장 성기게 풀립니다.
·사이 값은 매끄럽게 섞입니다.

예를 들어 중심을 0.2 근처, 끝을 1.0으로 두면 코어는 단단하고 바깥 아래쪽은 더 부드럽고 거칠어집니다.

Top/Anvil Profile Coordinate

구름 양이 아니라 룩업 좌표입니다. Top과 Anvil 프로파일 텍스처에서 어느 가로 X 열을 읽을지 고릅니다.

그래서 눈에 보이는 변화는 지금 로드된 Vertical Profile Curve, Anvil Profile Curve, 또는 그려 넣은 프로파일에 따라 달라집니다. 기본 키에서는 이렇게 됩니다.

물리 위치좌표읽는 프로파일 열
중심, 반경 X 01프로파일 X 1
본체 끝, 반경 X 10프로파일 X 0

뒤집혀 있는 덕분에 프로파일을 바깥에서 중심 방향으로 그릴 수 있습니다. 0.5 상수로 두면 모든 반경이 프로파일 가운데 열만 읽습니다. 오르내리는 커브는 반경 링마다 다른 열을 재사용해서 동심원 계단이 보일 수 있습니다.

바깥 앤빌은 본체 반경 X 1의 값을 계속 씁니다.

팁 — 좌표 수정을 확인하는 방법
Top이나 Anvil 프로파일을 프로파일 X 0, 0.5, 1에서 눈에 띄게 다르게 만들어 두세요. 그러면 커브가 어느 열을 고르고 있는지 바로 읽힙니다. 매핑이 맞으면 원래 프로파일로 되돌리세요.

Layer Bottom과 Layer Top

버티컬 프로파일이 적용되기 전에 폭풍이 쓸 수 있는 세로 구간을 정합니다. 둘 다 Volumetric Cloud 레이어 전체에 대한 정규화 높이로, 0이 레이어 바닥이고 1이 천장입니다.

반경마다 로컬 프로파일 높이가 이 구간으로 리맵됩니다.

Local height = (Cloud layer height − Layer Bottom)
             / (Layer Top − Layer Bottom)
수정결과
Bottom과 Top을 같이 이동그 반경 부분이 위아래로 움직입니다
Top만 올림쓸 수 있는 기둥이 높아집니다
Bottom만 올림바닥이 올라가고 기둥이 얇아집니다

모든 반경에서 Layer Bottom이 Layer Top보다 아래에 있어야 합니다. 만나거나 교차하면 셰이더가 top을 bottom 바로 위로 강제해서, 뒤집히는 대신 기둥이 붕괴합니다.

반경 입력이 본체 끝에서 클램프되니 바깥 앤빌은 X 1의 두 높이를 물려받습니다. 그 끝 값은 본체뿐 아니라 선반에도 맞아야 합니다.

참고 — 높이 구간과 버티컬 프로파일은 역할이 다릅니다
Layer Bottom과 Top은 쓸 수 있는 세로 구간을 놓고 크기를 정합니다. 버티컬 프로파일은 그 안에서 위·아래·앤빌을 깎습니다. 프로파일이 세로로 늘어나거나 눌려 보이면 Layer 커브 두 개를 먼저 보세요.

작업 순서와 기본 키

커브 계열을 한 번에 하나씩 바꾸는 게 결과를 예측하기 쉽습니다.

01
Layer BottomLayer Top0.08, 0.95 같은 상수로 둡니다.
02
Body Coverage는 거의 평평하고 높게, Anvil Strength는 0으로. 본체를 먼저 세웁니다.
03
Layer Bottom과 Top으로 필요한 단면을 만듭니다.
04
Bottom Softness로 아래쪽을 다듬습니다.
05
로드된 프로파일을 보면서 Top/Anvil Profile Coordinate를 조정합니다.
06
앤빌을 켜고 숫자 Anvil Coverage로 크기, Anvil Fill로 밀도 지지, 그다음 깊이와 프로파일.
07
키 위치가 Linear에서 잘 나온 뒤에 Cubic이나 Auto 탄젠트를 씁니다.
기본 키
커브키 (X, Y)
Body Coverage(0, 0.98), (0.55, 0.98), (1, 0.58)
Anvil Fill(0, 0.98), (0.55, 0.98), (1, 0.58)
Bottom Softness(0, 1), (1, 0)
Top/Anvil Profile Coordinate(0, 1), (1, 0)
Layer Bottom(0, 0.08), (1, 0.12)
Layer Top(0, 1), (1, 0.96)

형상 레시피

완성된 프리셋이 아니라 출발점입니다. 노이즈와 프로파일, 플로우맵, Volumetric Cloud 레이어가 최종 결과에 계속 관여합니다.

높은 돔형 본체
·Layer Bottom: (0, 0.06), (1, 0.14)
·Layer Top: (0, 1.00), (0.70, 0.88), (1, 0.62)
·Body Coverage: 중심과 어깨를 0.95 근처로 두고 끝에서 0.45 정도까지 내립니다.
납작한 선반
·Layer Bottom을 거의 상수로 둡니다.
·Layer Top도 거의 상수로 둬서 앤빌 기준점이 급하게 기울지 않게 합니다.
·숫자 Anvil Coverage를 올려 도달 거리를 늘립니다.
·Anvil Fill은 가운데까지 높게, 바깥 끝에서 내립니다.
성긴 눈
·Body Coverage를 X 0 근처에서 내리고, 가운데를 올리고, X 1에서 다시 내립니다.
·반경 개구부가 제대로 읽힐 때까지 Layer Bottom과 Top은 단순하게 둡니다.
·밀도 지지가 바뀌는 것이고 발자국 스텐실에 실제 구멍이 생기는 건 아닙니다.

내부 패킹과 자주 겪는 일

여섯 커브는 기존 셰이프 텍스처 패킹을 그대로 씁니다. 머티리얼이나 렌더 타깃을 디버깅할 때만 필요하고, 평소 커브 작업에는 몰라도 됩니다.

커브생성 데이터
Body CoverageShapeRT.R
Bottom SoftnessShapeRT.G
Top/Anvil Profile CoordinateShapeRT.B
Layer BottomShapeRT2.R
Layer TopShapeRT2.B
Anvil FillShapeRT2.A
증상확인할 것
앤빌 크기가 안 바뀜숫자 Anvil Coverage를 만지세요. Anvil Fill이 아닙니다
크기는 바뀌는데 앤빌이 비어 있음Anvil Strength를 올리고 Anvil Fill, 깊이, 앤빌 프로파일을 보세요
바텀을 만졌는데 밀도가 아니라 경계 단단함이 바뀜Bottom Softness는 페이드 폭입니다
톱이나 앤빌 변화가 커브 값과 무관해 보임Top/Anvil Profile Coordinate는 프로파일 X를 고릅니다. 로드된 프로파일을 보세요
끝이 아주 얇은 판이 됨X 1 근처에서 Layer Bottom이 Layer Top과 만났거나 교차했습니다
바깥 앤빌 높이나 프로파일이 예상과 다름본체 반경 X 1의 좌표·Layer 값을 물려받습니다
커브에 넓은 평평한 구간이 있음Cubic 탄젠트가 튀어서 클램프되고 있을 가능성이 큽니다
← Your first storm Ring motion →
Authoring

Ring motion

Up to six concentric rings, each turning at its own speed, so the storm shears against itself.

Ring influence debug view — each ring turns at its own speed, so the bands shear

The storm’s rotation is built from up to six concentric rings. Each ring turns at its own angular speed, so the storm shears against itself as radius increases instead of spinning as one rigid disc.

The controls are grouped under Storm | Settings → Motion Settings.

GroupControls
MotionMaster enable, editor preview, strength, and time scale
RingsRing count, boundaries, per-ring speed and skew, radial shear
BoundaryOverlap width and the transition mode between rings
MaskOuter radius and feather of the rotating region
HeightVertical band the rotation occupies
NoiseSeparate rotation multipliers for the LF, HF and curl bands

What the rings actually rotate

Ring motion rotates the coordinates used to sample the noise, not the density itself. Nothing is advected, and no velocity field is integrated.

Two consequences are worth knowing before tuning anything.

·The silhouette does not spin. The shape bake — footprint, anvil, layer heights, profiles — is static. Only the low-frequency carrier, the high-frequency erosion and the curl displacement turn inside that shape. A storm whose outline never changes is still rotating correctly.
·Rotation costs a second noise evaluation only where it must. Where the motion mask reaches zero the sample takes the unrotated path and the rings cost nothing at all.

Ring motion and the wind flow map are independent and compose in the same sample: the rings rotate the sample coordinates, and the flow map offsets them.

Ring layout

Rings are numbered from the centre outwards. Ring Count sets how many exist, and the two per-ring arrays resize with it.

PropertyEntriesMeaning
Ring End Radii 01Ring Count − 1Boundary between one ring and the next
Ring Angular Speed DegreesRing CountAngular speed of each ring
Ring Skew DegreesRing CountStatic angular offset of each ring

There is no entry for the outermost boundary. The last ring ends at Motion Radius Scale.

All ring radii are normalized across the complete anvil radius, matching the radial axis used by Anvil Fill in Radial Shape Curves.

Complete anvil radius = Radius * (1 + Anvil Coverage)

Anvil Coverage is clamped to 0.21.0, so radius 1.0 is between 1.2 and 2.0 body radii. Changing Anvil Coverage therefore moves every ring boundary in world space while their normalized values stay the same.

Boundaries are kept in ascending order and at least 0.01 apart. Editing one boundary past its neighbour pushes it back rather than reordering the rings.

Warning — Reducing Ring Count discards values
Ring Count is a resize, not a mask. Lowering it drops the trailing entries, and raising it again refills those slots with the shipped defaults rather than the values you had. Save a Preset before experimenting with the count.

Speed, direction and skew

Ring Angular Speed Degrees is degrees per second, scaled by Time Scale. At the default speeds and Time Scale 1, one full turn takes:

RingSpeed °/sOne turn
13.002 min
22.402 min 30 s
31.803 min 20 s
41.254 min 48 s
50.758 min
60.3517 min 9 s

The spread between the inner and outer ring is what produces visible spiral shear. Flatten the list and the storm turns as one piece.

Rotation direction is a Shape property, not a Motion property. Clockwise under Storm | Shape sets the direction for every ring at once. Individual rings cannot turn the other way: negative speeds are clamped to zero, so a ring can be stopped but not reversed.

Ring Skew Degrees is a static angular offset, applied whether or not the storm is moving. It is what curves the banding into arms. The value is not a per-ring step — it is interpolated continuously between adjacent ring centre radii, so the skew list reads as a smooth twist profile from centre to edge. The default list runs 140° at the centre down to at the outer ring.

Radial Shear Gain adds further static twist on top of the skew. It peaks at the centre and falls smoothly to zero at the motion outer radius, so it tightens the inner arms without touching the outer edge.

Frequency-band multipliers

The LF carrier, HF erosion and curl displacement each rotate at the ring phase times their own multiplier.

PropertyDefault
LF Rotation Multiplier1.00
HF Rotation Multiplier1.08
Curl Rotation Multiplier1.12

Because the three values differ slightly, the bands drift apart over time instead of turning as one locked pattern, and detail appears to boil within the rotation. Setting all three to the same value makes the noise turn rigidly.

Phases are stored as a wrapped angle plus a whole-turn count, and a multiplier is applied to the reconstructed unwrapped phase. Values other than 1 are therefore safe: the rotation stays continuous instead of jumping when the wrapped angle crosses its seam.

Where motion applies

The motion mask is the product of five terms.

Motion mask = Enabled * Motion Strength * Lifecycle
            * Radial mask * Height mask

Lifecycle is the formation and dissolution weight, so rotation fades in and out with the storm rather than snapping on.

Radial mask

Motion Radius Scale is the outer radius of the rotating region, in the same normalized anvil-radius space as the ring boundaries. Radial Feather 01 softens that outer edge. There is no inner cut-off — the centre always rotates.

Height mask

Height Min 01, Height Max 01 and Height Feather 01 bound the rotation vertically. The height they use is local to the storm’s own vertical slab, not raw cloud-layer altitude.

Local height = (Cloud layer height - Layer Bottom)
             / (Layer Top - Layer Bottom)

Layer Bottom and Layer Top are radial curves, so the motion band follows the storm’s cross-section rather than sitting at one flat altitude.

Both ends of the band feather by the same width. With the shipped defaults — 0.0, 0.62, feather 0.08 — the result is:

Local slab heightRotation
0.00none
0.00 → 0.08fading in
0.08 → 0.54full
0.54 → 0.62fading out
0.62 → 1.00none

Two defaults surprise people: the very base of the slab is static because the lower feather starts at Height Min 01, and the anvil does not turn because the band closes at 0.62. Raise Height Max 01 towards 1.0 for a storm that rotates through its full depth.

Ring boundaries and transition modes

Boundary Overlap 01 is the width of the transition region, centred on each boundary. It is clamped to 0.2 and to 90% of the narrowest ring, so tight rings automatically get a narrower transition.

Transition Mode decides what happens inside that region.

ModeBehaviourNoise evals in band
Speed BlendBlends the two rings’ rotation angles1
Noise Result BlendEvaluates both rings and blends the results2
Jittered BoundaryNo blend; the sample radius is dithered so the seam breaks up1

Speed Blend is the cheapest and reads well when neighbouring speeds are close. Where they differ sharply, blending angles smears the pattern, and Result Blend holds detail through the seam at twice the noise cost. Jittered Boundary keeps one evaluation and hides the seam with a stable hash instead: the jitter cell frequency is max(32, 2 / Boundary Overlap 01) in body coordinates, seeded from the storm’s stable id so the pattern does not crawl between frames. With Boundary Overlap 01 at 0, there is nothing to jitter and the mode has no effect.

Note — Where the frame cost actually goes
A sample inside the mask feather blends the rotated result against an unrotated one, which is one extra evaluation. Inside a Result Blend transition band that stacks to three evaluations for the same sample — the worst case in the system. Outside the mask the cost returns to one.

Ring visualization and boundary editing

Visualize Ring Influence Ranges is the tool for reading the ring layout, and it does two things at once.

It tints the storm by ring influence — the view at the top of this page. Each ring is drawn in its own hue, transition bands appear as a blend of the two neighbouring hues, and the motion mask fades the tint out where rotation stops. It is the quickest way to confirm that boundaries, overlap width and the height band are where they are intended to be. The tint replaces the storm’s colour only; density and shape are unaffected.

It also draws each ring boundary as a circle at the mid-height of the motion band, sized by the complete anvil radius. The circles are not only a display:

01
Select the storm actor.
02
Click a boundary circle. It highlights, and a label reads > Edit Boundary N Center: 0.xxx.
03
Drag the transform widget along X. The boundary radius follows the drag and writes back to Ring End Radii 01.

The toggle gates the handles as well as the drawing, so boundaries cannot be dragged while it is off. Turn it off before taking any final image — the tint is a diagnostic, not a look.

Editor preview

Preview In Editor advances motion time in the level viewport without entering PIE, so ring tuning is a direct edit-and-watch loop. Turning it off freezes the rotation for still frames while leaving Enabled alone.

Runtime control from Blueprint

NodeEffect
Set Storm Motion EnabledEnables or disables motion evaluation
Pause / Resume Storm MotionHolds or resumes motion time
Reset Storm MotionReturns motion time and every ring phase to zero
Set Storm Motion TimePlaces motion at an absolute time in seconds

Set Storm Motion Time rebuilds each ring’s phase from the absolute time rather than stepping forward, so the same value always produces the same rotation — useful for cinematics, recorded sequences and deterministic replays. It resolves against the current speeds and Time Scale, so those must match for two playbacks to agree.

Effective ranges

Several properties accept a wider range in the Details panel than the storm actually uses. The published values are clamped as follows.

PropertyDetails panelEffective
Motion Strength≥ 00 – 4
Time Scale≥ 00 – 100
Ring End Radii 010.01 – 0.99Ascending, ≥ 0.01 apart
Ring Angular Speed Degreesunbounded0 – 360
Ring Skew Degreesunbounded−720 – 720
Boundary Overlap 010 – 0.20 – 90% of narrowest ring
Motion Radius Scale0 – 2Last boundary + 0.01 – 2
Height Min 010 – 10 – 0.999
Height Max 010 – 1Height Min 01 + 0.001 – 1
LF/HF/Curl Rotation Multiplierunbounded0 – 8

A value beyond the effective range is not an error; it simply stops making a difference.

A predictable authoring workflow

Change one group at a time, and keep the ring visualization on while working.

01
Set Ring Count first. Changing it later discards per-ring values.
02
Flatten the speed list to a single value and set every skew to 0. The storm now turns rigidly — a clean baseline to judge everything against.
03
Place the boundaries, dragging the viewport circles rather than typing radii.
04
Re-spread the speeds from the centre outwards until the shear reads correctly. Use overall Time Scale for global pace, not the whole list.
05
Bring the skew list back for arm curvature, then add Radial Shear Gain to tighten the core.
06
Set the height band, then the radial mask and feather.
07
Choose Transition Mode last, once the speed differences are settled.
Baseline values
PropertyValue
Ring Count6
Ring End Radii 010.10, 0.22, 0.36, 0.54, 0.74
Ring Angular Speed Degrees3.00, 2.40, 1.80, 1.25, 0.75, 0.35
Ring Skew Degrees140, 96, 60, 34, 16, 0
Boundary Overlap 010.04
Transition ModeNoise Result Blend
Motion Radius Scale / Radial Feather 011.0 / 0.08
Height Min / Max / Feather 010.0 / 0.62 / 0.08
LF / HF / Curl Rotation Multiplier1.00 / 1.08 / 1.12
Radial Shear Gain0.6

Motion recipes

Starting points rather than finished looks — noise, profiles, the flow map and the cloud layer all still affect the result.

Rigid disc, for diagnosis

One speed repeated, every skew 0, Radial Shear Gain 0, Ring Count 1. Anything that still changes shape is coming from the noise or the flow map, not from the rings.

Tight fast core

Raise rings 1 and 2 well above the rest and pull their boundaries inwards (0.06, 0.14). Keep the centre skew high for curvature. Result Blend is worth its cost here because the inner speed step is large.

Rotation through the full depth

Take Height Max 01 to 1.0 and widen Height Feather 01 to about 0.15. The anvil then turns with the body. Expect a frame-cost rise: far more of the volume now takes the rotated path.

Slow storm-scale drift

Halve every speed and lower Time Scale rather than editing the list twice. Keep the skew profile — arm curvature is static and survives any pace.

Common surprises

SymptomCheck
Storm turns as one rigid discThe speed list is flat, or Ring Count is 1.
Rotation runs the wrong wayDirection is Clockwise under Shape, not a Motion property.
One ring will not turn backwardsSpeeds clamp at 0; reverse the whole storm instead.
The anvil never rotatesHeight Max 01 closes the band at 0.62 by default.
The base of the storm looks staticThe lower feather starts at Height Min 01.
The outline never movesExpected. Rings rotate the noise, not the shape bake.
Per-ring values resetRing Count was lowered and raised; re-added slots take defaults.
Nothing moves in the viewportPreview In Editor is off, or motion is paused.
Raising strength or time scale stops helpingThey clamp at 4 and 100.
A boundary circle will not dragVisualize Ring Influence Ranges gates the handles.
The storm renders as coloured bandsVisualize Ring Influence Ranges is still on.
A hard seam shows between ringsRaise Boundary Overlap 01, or change Transition Mode.
Frame cost rises in one bandResult Blend evaluates the noise twice there.
Overlap will not widen past a certain pointIt is capped at 90% of the narrowest ring.
← Radial shape curves Flow map editor →
Authoring

Ring motion

동심 링 최대 여섯 개가 각자 다른 속도로 돌면서 폭풍이 자기 자신에 대해 밀립니다.

링 영향 디버그 뷰 — 링마다 속도가 달라 밴드가 밀립니다

폭풍의 회전은 동심 링 최대 여섯 개로 만듭니다. 링마다 각속도가 달라서, 반경이 커질수록 폭풍이 자기 자신에 대해 밀립니다. 원판 하나가 통째로 도는 게 아닙니다.

컨트롤은 Storm | Settings → Motion Settings 아래에 모여 있습니다.

그룹내용
Motion전체 on/off, 에디터 프리뷰, 세기, 시간 배율
Rings링 개수, 경계, 링별 속도와 스큐, 방사 시어
Boundary겹침 폭과 링 사이 전이 모드
Mask회전 영역의 외곽 반경과 페더
Height회전이 차지하는 수직 밴드
NoiseLF·HF·컬 밴드별 회전 배율

링이 실제로 돌리는 것

링 모션은 밀도가 아니라 노이즈를 샘플할 좌표를 회전시킵니다. 아무것도 이류시키지 않고 속도장을 적분하지도 않습니다.

튜닝 전에 알아둘 게 두 가지 있습니다.

·실루엣은 돌지 않습니다. 셰이프 베이크는 정적입니다. 발자국, 앤빌, 레이어 높이, 프로파일 전부요. 그 안에서 저주파 캐리어와 고주파 침식, 컬 변위만 돕니다. 외곽선이 안 바뀌는 폭풍도 정상적으로 회전하는 중입니다.
·회전은 필요한 곳에서만 노이즈를 두 번 평가합니다. 모션 마스크가 0인 지점은 회전 없는 경로를 타고, 그 자리에서 링 비용은 0입니다.

링 모션과 윈드 플로우맵은 서로 독립이고 같은 샘플에서 합쳐집니다. 링이 샘플 좌표를 회전시키고, 플로우맵이 거기에 오프셋을 더합니다.

링 배치

링은 중심에서 바깥으로 번호가 붙습니다. Ring Count가 개수를 정하고, 링별 배열 두 개가 거기에 맞춰 크기가 바뀝니다.

프로퍼티항목 수의미
Ring End Radii 01Ring Count − 1링과 다음 링 사이의 경계
Ring Angular Speed DegreesRing Count링별 각속도
Ring Skew DegreesRing Count링별 정적 각도 오프셋

가장 바깥 경계는 항목이 없습니다. 마지막 링은 Motion Radius Scale에서 끝납니다.

링 반경은 모두 완전 앤빌 반경으로 정규화됩니다. Radial Shape Curves의 Anvil Fill이 쓰는 축과 같습니다.

완전 앤빌 반경 = Radius * (1 + Anvil Coverage)

Anvil Coverage0.2에서 1.0 사이로 잠기니, 반경 1.0은 본체 반경의 1.2배에서 2배 사이입니다. 그래서 Anvil Coverage를 바꾸면 정규화 값은 그대로인데 월드 공간에서 모든 링 경계가 움직입니다.

경계는 오름차순으로 유지되고 최소 0.01 간격을 둡니다. 한 경계를 옆 경계 너머로 밀면 순서가 뒤바뀌는 대신 되밀립니다.

주의 — Ring Count를 줄이면 값이 버려집니다
Ring Count는 마스크가 아니라 배열 크기 조절입니다. 줄이면 뒤쪽 항목이 사라지고, 다시 늘리면 그 자리에 원래 값이 아니라 기본값이 채워집니다. 개수를 실험할 거면 프리셋을 먼저 저장하세요.

속도, 방향, 스큐

Ring Angular Speed Degrees는 초당 각도고 Time Scale이 곱해집니다. 기본 속도에 Time Scale 1이면 한 바퀴에 이만큼 걸립니다.

속도 °/s한 바퀴
13.002분
22.402분 30초
31.803분 20초
41.254분 48초
50.758분
60.3517분 9초

안쪽 링과 바깥 링의 속도 차이가 눈에 보이는 나선형 시어를 만듭니다. 목록을 평평하게 만들면 폭풍이 한 덩어리로 돕니다.

회전 방향은 Motion이 아니라 Shape 프로퍼티입니다. Storm | Shape 아래 Clockwise가 모든 링의 방향을 한 번에 정합니다. 링을 개별로 반대로 돌릴 수는 없습니다. 음수 속도는 0으로 잠기니, 링을 멈출 수는 있어도 역회전시킬 수는 없습니다.

Ring Skew Degrees정적 각도 오프셋입니다. 폭풍이 움직이든 말든 적용됩니다. 밴딩을 나선 팔로 휘게 만드는 게 이 값입니다. 링마다 계단식으로 적용되는 게 아니라 인접한 링 중심 반경 사이에서 연속적으로 보간되니, 스큐 목록은 중심에서 가장자리까지의 매끄러운 트위스트 프로파일로 읽으면 됩니다. 기본값은 중심 140°에서 바깥 링 까지 내려갑니다.

Radial Shear Gain은 스큐 위에 정적 트위스트를 더 얹습니다. 중심에서 최대고 모션 외곽 반경에서 0으로 매끄럽게 떨어지니, 바깥 가장자리는 건드리지 않고 안쪽 팔만 조입니다.

주파수 밴드 배율

LF 캐리어, HF 침식, 컬 변위는 각각 링 위상에 자기 배율을 곱한 만큼 회전합니다.

프로퍼티기본값
LF Rotation Multiplier1.00
HF Rotation Multiplier1.08
Curl Rotation Multiplier1.12

세 값이 살짝 다르기 때문에 밴드가 시간이 지나며 서로 어긋납니다. 하나로 잠긴 패턴이 돌아가는 게 아니라, 회전 안에서 디테일이 끓는 것처럼 보입니다. 셋을 같은 값으로 두면 노이즈가 강체처럼 돕니다.

위상은 감긴 각도와 정수 회전 수로 저장하고, 배율은 다시 펼친 위상에 곱합니다. 그래서 1 이외의 값도 안전합니다. 감긴 각도가 이음매를 지날 때 튀지 않고 회전이 연속으로 이어집니다.

회전이 적용되는 범위

모션 마스크는 다섯 항의 곱입니다.

모션 마스크 = Enabled * Motion Strength * Lifecycle
            * 방사 마스크 * 높이 마스크

Lifecycle은 형성과 소멸 가중치입니다. 회전이 갑자기 켜지는 대신 폭풍과 함께 들어오고 나갑니다.

방사 마스크

Motion Radius Scale이 회전 영역의 외곽 반경입니다. 링 경계와 같은 정규화 앤빌 반경 공간을 씁니다. Radial Feather 01이 그 외곽 경계를 부드럽게 합니다. 안쪽 컷오프는 없습니다. 중심은 항상 회전합니다.

높이 마스크

Height Min 01, Height Max 01, Height Feather 01이 회전을 수직으로 제한합니다. 여기서 쓰는 높이는 구름 레이어 고도가 아니라 폭풍 자체의 수직 슬래브 기준입니다.

로컬 높이 = (구름 레이어 높이 − Layer Bottom)
           / (Layer Top − Layer Bottom)

Layer BottomLayer Top이 방사 커브라서, 모션 밴드가 한 고도에 평평하게 놓이는 대신 폭풍의 단면을 따라갑니다.

밴드 양끝은 같은 폭으로 페더됩니다. 기본값 0.0, 0.62, 페더 0.08이면 이렇게 됩니다.

로컬 슬래브 높이회전
0.00없음
0.00 → 0.08들어옴
0.08 → 0.54전부
0.54 → 0.62빠짐
0.62 → 1.00없음

기본값 두 개가 사람들을 놀래킵니다. 슬래브 맨 밑이 정지해 있는 건 아래쪽 페더가 Height Min 01에서 시작하기 때문입니다. 앤빌이 안 도는 건 밴드가 0.62에서 닫히기 때문입니다. 깊이 전체가 회전하는 폭풍을 원하면 Height Max 011.0쪽으로 올리세요.

링 경계와 전이 모드

Boundary Overlap 01은 전이 영역의 폭이고 각 경계를 중심으로 잡힙니다. 0.2와 가장 좁은 링의 90%로 잠기니, 링이 촘촘하면 전이 구간도 자동으로 좁아집니다.

Transition Mode가 그 영역 안에서 무슨 일이 일어날지 정합니다.

모드동작밴드 내 노이즈 평가
Speed Blend두 링의 회전 각도를 블렌드1
Noise Result Blend두 링을 각각 평가하고 결과를 블렌드2
Jittered Boundary블렌드 없이 샘플 반경을 디더링해 이음매를 깸1

Speed Blend가 가장 싸고 인접 속도가 비슷할 때 잘 읽힙니다. 속도 차가 크면 각도 블렌드가 패턴을 문대니, Result Blend가 노이즈 비용 두 배로 이음매를 지나며 디테일을 유지합니다. Jittered Boundary는 평가 한 번을 유지하면서 안정적인 해시로 이음매를 감춥니다. 지터 셀 주파수는 바디 좌표에서 max(32, 2 / Boundary Overlap 01)이고, 폭풍의 stable id로 시드를 잡아 프레임 사이에 패턴이 기어가지 않습니다. Boundary Overlap 010이면 지터할 게 없어서 이 모드는 아무 효과가 없습니다.

참고 — 프레임 비용이 실제로 어디로 가나
마스크 페더 안쪽 샘플은 회전한 결과와 회전 없는 결과를 블렌드하니 평가가 한 번 늘어납니다. Result Blend 전이 밴드 안이라면 같은 샘플에서 세 번까지 쌓입니다. 이 시스템의 최악 경우입니다. 마스크 밖에서는 다시 한 번으로 돌아옵니다.

링 시각화와 경계 편집

Visualize Ring Influence Ranges가 링 배치를 읽는 도구입니다. 두 가지 일을 동시에 합니다.

먼저 링 영향도로 폭풍을 물들입니다. 이 페이지 맨 위 영상이 그 화면입니다. 링마다 자기 색조로 그려지고, 전이 밴드는 인접한 두 색조가 섞인 상태로 나타나고, 회전이 멈추는 곳에서는 모션 마스크가 색을 빼줍니다. 경계와 겹침 폭, 높이 밴드가 의도한 자리에 있는지 확인하는 가장 빠른 방법입니다. 색조는 폭풍 색만 대체하고 밀도와 형상은 건드리지 않습니다.

그리고 각 링 경계를 모션 밴드 중간 높이에 원으로 그립니다. 완전 앤빌 반경 기준으로 크기가 잡히고, 이 원은 단순한 표시가 아닙니다.

01
스톰 액터를 선택합니다.
02
경계 원을 클릭합니다. 하이라이트되고 > Edit Boundary N Center: 0.xxx 라벨이 뜹니다.
03
트랜스폼 위젯을 X 방향으로 드래그합니다. 경계 반경이 따라오고 Ring End Radii 01에 값이 써집니다.

토글은 그리기뿐 아니라 핸들도 함께 막습니다. 꺼져 있으면 경계를 드래그할 수 없습니다. 최종 이미지를 뽑기 전에는 끄세요. 색조는 진단용이고 룩이 아닙니다.

에디터 프리뷰

Preview In Editor가 PIE에 들어가지 않고 레벨 뷰포트에서 모션 시간을 진행시킵니다. 링 튜닝이 고치고 바로 보는 루프가 됩니다. 끄면 회전이 정지 프레임용으로 얼고, Enabled는 그대로 둡니다.

블루프린트 런타임 제어

노드동작
Set Storm Motion Enabled모션 계산 on/off
Pause / Resume Storm Motion모션 시간 정지, 재개
Reset Storm Motion모션 시간과 모든 링 위상을 0으로
Set Storm Motion Time모션을 절대 시간(초)에 놓음

Set Storm Motion Time은 앞으로 한 스텝 나아가는 게 아니라 절대 시간에서 각 링의 위상을 다시 만듭니다. 그래서 같은 값이면 항상 같은 회전이 나옵니다. 시네마틱, 녹화 시퀀스, 결정적 리플레이에 유용합니다. 지금 속도와 Time Scale을 기준으로 계산하니, 두 번의 재생이 일치하려면 그 값들이 같아야 합니다.

실효 범위

Details 패널이 받아주는 범위보다 폭풍이 실제로 쓰는 범위가 좁은 프로퍼티가 몇 개 있습니다.

프로퍼티Details 패널실효
Motion Strength≥ 00 – 4
Time Scale≥ 00 – 100
Ring End Radii 010.01 – 0.99오름차순, ≥ 0.01 간격
Ring Angular Speed Degrees무제한0 – 360
Ring Skew Degrees무제한−720 – 720
Boundary Overlap 010 – 0.2가장 좁은 링의 90%까지
Motion Radius Scale0 – 2마지막 경계 + 0.01 – 2
Height Min 010 – 10 – 0.999
Height Max 010 – 1Height Min 01 + 0.001 – 1
LF/HF/Curl Rotation Multiplier무제한0 – 8

실효 범위를 넘는 값이 에러는 아닙니다. 그냥 더 이상 차이를 만들지 않습니다.

예측 가능한 작업 순서

한 번에 한 그룹만 바꾸고, 작업하는 동안 링 시각화를 켜두세요.

01
Ring Count를 가장 먼저 정합니다. 나중에 바꾸면 링별 값이 버려집니다.
02
속도 목록을 한 값으로 평평하게 만들고 스큐를 전부 0으로. 폭풍이 강체처럼 돕니다. 나머지를 판단할 깨끗한 기준선입니다.
03
경계를 배치합니다. 반경을 타이핑하지 말고 뷰포트 원을 드래그하세요.
04
중심에서 바깥으로 속도를 다시 벌려가며 시어가 맞게 읽힐 때까지 조정합니다. 전체 속도는 목록이 아니라 Time Scale로 잡으세요.
05
팔 곡률을 위해 스큐 목록을 되돌리고, Radial Shear Gain으로 코어를 조입니다.
06
높이 밴드를 정하고, 그다음 방사 마스크와 페더를.
07
Transition Mode는 마지막에. 속도 차가 확정된 뒤에 고릅니다.
기준값
프로퍼티
Ring Count6
Ring End Radii 010.10, 0.22, 0.36, 0.54, 0.74
Ring Angular Speed Degrees3.00, 2.40, 1.80, 1.25, 0.75, 0.35
Ring Skew Degrees140, 96, 60, 34, 16, 0
Boundary Overlap 010.04
Transition ModeNoise Result Blend
Motion Radius Scale / Radial Feather 011.0 / 0.08
Height Min / Max / Feather 010.0 / 0.62 / 0.08
LF / HF / Curl Rotation Multiplier1.00 / 1.08 / 1.12
Radial Shear Gain0.6

모션 레시피

완성된 룩이 아니라 출발점입니다. 노이즈와 프로파일, 플로우맵, 구름 레이어가 모두 결과에 영향을 줍니다.

강체 원판 — 진단용

속도 하나를 반복하고, 스큐 전부 0, Radial Shear Gain 0, Ring Count 1. 이 상태에서도 형태가 바뀌는 게 있으면 링이 아니라 노이즈나 플로우맵에서 오는 겁니다.

좁고 빠른 코어

링 1·2를 나머지보다 훨씬 올리고 경계를 안쪽으로 당깁니다(0.06, 0.14). 곡률을 위해 중심 스큐는 높게 유지하세요. 안쪽 속도 단차가 크니 여기서는 Result Blend가 비용을 낼 만합니다.

깊이 전체 회전

Height Max 011.0으로, Height Feather 010.15 정도로 넓힙니다. 앤빌이 본체와 함께 돕니다. 프레임 비용은 올라갑니다. 훨씬 많은 볼륨이 회전 경로를 타게 됩니다.

느린 폭풍 규모 드리프트

목록을 두 번 고치는 대신 모든 속도를 반으로 줄이고 Time Scale을 낮추세요. 스큐 프로파일은 유지합니다. 팔 곡률은 정적이라 어느 속도에서도 살아남습니다.

자주 겪는 것들

증상확인할 것
폭풍이 강체 원판처럼 돕니다속도 목록이 평평하거나 Ring Count1입니다.
회전이 반대로 갑니다방향은 Motion이 아니라 Shape 아래 Clockwise입니다.
링 하나만 반대로 안 돕니다속도는 0에서 잠깁니다. 폭풍 전체를 뒤집으세요.
앤빌이 전혀 안 돕니다Height Max 01이 기본값 0.62에서 밴드를 닫습니다.
폭풍 밑동이 정지해 보입니다아래쪽 페더가 Height Min 01에서 시작합니다.
외곽선이 전혀 안 움직입니다정상입니다. 링은 셰이프 베이크가 아니라 노이즈를 회전시킵니다.
링별 값이 초기화됐습니다Ring Count를 줄였다 늘렸습니다. 다시 생긴 슬롯은 기본값입니다.
뷰포트에서 아무것도 안 움직입니다Preview In Editor가 꺼져 있거나 모션이 정지 상태입니다.
세기나 시간 배율을 올려도 더 안 변합니다4100에서 잠깁니다.
경계 원이 드래그되지 않습니다Visualize Ring Influence Ranges가 핸들을 막고 있습니다.
폭풍이 색 밴드로 렌더됩니다Visualize Ring Influence Ranges가 켜져 있습니다.
링 사이에 딱딱한 이음매가 보입니다Boundary Overlap 01을 올리거나 Transition Mode를 바꾸세요.
특정 밴드에서 프레임 비용이 오릅니다Result Blend가 거기서 노이즈를 두 번 평가합니다.
겹침이 어느 지점부터 안 넓어집니다가장 좁은 링의 90%에서 상한입니다.
← Radial shape curves Flow map editor →
Authoring

Flow map editor

Painting a three-layer 2.5D wind field that animates the storm independently of its rotation.

Storm with an upward-painted flow map advecting the noise

What it does

A flow map asset animates the storm independently of the storm’s overall rotation. Three layers — lower, middle and upper — are painted separately and weighted by height.

Opening the editor

Actor Details panel → Functions → Edit Storm Flow Map.
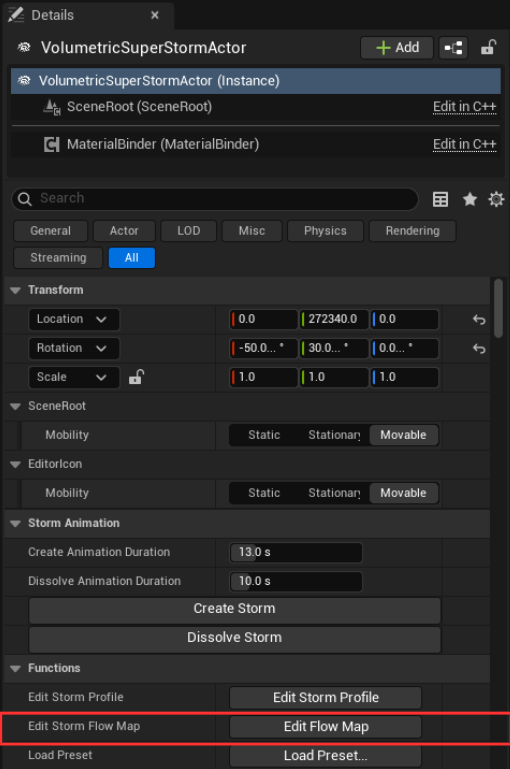
Details panel — Functions section

The editor, region by region

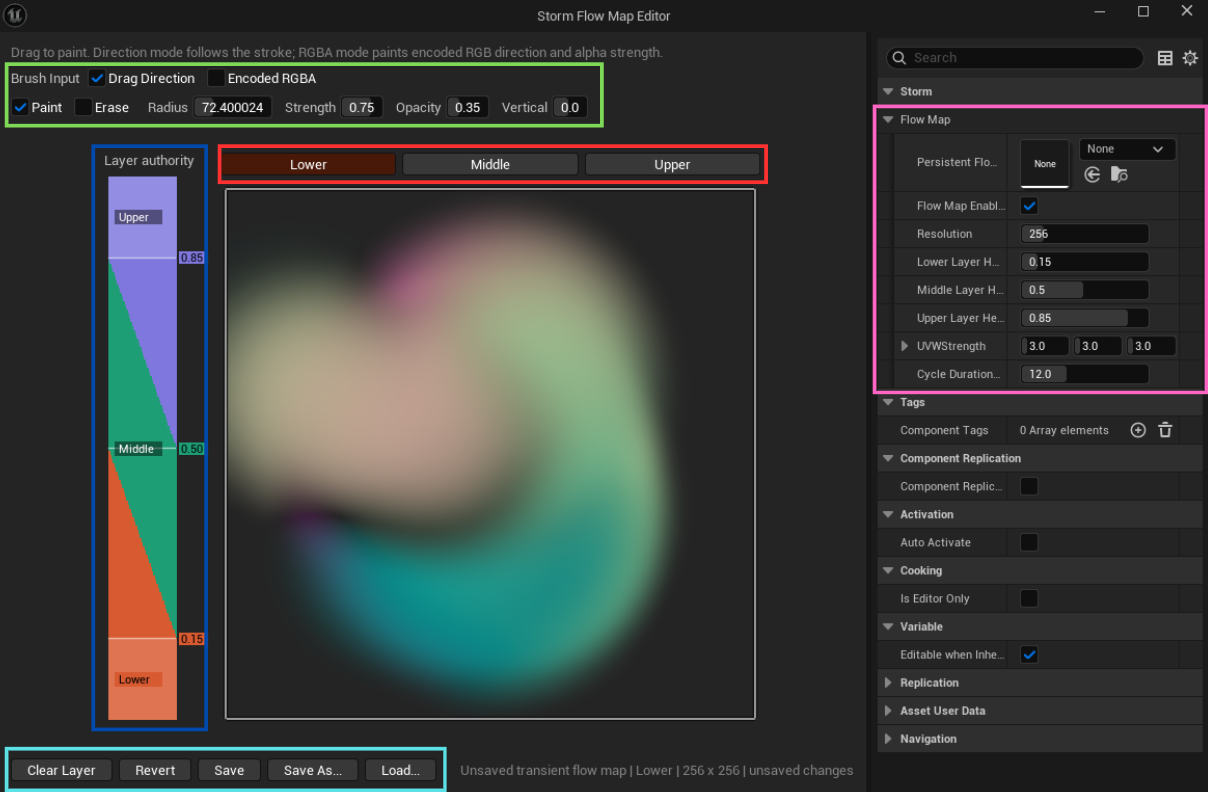
Flow map editor — brush, layer tabs, authority ribbon, details, file actions
RegionWhat it holds
Brush inputDrag Direction takes the flow vector from the stroke; Encoded RGBA paints an explicit direction. Radius, Strength (0.75) and Opacity (0.35) set the footprint — the low opacity is deliberate, since flow reads better built up over several passes. Vertical sets the z-component of the painted direction: zero keeps the flow in-plane, and it is the extra half-dimension that makes the map 2.5D.
Layer tabsLower, Middle and Upper, painted independently. Only one layer is edited at a time and the status bar names it.
Layer authorityA ribbon showing how strongly each layer governs the result at a given height. Handles at 0.15, 0.50 and 0.85 are the same values as the layer heights in the details panel. The three weights always sum to one.
Flow Map detailsPersistent asset, enabled flag, resolution (256 default, 32–2048), the three layer heights, UVW Strength and Cycle Duration.
File actionsClear Layer · Revert · Save · Save As… · Load…
Tip — Keep the resolution a power of two
Resolution accepts 32 to 2048; powers of two are strongly recommended.

What the colour encodes

ChCarriesStored as
RU component of the flow directiondirection * 0.5 + 0.5
GV componentdirection * 0.5 + 0.5
BW component — the vertical half-dimensiondirection * 0.5 + 0.5
AStrength of the flow, 0 to 1stored directly

RGB sets direction only — on decode the vector is re-normalized, so distance from 0.5 has no effect on speed. Magnitude comes entirely from alpha. A neutral texel is (0.5, 0.5, 0.5, 0), which is what an empty layer holds and what Clear Layer writes back.

Save and load

The three layers live in render targets on the storm’s flow map component. They are transient — built at runtime, never serialized. An asset is a saved snapshot, and seeding runs one way: asset into surfaces. That is why painting appears immediately, including in PIE, and equally why nothing survives closing Unreal unless it was written into an asset.

Unsaved transient flow map | Lower | 256 x 256 | unsaved changes
Warning — Save marks the asset dirty — it does not write to disk
Save writes into the asset object and marks its package dirty. The package still has to be saved in the editor before anything reaches disk.
Warning — Changing resolution requires a Revert before you can save
Saving is refused while the asset resolution and the working resolution disagree. Revert first to rebuild the layers at the new resolution, then repaint.
Status bar fieldReads
FirstThe bound asset’s name, or Unsaved transient flow map when none is bound — in that state Save As… is the only way to keep the work
SecondThe active layer
ThirdThe working resolution
unsaved changesShown whenever the painted surfaces differ from the asset. Its absence is your green light
ActionDoes
SaveWrites all three layers into the bound asset as embedded textures, with the current parameters alongside them
Save As…Creates a new asset from the current surfaces — what you need the first time
Load…Binds a different asset and re-seeds from it. Confirms first, because it discards unsaved paint. The list holds your flow maps and the plugin’s examples
RevertRe-seeds from the bound asset, discarding everything painted since the last save. Confirms as well
Note — Save As… writes into your project
It targets /Game/SuperStorm/FlowMaps, not the plugin — the folder is created on first use and the dialog asks only for a name. Change the location under Edit → Project Settings → Plugins → Volumetric Super Storm → Authoring Directories. A plugin under the engine directory can be read-only, and a plugin update replaces everything it ships.
Note — Opening an asset directly
Double-clicking a flow map asset in the Content Browser opens the same editor with no storm attached. Save reads Bake and Save in that mode and the asset-bound controls are hidden — you are editing the asset’s own surfaces rather than a live storm’s.
Working example
← Ring motion Vertical profile editor →
Authoring

Flow map editor

폭풍 회전과 상관없이 따로 도는 바람을 붓으로 그립니다. 레이어 세 장, 2.5D 필드입니다.

위쪽으로 그린 플로우맵이 노이즈를 밀어 올립니다

동작 방식

플로우맵은 폭풍 전체 회전과 별개로 움직입니다. 하단, 중단, 상단 레이어를 따로 그리면 높이에 따라 알아서 섞입니다.

에디터 여는 곳

액터 Details 패널 → Functions → Edit Storm Flow Map

Details panel — Functions section
Details 패널의 Functions 섹션

화면 구성

Flow map editor — brush, layer tabs, authority ribbon, details, file actions
플로우맵 에디터. 브러시, 레이어 탭, 가중치 리본, 디테일, 파일 메뉴
구역내용
브러시 입력Drag Direction은 획을 그은 방향을 그대로 벡터로 씁니다. Encoded RGBA는 방향을 직접 지정해서 찍습니다. 붓 자국은 Radius, Strength(0.75), Opacity(0.35)로 결정됩니다. Opacity가 낮게 잡혀 있는 건 일부러 그런 겁니다. 한 번에 진하게 칠하는 것보다 여러 번 겹쳐 쌓는 쪽이 흐름이 훨씬 자연스럽게 나옵니다. Vertical은 그린 방향의 z 성분입니다. 0이면 흐름이 평면에 머물고, 이 값이 맵을 2.5D로 만드는 반 차원입니다.
레이어 탭Lower, Middle, Upper를 따로 그립니다. 한 번에 한 장만 편집되고, 지금 어느 장인지는 상태바에 뜹니다.
레이어 가중치어느 높이에서 어떤 레이어가 얼마나 세게 먹히는지 보여주는 리본입니다. 핸들 0.15, 0.50, 0.85는 디테일 패널의 레이어 높이와 같은 값입니다. 세 가중치를 더하면 항상 1이 됩니다.
플로우맵 디테일연결된 에셋, 사용 여부, 해상도(기본 256, 32~2048), 레이어 높이 세 개, UVW Strength, Cycle Duration
파일 동작Clear Layer · Revert · Save · Save As… · Load…
팁 — 해상도는 2의 거듭제곱을 쓰세요
32부터 2048까지 아무 값이나 들어가지만, 2의 거듭제곱이 아니면 손해입니다.

채널별 의미

채널담기는 값저장 방식
R흐름 방향 Udirection * 0.5 + 0.5
G흐름 방향 Vdirection * 0.5 + 0.5
BW 성분. 위아래 방향direction * 0.5 + 0.5
A흐름 세기, 0~1값 그대로

RGB는 방향만 담습니다. 읽을 때 벡터를 다시 정규화하기 때문에 0.5 에서 얼마나 떨어져 있든 속도는 안 변합니다. 세기는 전부 알파가 결정합니다. 아무것도 없는 텍셀은 (0.5, 0.5, 0.5, 0) 값을 가집니다. 빈 레이어와 Clear Layer 결과가 이 값입니다.

저장, 불러오기

세 레이어는 플로우맵 컴포넌트의 렌더 타깃에 들어 있습니다. 런타임에 만들어지는 임시 데이터라 저장되지 않습니다. 에셋은 그 순간을 떠 놓은 스냅샷이고, 데이터는 에셋에서 렌더 타깃으로만 흐릅니다. 그래서 PIE에서도 붓질이 바로 보입니다. 반대로 에셋에 쓰지 않으면 언리얼을 닫는 순간 다 날아갑니다.

Unsaved transient flow map | Lower | 256 x 256 | unsaved changes
주의 — Save를 눌러도 디스크에는 안 써집니다
Save는 에셋 오브젝트에 값을 넣고 패키지를 dirty로 표시하는 데까지입니다. 실제로 파일로 남기려면 에디터에서 패키지를 한 번 더 저장하세요.
주의 — 해상도를 바꿨으면 Revert부터
에셋 해상도와 작업 해상도가 다르면 저장이 막힙니다. Revert로 새 해상도에 맞춰 레이어를 다시 만들고 그리세요.
상태바 필드내용
첫째물린 에셋 이름, 없으면 Unsaved transient flow map. 그 상태에서는 디스크에 되돌려 쓸 게 없으니 Save As…만 작업을 남길 수 있습니다
둘째지금 편집 중인 레이어
셋째작업 해상도
unsaved changes그린 면이 에셋과 다를 때 표시됩니다. 없으면 안전하다는 뜻입니다
동작내용
Save세 레이어를 물린 에셋에 내장 텍스처로 쓰고, 현재 파라미터도 같이 복사합니다
Save As…현재 면으로 새 에셋을 만듭니다. 처음에는 이걸 써야 합니다
Load…다른 에셋을 물리고 거기서 면을 다시 채웁니다. 저장 안 한 붓질이 버려지니 먼저 확인을 묻습니다. 목록에는 내 플로우맵과 플러그인 예시가 함께 나옵니다
Revert물린 에셋에서 다시 채우며 마지막 저장 이후 그린 걸 전부 버립니다. 이것도 확인을 묻습니다
참고 — Save As…는 프로젝트에 씁니다
플러그인이 아니라 /Game/SuperStorm/FlowMaps에 저장합니다. 폴더는 처음 쓸 때 만들어지고 다이얼로그는 이름만 묻습니다. 위치는 Edit → Project Settings → Plugins → Volumetric Super Storm → Authoring Directories에서 바꿉니다. 엔진 폴더에 깔린 플러그인은 읽기 전용일 수 있고, 업데이트하면 배포 파일이 전부 교체됩니다.
참고 — 에셋을 직접 열기
콘텐츠 브라우저에서 플로우맵 에셋을 더블클릭하면 폭풍 없이 같은 에디터가 열립니다. 이 모드에서는 Save가 Bake and Save로 바뀌고 에셋에 묶인 컨트롤은 숨습니다. 살아 있는 폭풍이 아니라 에셋 자체의 면을 편집하는 겁니다.
실제 작업 화면
← Ring motion Vertical profile editor →
Authoring

Vertical profile editor

Three lookup textures that carve the storm’s silhouette, and a 16-key timeline that animates them.

What a vertical profile is

A vertical profile is a lookup texture that returns a density multiplier for a given height. The material samples it while marching through the cloud and multiplies the result into the density field, so profiles are what carve the storm’s silhouette from top to bottom.

There are three, and each owns one boundary.

ProfileOwnsShaped by
TopThe upper surface of the body — how high each column reachesVertical Profile Curve, Top Fade
BottomThe lower boundary — how the storm dissolves into its baseBottom Fade
AnvilHow far the anvil extends downward from its anchorAnvil Profile Curve

All three work the same way: a threshold height is full density on one side and empty on the other, with a fade band across the boundary. Top is solid below its curve height and fades out as it approaches it. Anvil mirrors that, solid from its anchor downward and fading at the curve’s depth. Bottom ramps up from zero at the very base.

The Bottom profile is indexed differently from the other two: its horizontal axis is the cloud-bottom type selector rather than a column position, and a higher type widens the translucent transition so more of the wispy structure near the base shows through.

Note — A profile multiplies, it does not add
Wherever a profile reads zero the storm is empty, regardless of what shape, noise or erosion would have put there. That is why a profile edit can appear to delete large parts of the storm rather than reshape them.
Warning — Heights are normalized, not altitudes
The vertical axis runs from the base to the top of the cloud column, 0 to 1. A profile has no idea where the storm sits in the world — that belongs to the Volumetric Cloud layer. The same profile in a taller layer produces a taller storm.

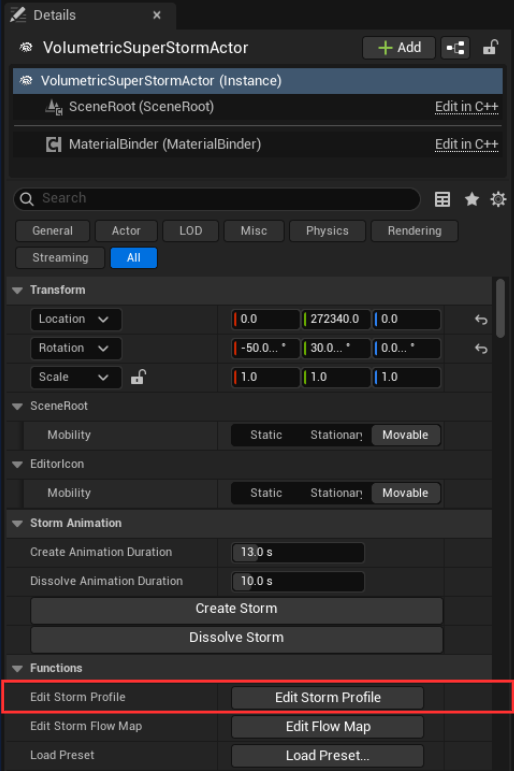
Opening the editor

Actor Details panel → Functions → Edit Storm Profile

Clicking Edit Storm Profile opens the editor window.

The editor, region by region

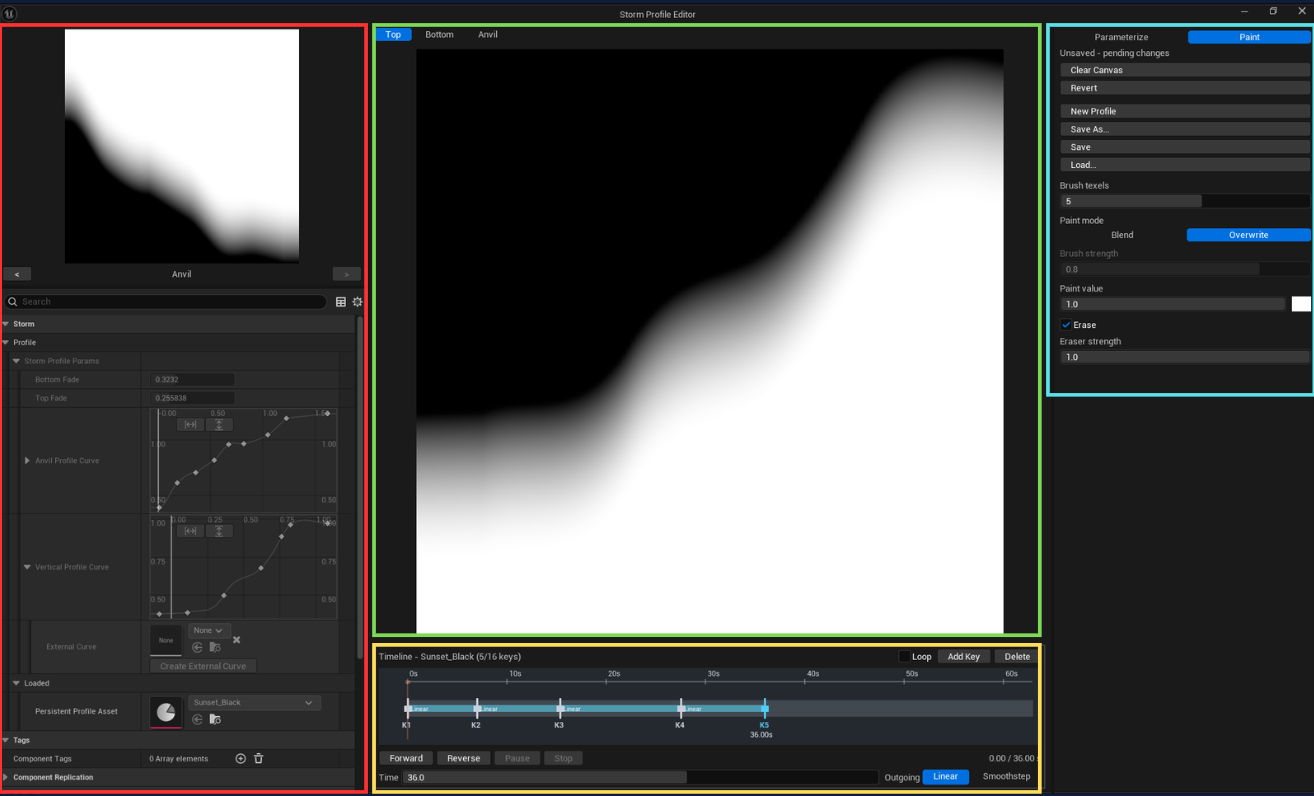
The profile editor — preview and parameters, canvas, modes and actions, timeline
Composite preview — top left

A live thumbnail of the profile as the material reads it. It updates as you edit parameters or paint, so use it to judge the overall silhouette while the large canvas shows one profile at a time in detail. The < and > buttons cycle what it shows, and the label between them names the current one: Body Composite, the top and bottom profiles composited together, or Anvil.

Profile parameters — left
ParameterDefaultRangeControls
Bottom Fade0.10 – 1Vertical width of the fade band at the base
Top Fade0.10 – 1Blend strength of the top profile’s edge fade
Anvil Profile CurvePer-column downward extent from the anvil anchor
Vertical Profile CurvePer-column top height of the storm body

Persistent Profile Asset, under Loaded, names the asset the live surfaces were seeded from.

Profile canvas — centre

The Top, Bottom and Anvil tabs choose which profile the canvas shows. The canvas renders density across the profile: white is full density, black is empty.

Modes and actions — right
·Parameterize and Paint switch what you are doing. There is no separate rebuild button — entering Parameterize is what regenerates the Top and Anvil surfaces from the parameters.
·Clear Canvas appears in Paint mode only. It wipes the displayed Top or Anvil surface to empty, leaving the parameters alone; to get the parametric shape back instead, switch to Parameterize.
·Revert discards every change made to the selected key since it was last saved, restoring that key’s parameters and painted surfaces from the asset. It needs a saved asset.
·New Profile releases the targeted asset and starts a clean unsaved profile. Save, Save As… and Load… move the profile to and from a persistent asset.
Timeline — bottom centre

A profile asset is not a single shape but a sequence of up to 16 keys, and the timeline is where that sequence lives. Its header names the targeted asset and the key count — Sunset_Black (5/16 keys) in the screenshot.

·Click the timeline to scrub. Click a key to select it, and drag any key after K1 to move it in time. Add Key duplicates the selected key, textures and all; Delete removes it.
·Forward, Reverse, Pause and Stop preview the sequence, and Loop repeats it. Stop returns the editor to the selected key.
·Time is the selected key’s own time, and Outgoing sets the easing — Linear or Smoothstep — it blends with into the next key.
Warning — Everything edits the selected key
The canvas, the parameters and the brush all act on whichever key the timeline has selected, so check the selection before painting.

Editing the Top profile

Parameterize

The surface is generated from the parameters on the left, and regenerated whenever they change.
·Vertical Profile Curve is the main control — its value at each point across the radius is that column’s top height.
·Top Fade softens the profile’s edge.
·Press Rebuild from params to regenerate after editing.
·To reuse a shape elsewhere, bind an External Curve, or press Create External Curve to promote the inline curve into an asset.
Paint
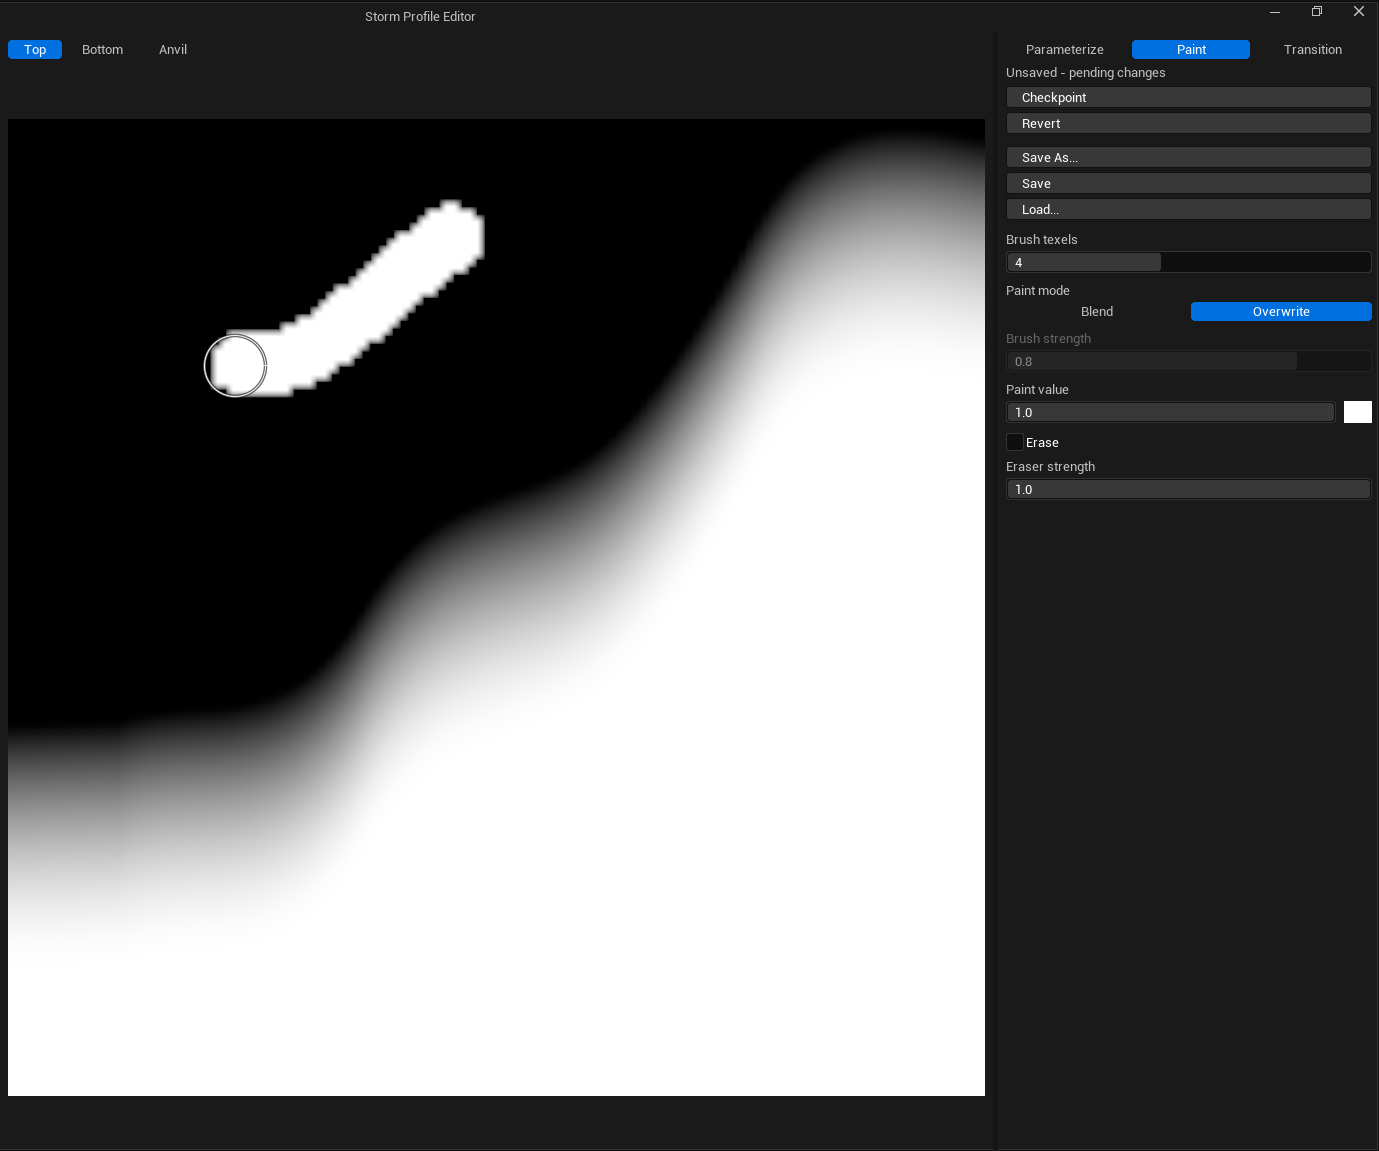
Paint mode — brush texels, paint mode, paint value, eraser

Paint mode freezes the current surfaces as a base and lets you brush directly onto them, for detail a curve cannot express. Strokes apply to the profile selected by the centre tab.

ControlDoes
Brush texelsBrush radius, in texels of the 128-wide profile
Paint modeBlend eases covered texels toward the paint value; Overwrite replaces them outright
Brush strengthBlend weight per dab. Greys out under Overwrite
Paint valueThe density written — 1.0 full, 0.0 empty
Erase / Eraser strengthErasing targets zero density and ignores paint mode
Warning — Switching back to Parameterize discards your paint
Entering Parameterize rebuilds Top and Anvil from the parameters, throwing away everything painted since you left it. Entering Paint freezes the current surfaces as the new paint base. Work the parameters first, then paint. If you must adjust a curve after painting, press Checkpoint first — Revert restores params and the painted surface, so the checkpoint is your way back.

Editing the Bottom profile

The bottom profile is parametric only — it has no painting stage. Select the Bottom tab to view it on the canvas, and use Bottom Fade for the vertical width of the fade band at the base. It is regenerated from parameters whenever the profile rebuilds, including as part of a Revert, so it stays coherent with the current parameter set.

Note — The brush writes to the Top and Anvil surfaces only
If a stroke on the Bottom tab appears to do nothing, that is why.

Editing the Anvil profile

The anvil profile controls how far the anvil reaches downward from its anchor, column by column. It is edited exactly like the top profile — the same Parameterize and Paint modes, the same brush, and the same caution about switching back to Parameterize.

It is measured downward. V = 0 is the anchor and V = 1 is the cloud-layer bottom, mirroring the top profile. The Anvil Profile Curve gives each column a depth rather than a height, so a larger value reaches further down.

It is paintable. Unlike the bottom profile, the brush does write to the anvil surface. Select the Anvil tab before painting.

Warning — The anchor lives elsewhere
Anvil Strength on the storm actor defaults to 0.0, and zero is an exact identity — the anvil contributes nothing regardless of what you author here. Raise it under the actor’s Shape settings, and check Anvil Depth 01, which limits the depth window the profile is allowed to shape.

Authoring a profile sequence

A profile asset is a timeline of keys, not a single shape. Each key holds its own parameters and its own baked Top, Bottom and Anvil surfaces, and playback blends between adjacent keys — for a storm that changes silhouette over time rather than holding one shape.

The sequence playing back in the profile editor
The same keys in the timeline UI
What a key stores
FieldWhat it holds
TimeWhere the key sits on the timeline, in seconds. The first key must be at 0, and the last key’s time is the sequence duration
ParamsThe Storm Profile Params captured when the key was authored
Outgoing easingLinear or Smoothstep, applied across the segment that starts at this key. Easing is per segment, not per sequence
Baked surfacesTop, Bottom and Anvil, embedded in the asset

An asset holds at most 16 keys, and no key can sit past 3600 s.

The authoring loop
01
Select the key you want to work on in the timeline.
02
Edit it exactly as above — parameters first, then paint.
03
Press Save. Saving bakes the working surfaces and the current parameters into the selected key.
04
Press Add Key to duplicate that key, drag the copy to a later time, and edit it into the next pose.

Add Key copies the selected key whole, embedded textures included, so sequences are easiest to build forward: author the first pose, duplicate it, move it, then change only what differs.

Previewing

Forward and Reverse run the playhead from wherever it stands. Pause holds it with the composed preview still on screen; Stop ends the preview and puts the live authoring surfaces back on the storm. Loop is stored on the asset as Loop By Default, so it persists with the profile rather than the session.

The transport stays disabled until the sequence can actually play: two or more keys, every key’s surfaces baked, and a duration above zero.

Driving it from Blueprint

On the storm’s vertical profile tool component, under Storm | Profile | Sequence.

NodeDoes
Play Profile SequencePlays forward from the playhead. Set Restart to begin at 0 instead
Play Profile Sequence ReverseThe same, backward toward 0
Pause Profile SequenceHolds the playhead and keeps the composed preview
Stop Profile SequenceEnds the preview and restores the live authoring surfaces
Set Profile Sequence TimeScrubs to an exact time, preview still composed
Set Profile Sequence LoopingRuntime override of the asset’s Loop By Default
Get Profile Sequence TimeCurrent playhead position, in seconds
Get Profile Sequence DurationThe final key’s time
Get Profile Sequence Playback StateStopped, Playing or Paused
Get Profile Sequence Playback DirectionForward or Reverse
Is Profile Sequence PlayingTrue only while the playhead is advancing
Is Profile Sequence Preview ActiveTrue while the storm samples the composed surfaces
Can Play Profile SequenceWhether the asset has the keys, surfaces and duration to play

Set Profile Sequence Time is what the editor’s own scrubbing uses. It is equally valid in gameplay when you want the position driven by your own curve rather than the built-in transport.

← Flow map editor Inner light →
Authoring

Vertical profile editor

폭풍 실루엣을 깎는 룩업 텍스처 세 장, 그리고 그걸 움직이는 16키 타임라인.

버티컬 프로파일이란

높이를 넣으면 밀도 배수가 나오는 룩업 텍스처입니다. 머티리얼이 구름을 레이마칭하면서 이 값을 읽어 밀도에 곱합니다. 그래서 폭풍의 실루엣을 위아래로 깎는 게 프로파일입니다.

세 장이 있고 각각 경계 하나를 담당합니다.

프로파일담당조절
Top본체 위쪽 면. 기둥마다 어디까지 올라가는지Vertical Profile Curve, Top Fade
Bottom아래쪽 경계. 폭풍이 밑에서 어떻게 풀리는지Bottom Fade
Anvil앤빌이 기준점에서 얼마나 내려오는지Anvil Profile Curve

셋 다 방식은 같습니다. 임계 높이를 기준으로 한쪽은 꽉 찬 밀도, 다른 쪽은 비어 있고, 경계에 페이드 밴드가 걸립니다. Top은 커브 높이 아래가 꽉 차 있고 가까워질수록 사라집니다. Anvil은 그걸 뒤집어서 기준점부터 아래로 꽉 차 있다가 커브 깊이에서 사라집니다. Bottom은 바닥 0에서 올라옵니다.

Bottom만 가로축이 다릅니다. 기둥 위치가 아니라 구름 바닥 타입 선택자입니다. 타입이 높으면 반투명 전이 구간이 넓어져서 바닥 근처 성긴 구조가 더 드러납니다.

참고 — 프로파일은 더하는 게 아니라 곱합니다
프로파일이 0인 높이는 셰이프든 노이즈든 침식이든 뭘 채워 넣었어도 그냥 빕니다. 프로파일을 조금 건드렸는데 폭풍이 통째로 잘려 나가 보이는 게 이 때문입니다.
주의 — 높이는 고도가 아니라 0~1 값입니다
세로축은 구름 기둥 바닥이 0, 천장이 1입니다. 프로파일은 폭풍이 월드 어디에 있는지 모릅니다. 그건 Volumetric Cloud 레이어 쪽 일입니다. 같은 프로파일을 써도 레이어가 두꺼우면 폭풍이 그만큼 높아집니다.

에디터 여는 곳

액터 Details 패널 → Functions → Edit Storm Profile

Edit Storm Profile을 누르면 편집 창이 열립니다.

화면 구성

프로파일 에디터 — 프리뷰와 파라미터, 캔버스, 모드와 액션, 타임라인
합성 프리뷰 — 좌측 상단

머티리얼이 읽는 그대로의 프로파일을 실시간으로 보여줍니다. 파라미터를 만지거나 붓질할 때마다 갱신되니, 큰 캔버스가 프로파일 한 장을 자세히 보여주는 동안 여기서 전체 실루엣을 판단하세요. <>로 보여줄 대상을 바꾸고, 가운데 라벨이 이름을 알려줍니다. Top과 Bottom을 합친 Body Composite, 또는 Anvil입니다.

프로파일 파라미터 — 좌측
파라미터기본값범위역할
Bottom Fade0.10 – 1바닥 페이드 구간 두께
Top Fade0.10 – 1상단 가장자리 페이드 세기
Anvil Profile Curve기둥마다 앤빌이 내려오는 깊이
Vertical Profile Curve기둥마다 본체가 닿는 높이

Loaded 아래 Persistent Profile Asset은 지금 작업 중인 면을 어느 에셋에서 가져왔는지 알려줍니다.

프로파일 캔버스 — 중앙

Top·Bottom·Anvil 탭으로 볼 프로파일을 고릅니다. 캔버스는 밀도를 그대로 그립니다. 흰색이 꽉 찬 밀도, 검정이 빈 곳입니다.

모드와 액션 — 우측
·ParameterizePaint로 작업 방식을 바꿉니다. 리빌드 버튼은 따로 없습니다. Parameterize로 들어가는 것 자체가 파라미터에서 Top과 Anvil을 다시 만드는 동작입니다.
·Clear Canvas는 Paint 모드에서만 나옵니다. 지금 보이는 Top이나 Anvil 면을 비우고 파라미터는 그대로 둡니다. 파라미터로 만든 모양으로 되돌리려면 Parameterize로 가세요.
·Revert는 선택한 키를 마지막 저장 상태로 돌립니다. 파라미터와 붓질한 면 둘 다요. 저장된 에셋이 있어야 동작합니다.
·New Profile은 대상 에셋을 놓고 빈 프로파일로 시작합니다. Save, Save As…, Load…로 에셋을 오갑니다.
타임라인 — 하단

프로파일 에셋은 모양 하나가 아니라 최대 16개 키로 된 시퀀스입니다. 그 시퀀스가 사는 곳이 타임라인입니다. 헤더가 대상 에셋과 키 개수를 보여줍니다. 스크린샷에서는 Sunset_Black (5/16 keys)입니다.

·타임라인을 클릭하면 스크럽합니다. 키를 클릭해 선택하고, K1 뒤쪽 키는 드래그로 시간을 옮깁니다. Add Key는 선택한 키를 텍스처까지 통째로 복제하고 Delete는 지웁니다.
·Forward, Reverse, Pause, Stop으로 시퀀스를 미리 봅니다. Loop는 반복이고, Stop을 누르면 선택한 키로 돌아옵니다.
·Time은 선택한 키의 시간, Outgoing은 다음 키로 넘어갈 때 쓰는 이징입니다. Linear 또는 Smoothstep.
주의 — 모든 편집은 선택된 키에 들어갑니다
캔버스, 파라미터, 붓 전부 타임라인에서 선택한 키에 작용합니다. 붓질하기 전에 어느 키가 선택됐는지 확인하세요.

Top 프로파일 편집

Parameterize

파라미터에서 면을 만들고, 값이 바뀌면 바로 다시 만듭니다.

·Vertical Profile Curve가 핵심입니다. 반경 방향 각 지점의 값이 그 기둥의 상단 높이입니다.
·Top Fade는 가장자리를 부드럽게 합니다.
·Rebuild from params로 편집 후 다시 만듭니다.
·모양을 다른 데서 재사용하려면 External Curve를 물리거나, Create External Curve로 인라인 커브를 에셋으로 승격하세요.
Paint
Paint 모드 — 브러시 텍셀, 페인트 모드, 페인트 값, 지우개

지금 면을 베이스로 굳혀 두고 그 위에 직접 붓질합니다. 커브로 안 되는 디테일을 넣을 때 씁니다. 붓질은 중앙 탭에서 고른 프로파일에 들어갑니다.

컨트롤동작
Brush texels브러시 반경. 가로 128텍셀 기준
Paint modeBlend는 닿은 텍셀을 페인트 값 쪽으로 서서히 끌고 갑니다. Overwrite는 바로 덮어씁니다
Brush strength한 번 찍을 때 섞이는 정도. Overwrite에서는 비활성됩니다
Paint value써 넣을 밀도. 1.0이면 꽉 차고 0.0이면 빕니다
Erase / Eraser strength밀도를 0으로 만듭니다. 페인트 모드와 무관하게 동작합니다
주의 — Parameterize로 돌아가면 붓질이 날아갑니다
Parameterize로 들어가면 Top과 Anvil을 파라미터에서 새로 만들면서 그 뒤 붓질을 전부 버립니다. Paint로 들어가면 지금 면을 새 베이스로 굳힙니다. 파라미터를 먼저 정하고 그 다음에 그리세요. 다 그린 뒤에 커브를 손대야 하면 Checkpoint를 먼저 찍어두세요. Revert가 파라미터와 붓질한 면을 함께 되돌리니 그게 돌아올 길입니다.

Bottom 프로파일 편집

Bottom은 파라미터 전용입니다. 페인트 단계가 없습니다. Bottom 탭을 골라 캔버스에서 보고, Bottom Fade로 바닥 페이드 폭을 조절합니다. Revert를 포함해 프로파일이 다시 만들어질 때마다 파라미터에서 재생성되니 현재 파라미터와 항상 맞습니다.

참고 — 붓은 Top과 Anvil에만 씁니다
Bottom 탭에서 그은 획이 아무 일도 안 하는 것처럼 보이면 그 때문입니다.

Anvil 프로파일 편집

앤빌이 기준점에서 아래로 얼마나 뻗는지를 기둥별로 정합니다. 편집 방식은 Top과 똑같습니다. 같은 Parameterize와 Paint 모드, 같은 붓, Parameterize로 돌아갈 때의 같은 주의사항.

아래로 잽니다. V = 0이 기준점, V = 1이 구름 레이어 바닥입니다. Anvil Profile Curve가 각 기둥에 높이가 아니라 깊이를 주니, 값이 클수록 더 아래까지 내려옵니다.

붓질됩니다. Bottom과 달리 붓이 앤빌 면에 씁니다. 그리기 전에 Anvil 탭을 고르세요.

주의 — 기준점은 액터 쪽에 있습니다
액터의 Anvil Strength 기본값이 0.0입니다. 0이면 앤빌이 완전히 죽어서 여기서 뭘 그려도 화면에 안 나옵니다. 액터 Shape 설정에서 올리고, 프로파일이 다룰 수 있는 깊이 창을 제한하는 Anvil Depth 01도 함께 보세요.

프로파일 시퀀스 만들기

프로파일 에셋은 모양 하나가 아니라 키의 타임라인입니다. 키마다 자기 파라미터와 자기 Top·Bottom·Anvil 면을 들고 있고, 재생하면 인접한 키 사이를 블렌드합니다. 한 모양을 유지하는 게 아니라 시간에 따라 실루엣이 변하는 폭풍을 만들 수 있습니다.

프로파일 에디터에서 재생되는 시퀀스
같은 키를 타임라인 UI에서 본 것
키에 담기는 것
항목내용
Time타임라인 위 위치, 초 단위. 첫 키는 0에 있어야 하고 마지막 키 시간이 시퀀스 길이입니다
Params키를 만들 때 잡아 둔 Storm Profile Params
Outgoing easingLinear 또는 Smoothstep. 이 키에서 시작하는 구간에 적용됩니다. 시퀀스 전체가 아니라 구간마다입니다
Baked surfacesTop·Bottom·Anvil 세 장. 에셋에 박혀 들어갑니다

에셋 하나에 키는 최대 16개, 어느 키도 3600초를 넘을 수 없습니다.

작업 순서
01
타임라인에서 작업할 키를 선택합니다.
02
위 단계들처럼 편집합니다. 파라미터 먼저, 그다음 붓질.
03
Save를 누릅니다. 저장은 작업 중인 면과 현재 파라미터를 선택한 키에 굽습니다.
04
Add Key로 그 키를 복제하고, 복사본을 뒤 시간으로 끌어다 다음 포즈로 고칩니다.

Add Key는 선택한 키를 텍스처까지 통째로 복사합니다. 그래서 앞에서 뒤로 쌓아가는 게 가장 편합니다. 첫 포즈를 만들고, 복제하고, 옮기고, 달라지는 부분만 고치세요.

미리보기

ForwardReverse는 플레이헤드가 있는 자리에서 시작합니다. Pause는 합성된 프리뷰를 화면에 남긴 채 멈추고, Stop은 프리뷰를 끝내고 작업 중인 면을 폭풍에 다시 올립니다. Loop는 에셋에 Loop By Default로 저장되니 세션이 아니라 프로파일에 남습니다.

실제로 재생할 수 있을 때까지 트랜스포트는 비활성입니다. 키가 둘 이상, 모든 키의 면이 구워져 있고, 길이가 0보다 커야 합니다.

블루프린트로 돌리기

버티컬 프로파일 툴 컴포넌트의 Storm | Profile | Sequence 아래에 있습니다.

노드동작
Play Profile Sequence플레이헤드에서 정방향 재생. Restart를 켜면 0에서 시작
Play Profile Sequence Reverse같은 방식으로 0을 향해 역방향
Pause Profile Sequence플레이헤드를 멈추고 합성 프리뷰를 유지
Stop Profile Sequence프리뷰를 끝내고 작업 중인 면을 복원
Set Profile Sequence Time정확한 시간으로 스크럽. 프리뷰는 유지
Set Profile Sequence Looping에셋의 Loop By Default를 런타임에 덮어씀
Get Profile Sequence Time현재 플레이헤드 위치, 초 단위
Get Profile Sequence Duration마지막 키의 시간
Get Profile Sequence Playback StateStopped, Playing, Paused
Get Profile Sequence Playback DirectionForward 또는 Reverse
Is Profile Sequence Playing플레이헤드가 실제로 움직일 때만 true
Is Profile Sequence Preview Active폭풍이 합성된 면을 샘플하는 동안 true
Can Play Profile Sequence에셋에 재생할 키·면·길이가 갖춰졌는지

Set Profile Sequence Time은 에디터 스크럽이 쓰는 것과 같습니다. 내장 트랜스포트 대신 직접 만든 커브로 위치를 몰고 싶을 때 게임플레이에서도 그대로 유효합니다.

← Flow map editor Inner light →
Authoring

Inner light

The emission that comes from inside the cloud volume rather than from a light in the scene.

What inner light is

A volumetric cloud is normally lit from outside: the directional light, the sky, and whatever else the scene provides. A storm does not read as a storm under that alone, because a real supercell is lit from within — a dull, sustained glow deep in the core, and the short violent bloom of a discharge.

So the plugin adds emission during the raymarch, split across two independent sources.

SourceOwnsDriven by
Static GlowCore emission that persists independently of the lightning pulseShape settings — one intensity, colour and extent
Flash GlowThe transient bloom of a lightning dischargeThe lightning component’s pulse, evaluated from a curve

Both are ellipsoid masks placed in normalized storm space, both add radiance into the density field as the material marches through it, and neither is a light source in the engine’s sense.

Warning — Inner light does not light the world
Emission is added inside the cloud material only. It will not illuminate terrain, meshes, water or exponential height fog, and it casts no shadow. If the scene has to react to a flash, drive a real light from the same pulse: bind On Lightning Pulse and feed its Pulse into a Point or Rect light’s Intensity, so scene lighting rises and falls on the same curve the cloud does.
Tip — Emission accumulates along the march
Every step the material takes through the glow region adds to the result, so the value you author is not the brightness you see. A thick storm accumulates far more of it than a thin one. This is why the defaults look implausibly small — Fill Intensity ships at 0.006.
Normalized storm space
·X and Y are fractions of the storm’s Radius.
·Z runs 0 to 1 from the bottom to the top of the cloud layer.

A centre of (0, 0, 0.2) sits on the storm’s axis, a fifth of the way up the layer; an extent of 0.15 in X reaches 15% of the radius outward. Inner light therefore rescales with the storm for free — change Radius and the glow follows. The catch is that the vertical axis belongs to the Volumetric Cloud layer, so raising the layer moves the glow up in world space without you touching a parameter.

Static Glow

Storm | Settings → Shape Settings → Lighting

The static glow is the storm’s resting state: an ellipsoid of emission at the centre of the body, evaluated continuously and independently of lightning playback.

ParameterDefaultRangeControls
Storm Static Glow Intensity0.050 – 1Master amount. 0 turns the glow off
Storm Static Glow ColorwhiteTint of the emission
Glow Extent0.15, 0.15, 0.14≥ 0.001 per axisNormalized X, Y, Z radii of the glow ellipsoid

Two neighbours in the same section are easy to confuse with the glow. Brim Emissive Color tints the emissive contribution at the storm’s brim — a surface accent on the outer edge, not a volume glow at the core. Underside Visibility raises the visibility of the underside so the base does not read as a flat black disc; it corrects the existing scattering result rather than adding light.

Choosing a value

Start at the default 0.05 and move in steps of 0.01. Because the contribution accumulates through the volume, the range that reads as “lit from within” rather than “a glowing sphere sitting inside the cloud” is narrow — roughly 0.02 to 0.08 for a storm at default Density.

The default extent is deliberately flatter vertically than it is wide (0.15 in X and Y against 0.14 in Z). A glow that is spherical in normalized space is taller than it looks in world space, because the cloud layer is thin compared to the radius, and it tends to push a bright cap through the top surface.

Tip — Density and glow are coupled
Raising Density raises the apparent glow, because there is more medium for the emission to accumulate through. Retune the glow after any large density change rather than before.

Flash Glow

Storm | Settings → Lightning → Lightning Sequence

The flash is not one glowing blob — and not three cleanly separated concentric layers either. Three contributions share the same centre and the same two extents, Flash and Halo, and overlap to produce the final colour.

ContributionAuthored byReads as
Hot White CoreHot White Color, Fill Color, Core Peak HDRThe brightest centre — an HDR peak transitioning from Fill Color toward Hot White Color
FillFill Color, Fill IntensityThe main colour added around the core and across the wider propagation region
LeakLeak Color, Leak IntensityA secondary emission spreading further out through the body
Geometry
ParameterDefaultControls
Flash Center (Normalized)0, 0, 0.2046Where the discharge sits. X/Y are fractions of Radius, Z is cloud-layer height
Flash Extent (Normalized)0.15, 0.15, 0.15Radius of the dense core source and its peak region; also influences the Fill and Leak energy leaving the core
Halo Extent (Normalized)0.50, 0.50, 0.16The main range across which Fill and Leak propagate; also affects the outer boundary where the core and Leak fall away

The default centre sits low in the layer, at about a fifth of its height, which is where a discharge inside the body reads best: high enough to light the mass above it, low enough that the underside catches the bounce.

Note — Extents do not map one-to-one onto the contributions
Flash Extent directly creates the dense source region of the Hot White Core, but it also influences the Fill and Leak energy spreading out of that core. Halo Extent is the main propagation range for Fill and Leak, and it also takes part in the outer boundary where the core and Leak disappear. Describing them as one extent owned by each colour does not match the actual result.
Warning — Flash and Halo have to fit inside the layer
Extents are measured from Flash Center. If Center.Z − Extent.Z falls below 0, or Center.Z + Extent.Z rises above 1, the bottom or top of the emission can be clipped at the cloud-layer boundary. If you change the centre height, check the Z range of both Flash and Halo along with it.
Appearance

The values below are the initial values the plugin ships. Colours are Linear RGB, and the current material does not use their alpha channel for the visual result.

ParameterDefaultRangeControls
Hot White Color0.931, 0.928, 1.0The peak tint reached at the very brightest point of the core. Slightly blue-shifted white by default
Core Peak HDR4.0≥ 0Peak radiance of the core. Above 1 it produces HDR output, which can contribute strongly to Bloom depending on exposure and post-process settings
Fill Color1.0, 0.050, 0.138The core’s base colour, and the main colour added to the surrounding cloud
Fill Intensity0.006≥ 0Amount of Fill. Small on purpose
Leak Color1.0, 0.02, 0.05Colour of the secondary emission spreading widely through the body
Leak Intensity0.10≥ 0Amount of Leak
Warning — There are limits to reproducing a Hot White Core colour
Hot White Color is not an independent colour layer. It is the peak tint the core transitions to, from Fill Color, at its centre — so picking pink in the swatch is no guarantee the centre of the screen reads as that pink. A high Core Peak HDR, or strong exposure and Bloom, can push a very bright colour toward white; additive compositing where Fill and Leak overlap does the same. The Details panel exposes no property for the width or start point of the Fill → Hot White transition.
Tip — How to check a Hot White colour
01
Temporarily drop Fill Intensity and Leak Intensity to 0.
02
Lower Core Peak HDR to somewhere around 0.51.0.
03
Judge Hot White Color under fixed exposure and weak Bloom if you can.
04
Once the colour is right, restore Fill and Leak one at a time.

Even then the colour appears only at the brightest centre, not across the whole core.

Tip — Why Fill Intensity is so much smaller than Leak Intensity
Fill passes through the storm’s dense region and accumulates over many raymarch steps; Leak spreads across a wider and thinner region. The two numbers do not mean the same thing on screen at a 1:1 ratio, and the defaults 0.006 and 0.10 account for the different ways they accumulate. Raising Fill to 0.1 tends to read as a solid coloured sphere rather than a brighter flash.
Warning — The shipped defaults are a red discharge
Fill and Leak both default to a saturated red while the core peak is white. That combination is intentional, but changing only one of them leaves a white core inside a red region, or the reverse. Check all three colours as a relationship — Hot White for the centre peak, Fill for the main surrounding colour, Leak for the wide secondary emission.

Timing — the Flash Pulse Curve

Everything above describes the flash at Pulse = 1. What makes it an actual flash is the Flash Pulse Curve: all three contributions are scaled by the single scalar the curve returns, and that scalar is the only value written to the material per frame. The static glow is not affected by it — a storm with lightning stopped is still lit from inside, it just is not flashing.

You author the curve yourself, in the curve editor on the Details panel. Two consequences are worth knowing before you start.

·The curve’s length is the sequence’s length. There is no separate duration property; the component reads the curve’s time range every time it plays, so extending the curve extends the sequence.
·Cue times are normalized against it. Ground Strike Times and Custom Cues are positions from 0 to 1 along whatever length the curve turns out to be, so they keep their relative place when you stretch it.

The plugin ships a one-second double-flash as the default, which reads well as an example of the shape.

TimeValueReads as
0.001.00Strike
0.121.00Held at full for a beat
0.250.18Collapse
0.420.72Re-strike, weaker
0.650.08Collapse again
1.000.00Decayed to nothing

All six keys are linear. What sells a discharge is the asymmetry — it switches on instantly and decays slowly and unevenly. A curve that eases in and out symmetrically reads as a lamp being turned up, not as lightning.

Tip — The only material value updated per tick is the Pulse
The colours and extents above are uploaded to the material once, when a sequence begins; after that only the Pulse is written each tick. Authoring the curve with finer keys does not add any further material parameter uploads.

Playback

SettingDefaultControls
EnabledtrueMaster switch. False disables automatic and manual playback
Auto PlaytrueStarts a sequence on begin play
LooptrueRepeats after the delay below
Lightning Repeat Delay2.0 sWait between the end of one sequence and the start of the next. Range 0.1 – 10 s
Ground Strike Probability1.0Chance, rolled once per sequence, that this flash also produces a ground strike

The default cue time of 0.20 in Ground Strike Times lands just after the first peak collapses, so the bolt appears while the cloud is still bright. That value is not a probability — it is the normalized time at which the ground strike event fires within the sequence.

← Vertical profile editor Presets →
Authoring

Inner light

씬의 라이트가 아니라 구름 볼륨 안쪽에서 나오는 발광을 다룹니다.

인너 라이트란

볼류메트릭 클라우드는 보통 바깥에서만 빛을 받습니다. 디렉셔널 라이트, 스카이, 그 밖에 씬에 있는 것들이죠. 그런데 실제 슈퍼셀은 안에서 빛나기 때문에 바깥 조명만으로는 폭풍처럼 보이지 않습니다. 코어 깊은 곳에서 계속 도는 둔한 발광과, 방전이 터질 때의 짧고 강한 블룸이 필요합니다.

그래서 레이마칭 중에 이미션을 더합니다. 소스는 두 개고 서로 독립입니다.

소스담당구동
Static Glow라이트닝 펄스와 무관하게 계속 도는 코어 발광셰이프 설정의 강도, 색, 크기
Flash Glow방전이 터질 때의 순간 블룸라이트닝 컴포넌트의 펄스, 커브로 평가

둘 다 정규화된 폭풍 공간에 놓인 타원체 마스크고, 머티리얼이 밀도 필드를 지나갈 때 복사를 더합니다. 어느 쪽도 엔진이 인식하는 라이트는 아닙니다.

주의 — 인너 라이트는 월드를 밝히지 않습니다
이미션은 클라우드 머티리얼 안에서만 더해집니다. 지형이나 메시, 물, 익스포넨셜 하이트 포그를 밝히지 않고 그림자도 만들지 않습니다. 씬이 번개에 반응해야 하면 같은 펄스로 실제 라이트를 돌리세요. On Lightning Pulse 이벤트를 받아 Pulse 값을 포인트나 렉트 라이트의 Intensity에 넣으면 씬 조명이 구름과 같은 커브로 오르내립니다.
팁 — 이미션은 마칭하면서 누적됩니다
머티리얼이 발광 영역을 지나가는 스텝마다 값이 쌓이기 때문에, 입력한 숫자가 화면에서 보이는 밝기는 아닙니다. 두꺼운 폭풍은 얇은 폭풍보다 훨씬 많이 누적합니다. 기본값이 터무니없이 작아 보이는 이유가 이겁니다. Fill Intensity가 0.006로 나갑니다.
정규화된 폭풍 공간
·X와 Y는 폭풍 Radius에 대한 비율입니다.
·Z는 구름 레이어 바닥 0에서 천장 1까지입니다.

중심이 (0, 0, 0.2)면 폭풍 축 위, 레이어 높이의 5분의 1 지점입니다. X 크기가 0.15면 반경의 15%까지 뻗습니다. 덕분에 Radius를 바꾸면 발광도 같이 스케일됩니다. 대신 세로축은 Volumetric Cloud 레이어 것이라, 레이어를 올리면 파라미터를 안 건드려도 발광 위치가 월드에서 올라갑니다.

Static Glow

Storm | Settings → Shape Settings → Lighting

폭풍의 기본 상태입니다. 본체 중심에 놓인 이미션 타원체가 라이트닝 재생과 무관하게 계속 평가됩니다.

파라미터기본값범위역할
Storm Static Glow Intensity0.050 – 1전체 양. 0이면 꺼집니다
Storm Static Glow Color흰색발광 색
Glow Extent0.15, 0.15, 0.14축마다 ≥ 0.001발광 타원체의 정규화 X, Y, Z 반지름

같은 섹션에 있는 두 값은 발광과 헷갈리기 쉬워서 구분해 둘 만합니다. Brim Emissive Color는 폭풍 브림의 이미션을 물들이는 값으로, 코어의 볼륨 발광이 아니라 바깥 경계의 표면 악센트입니다. Underside Visibility는 바닥이 검은 원판처럼 보이지 않게 아래쪽 가시성을 올립니다. 빛을 더하는 게 아니라 이미 계산된 스캐터링 결과를 보정합니다.

값 잡기

기본값 0.05에서 시작해 0.01씩 움직이세요. 볼륨을 지나며 누적되기 때문에 "안에서 빛난다"로 읽히는 구간과 "구름 안에 발광구가 박혀 있다"로 읽히는 구간의 차이가 좁습니다. 기본 Density 기준으로는 대략 0.02에서 0.08 사이가 출발점입니다.

기본 크기는 일부러 세로가 가로보다 납작합니다(X·Y 0.15 대 Z 0.14). 정규화 공간에서 구형인 발광은 구름 레이어가 반경보다 얇기 때문에 월드에서는 보기보다 키가 커지고, 밝은 캡이 위쪽 표면을 뚫고 나오기 쉽습니다.

팁 — Density와 발광은 붙어 있습니다
Density를 올리면 이미션이 누적될 매질이 늘어나니 발광도 같이 밝아집니다. 밀도를 크게 바꿨으면 발광은 그 뒤에 다시 잡으세요.

Flash Glow

Storm | Settings → Lightning → Lightning Sequence

플래시는 발광 덩어리 하나도 아니고, 깔끔하게 분리된 동심 레이어 세 개도 아닙니다. 같은 중심과 같은 두 크기(Flash, Halo)를 공유하는 기여 세 개가 겹쳐서 최종 색을 만듭니다.

기여저작 값읽히는 모습
Hot White CoreHot White Color, Fill Color, Core Peak HDR가장 밝은 중심. Fill Color에서 Hot White Color로 넘어가는 HDR 피크
FillFill Color, Fill Intensity코어 주변과 더 넓은 전파 영역에 더해지는 주 색
LeakLeak Color, Leak Intensity본체를 통해 더 멀리 퍼지는 2차 발광
지오메트리
파라미터기본값역할
Flash Center (Normalized)0, 0, 0.2046방전 위치. X·Y는 Radius 비율, Z는 구름 레이어 높이
Flash Extent (Normalized)0.15, 0.15, 0.15밀집 코어 소스와 피크 영역의 반지름. 코어에서 빠져나가는 Fill·Leak 에너지에도 영향
Halo Extent (Normalized)0.50, 0.50, 0.16Fill과 Leak이 퍼지는 주 범위. 코어와 Leak이 사라지는 외곽 경계에도 관여

기본 중심은 레이어 높이의 5분의 1쯤, 낮은 곳에 있습니다. 본체 안쪽 방전은 그 높이가 가장 잘 읽힙니다. 위쪽 덩어리를 밝힐 만큼은 높고, 아래쪽이 반사광을 받을 만큼은 낮습니다.

참고 — 크기와 색 기여는 1:1로 대응하지 않습니다
Flash Extent는 Hot White Core의 밀집 소스 영역을 직접 만들지만, 거기서 빠져나가는 Fill·Leak 에너지에도 영향을 줍니다. Halo Extent는 Fill·Leak의 주 전파 범위이면서 코어와 Leak이 사라지는 외곽 경계에도 관여합니다. 그래서 "Flash Extent = Fill의 범위, Halo Extent = Leak의 범위"처럼 색마다 크기 하나를 짝지어 생각하면 실제 결과와 맞지 않습니다.
주의 — Flash와 Halo는 레이어 안에 들어가야 합니다
크기는 Flash Center에서부터 잽니다. Center.Z − Extent.Z0 아래로 내려가거나 Center.Z + Extent.Z1 위로 올라가면 이미션의 아래위가 구름 레이어 경계에서 잘릴 수 있습니다. 중심 높이를 바꿨으면 Flash와 Halo 두 쪽의 Z 범위를 같이 확인하세요.
외형

아래는 플러그인이 들고 나가는 초기값입니다. 색은 Linear RGB고, 현재 머티리얼은 알파 채널을 결과에 쓰지 않습니다.

파라미터기본값범위역할
Hot White Color0.931, 0.928, 1.0코어의 가장 밝은 지점에서 도달하는 피크 색. 기본값은 살짝 청색 쪽으로 치우친 흰색
Core Peak HDR4.0≥ 0코어의 피크 복사량. 1을 넘으면 HDR로 나가서 노출·포스트프로세스 설정에 따라 블룸에 크게 기여
Fill Color1.0, 0.050, 0.138코어의 기본 색이자 주변 구름에 더해지는 주 색
Fill Intensity0.006≥ 0Fill의 양. 작은 게 의도입니다
Leak Color1.0, 0.02, 0.05본체를 넓게 퍼지는 2차 발광의 색
Leak Intensity0.10≥ 0Leak의 양
주의 — Hot White Core 색은 원하는 대로 다 나오지 않습니다
Hot White Color는 독립된 색 레이어가 아닙니다. 중심에서 Fill Color로부터 넘어가 도달하는 피크 색입니다. 그래서 스와치에서 분홍을 골라도 화면 중앙이 그 분홍으로 읽힌다는 보장이 없습니다. Core Peak HDR가 높거나 노출·블룸이 강하면 아주 밝은 색은 흰색 쪽으로 밀리고, Fill과 Leak이 같은 영역에서 겹치면 가산 합성도 중앙을 흰색으로 씻어냅니다. Fill에서 Hot White로 넘어가는 구간의 폭이나 시작점을 조절하는 프로퍼티는 지금 노출되어 있지 않습니다.
팁 — Hot White Color를 확인하는 방법
01
Fill IntensityLeak Intensity를 잠시 0으로 내립니다.
02
Core Peak HDR0.51.0 정도로 낮춥니다.
03
가능하면 노출을 고정하고 블룸을 약하게 한 상태에서 Hot White Color를 봅니다.
04
색이 맞으면 Fill과 Leak을 하나씩 되돌립니다.

그래도 이 색은 코어 전체가 아니라 가장 밝은 중심에만 나타납니다.

팁 — Fill Intensity가 Leak Intensity보다 훨씬 작은 이유
Fill은 폭풍의 밀집 영역을 지나며 여러 스텝에 걸쳐 누적됩니다. Leak은 더 넓고 얇은 영역에 퍼집니다. 두 숫자가 화면에서 1:1로 같은 뜻이 아니라서, 기본값 0.0060.10은 누적 방식의 차이를 감안한 출발점입니다. Fill을 0.1까지 올리면 더 밝은 플래시가 아니라 색이 꽉 찬 구체처럼 읽힙니다.
주의 — 기본값은 붉은 방전입니다
Fill과 Leak 둘 다 채도 높은 빨강이고 코어 피크는 흰색입니다. 의도한 조합이지만, 한쪽만 바꾸면 붉은 영역 안에 흰 코어가 남거나 그 반대가 됩니다. 폭풍을 다시 잡을 때는 세 색을 관계로 놓고 보세요. Hot White는 중심 피크, Fill은 주변의 주 색, Leak은 넓은 2차 발광입니다.

타이밍 — Flash Pulse Curve

위 내용은 모두 Pulse = 1 상태의 플래시입니다. 이걸 실제 플래시로 만드는 건 Flash Pulse Curve입니다. 세 기여 전부가 커브가 돌려주는 스칼라 하나로 스케일되고, 프레임마다 머티리얼에 쓰이는 값은 그 스칼라뿐입니다. Static Glow는 영향을 받지 않아서, 라이트닝을 멈춘 폭풍도 안에서는 여전히 빛나고 다만 번쩍이지 않을 뿐입니다.

커브는 Details 패널의 커브 에디터에서 직접 짭니다. 시작하기 전에 알아둘 게 두 가지 있습니다.

·커브 길이가 시퀀스 길이입니다. 별도 지속 시간 프로퍼티가 없습니다. 재생할 때마다 컴포넌트가 커브의 시간 범위를 읽으니, 커브를 늘리면 시퀀스가 늘어납니다.
·큐 시간은 그 길이에 정규화됩니다. Ground Strike Times와 Custom Cues는 커브 길이에 대한 01 위치라서, 커브를 늘려도 상대 위치를 유지합니다.

기본값으로 1초짜리 이중 섬광이 들어 있습니다. 형태 예시로 읽기 좋습니다.

시간읽히는 모습
0.001.00타격
0.121.00한 박자 유지
0.250.18붕괴
0.420.72재타격, 더 약하게
0.650.08다시 붕괴
1.000.00완전히 감쇠

여섯 키 전부 선형입니다. 방전처럼 보이게 하는 건 비대칭입니다. 즉시 켜지고 느리게, 고르지 않게 감쇠합니다. 좌우 대칭으로 이징하는 커브는 번개가 아니라 조명을 서서히 올리는 것처럼 읽힙니다.

팁 — 재생 중 매 틱 갱신되는 건 Pulse뿐입니다
위의 색과 크기는 시퀀스가 시작될 때 한 번만 머티리얼로 올라가고, 그 뒤에는 틱마다 Pulse만 씁니다. 커브 키를 촘촘하게 짜도 머티리얼 파라미터 업로드가 늘지 않습니다.

재생

설정기본값역할
Enabledtrue마스터 스위치. false면 자동·수동 재생 전부 막힙니다
Auto Playtrue비긴 플레이에 시퀀스를 시작합니다
Looptrue아래 딜레이 뒤에 반복합니다
Lightning Repeat Delay2.0 s한 시퀀스가 끝나고 다음이 시작될 때까지의 대기. 0.1 – 10 s
Ground Strike Probability1.0시퀀스마다 한 번 굴려서 이 플래시가 지상 낙뢰까지 낼지 정합니다

Ground Strike Times의 기본 큐 시간 0.20은 첫 피크가 붕괴한 직후라, 구름이 아직 밝을 때 볼트가 나타납니다. 이 값은 확률이 아니라 시퀀스 안에서 지상 낙뢰 이벤트가 발생하는 정규화된 시간입니다.

← Vertical profile editor Presets →
Authoring

Presets

One asset holding the storm’s complete authorable configuration.

What a preset stores

·Shape settings, including radial curves, density, lighting and wind
·Motion settings
·Formation and dissolution durations
·Lightning sequence, repeat delay and ground-strike probability
·Vertical profile asset. The key sequence lives in that asset, not in the preset
·Flow-map asset and enabled state
Note — References, not pixels
Profile and flow-map pixels are not embedded. The preset stores references to saved assets, so transient painter surfaces must be saved before creating the preset.

What it does not store

The actor transform, target cloud reference, base cloud material, and the Volumetric Cloud component’s own settings — layer altitude, layer height, tracing and quality — remain outside the preset and must be configured separately.

Applying a preset

ApplyPreset copies values into the actor, updates the profile and flow-map components, sanitizes the result and performs a full render-data rebuild. The actor does not retain a live link to the preset asset.

Editor workflow
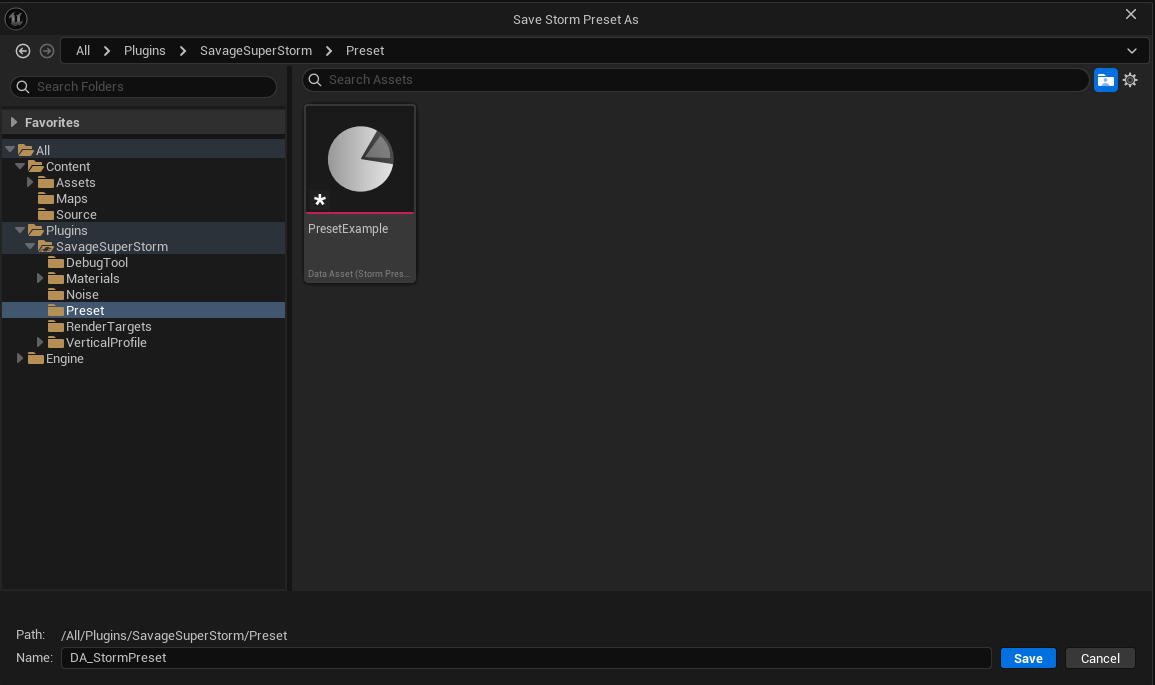
01
Configure the storm actor
Shape, motion, lightning and durations.
02
Save the profile and flow map
Save the vertical profile and flow map when they should be part of the preset.
03
Save Preset As
From the actor’s Details panel.
04
Load Preset
Select a Storm Preset asset to copy it into another storm.
Save preset drawer
Save preset drawer

Where presets are saved

Save Preset As writes to /Game/SuperStorm/Presets in your project, not into the plugin. The folder is created on first use, and the dialog asks only for a name — you cannot save outside that directory by accident.

Change the location under Edit → Project Settings → Plugins → Volumetric Super Storm → Authoring Directories.

Note — Why it saves into your project
A plugin installed under the engine directory can be read-only, and a plugin update replaces everything the plugin ships. Presets in your project are unaffected by either.

Load Preset lists your saved presets alongside the examples that ship with the plugin, so the bundled SP_* presets stay available as starting points.

← Inner light Storm actor →
Authoring

Presets

작업한 폭풍 설정을 통째로 담아 두는 에셋입니다.

프리셋에 들어가는 값

·셰이프 설정 전체. 방사 커브, 밀도, 라이팅, 바람까지
·모션 설정
·형성 시간, 소멸 시간
·라이트닝 시퀀스와 반복 딜레이, 지상 낙뢰 확률
·버티컬 프로파일 에셋. 키 시퀀스는 그 에셋에 있고 프리셋에는 없습니다
·플로우맵 에셋, 사용 여부
참고 — 담기는 건 픽셀이 아니라 참조입니다
프로파일과 플로우맵 픽셀은 프리셋에 안 들어갑니다. 저장된 에셋을 가리키는 참조만 들어갑니다. 그래서 페인터에서 그린 임시 면은 프리셋을 만들기 전에 저장해야 합니다.

프리셋에 안 들어가는 값

액터 트랜스폼, 대상 클라우드 참조, 베이스 클라우드 머티리얼은 프리셋 밖입니다. Volumetric Cloud 컴포넌트 설정도 마찬가지입니다. 레이어 고도와 두께, 트레이싱, 품질은 직접 맞춰주세요.

프리셋 적용

ApplyPreset 을 호출하면 값이 액터로 복사되고 프로파일과 플로우맵 컴포넌트가 갱신됩니다. 값을 정리한 다음 렌더 데이터를 전부 다시 만듭니다. 적용이 끝나면 프리셋과의 연결은 끊깁니다.

작업 순서

01
폭풍 액터를 맞춥니다
셰이프, 모션, 라이트닝, 지속 시간을 잡습니다.
02
프로파일과 플로우맵을 저장합니다
버티컬 프로파일과 플로우맵은 프리셋의 일부로 쓸 거라면 먼저 저장하세요.
03
Save Preset As
액터 Details 패널에서 누릅니다.
04
Load Preset
Storm Preset 에셋을 고르면 다른 폭풍에 그대로 옮겨집니다.
Save preset drawer
프리셋 저장 창

프리셋이 저장되는 곳

Save Preset As는 플러그인이 아니라 프로젝트의 /Game/SuperStorm/Presets에 씁니다. 폴더는 처음 쓸 때 자동으로 만들어지고, 다이얼로그는 이름만 묻습니다. 실수로 다른 데 저장될 일이 없습니다.

위치는 Edit → Project Settings → Plugins → Volumetric Super Storm → Authoring Directories에서 바꿉니다.

참고 — 왜 프로젝트에 저장하나
엔진 폴더에 깔린 플러그인은 읽기 전용일 수 있고, 플러그인을 업데이트하면 배포 파일이 전부 교체됩니다. 프로젝트에 있는 프리셋은 둘 다 영향을 받지 않습니다.

Load Preset은 저장한 프리셋과 플러그인 예시를 같이 보여줍니다. 배포되는 SP_* 프리셋을 출발점으로 계속 쓸 수 있습니다.

← Inner light Storm actor →
Reference

Storm actor

The single orchestrator a world accepts, and everything it owns.

AVolumetricSuperStormActor owns the authorable state and coordinates rendering, motion, profiles, flow maps, lightning, formation and the cloud material binder. A world accepts one registered actor; an additional one is disabled rather than replacing the active storm or sharing mutable render state.

Components

ComponentPurpose
SceneRootRoot transform for the storm actor
MaterialBinderCreates and updates the target cloud’s dynamic material instance
LightningComponentPlays the authored sequence and publishes lightning events
VerticalProfileToolOwns the live bottom, top and anvil profile render targets
FlowMapComponentOwns the three flow-map layers and their live render targets
EditorIconEditor-only viewport selection icon

Authorable settings

PropertyTypePurpose
StableStormIdint32Shared deterministic seed for motion and lightning; zero derives it from the actor name
ShapeSettingsstructShape bake, anvil, density, lighting, wind and appearance
MotionSettingsstructRing motion, masks, height range, frequency-band rotation and shear
LightningSequencestructCue sequence and material pulse behaviour
LightningRepeatDelaySecondsfloatDelay between automatically repeated sequences
GroundStrikeProbabilityfloatChance an eligible sequence produces a ground strike
FormationDurationSecondsfloatFormation animation duration
DissolutionDurationSecondsfloatDissolution animation duration

Runtime behaviour

The actor registers with UStormRenderWorldSubsystem, builds one immutable shape-bake input set, and uploads the resulting shape textures to the target cloud material. Static changes rebuild the shape data; profile changes update only profile textures; motion, transform, lifecycle and lightning changes use frame-level uploads.

Note — No simulation-mode switch
The actor ticks while time-dependent state is active. There is no public tick or simulation-mode property to manage.

Main functions

FunctionPurpose
PrepareStormResourcesRegisters the actor and initializes render and material resources
RebuildRenderDataRebuilds static render data and refreshes the target material
ApplyPresetCopies a preset into the actor and rebuilds runtime state
Create / Dissolve StormStarts formation or dissolution
ShowMatureStorm / HideStormImmediatelySwitches state with no animation
PlayLightningSequenceStarts the configured lightning sequence
PlayProfileSequence / ReversePlays the bound profile asset’s key sequence
PauseProfileSequence / StopProfileSequenceHolds or ends sequence playback
SetProfileSequenceTime / LoopingScrubs the sequence, or repeats it at the ends
SetStormMotionEnabledEnables or disables shader motion
Pause / Resume / ResetStormMotionControls motion time integration
← Presets Components →
Reference

Storm actor

월드에 하나만 둘 수 있는 액터입니다. 무엇을 들고 있는지 정리했습니다.

AVolumetricSuperStormActor 가 작업 상태를 전부 들고 있습니다. 렌더링, 모션, 프로파일, 플로우맵, 라이트닝, 형성, 그리고 클라우드 머티리얼 바인더까지 여기서 조율합니다. 월드에 등록되는 건 하나뿐입니다. 두 번째 액터를 놓으면 기존 폭풍을 밀어내거나 렌더 상태를 나눠 쓰는 대신 그냥 비활성화됩니다.

컴포넌트

컴포넌트역할
SceneRoot액터의 루트 트랜스폼
MaterialBinder대상 클라우드의 다이내믹 머티리얼 인스턴스 생성, 갱신
LightningComponent시퀀스 재생, 라이트닝 이벤트 전달
VerticalProfileTool바텀, 톱, 앤빌 프로파일 렌더 타깃 보유
FlowMapComponent플로우맵 세 레이어와 렌더 타깃 보유
EditorIcon뷰포트 선택용 아이콘 (에디터 전용)

설정 값

프로퍼티타입역할
StableStormIdint32모션과 라이트닝이 같이 쓰는 시드. 0이면 액터 이름으로 만듭니다
ShapeSettingsstruct셰이프 베이크, 앤빌, 밀도, 라이팅, 바람, 색
MotionSettingsstruct링 모션, 마스크, 높이 범위, 주파수별 회전과 시어
LightningSequencestruct큐 시퀀스, 머티리얼 펄스 동작
LightningRepeatDelaySecondsfloat자동 반복 간격
GroundStrikeProbabilityfloat시퀀스가 지상 낙뢰를 낼 확률
FormationDurationSecondsfloat형성 애니메이션 시간
DissolutionDurationSecondsfloat소멸 애니메이션 시간

런타임 동작

액터는 UStormRenderWorldSubsystem 에 등록한 다음, 한 번 만들면 바뀌지 않는 셰이프 베이크 입력 세트를 만듭니다. 그 결과 텍스처가 대상 클라우드 머티리얼로 올라갑니다. 고정 값이 바뀌면 셰이프를 다시 만들고, 프로파일이 바뀌면 프로파일 텍스처만 갱신합니다. 모션, 트랜스폼, 라이프사이클, 라이트닝은 프레임마다 올립니다.

참고 — 시뮬레이션 모드 같은 건 없습니다
시간에 따라 움직이는 값이 살아 있는 동안만 액터가 틱합니다. 따로 켜고 끌 틱이나 모드 프로퍼티는 없습니다.

주요 함수

함수역할
PrepareStormResources액터 등록, 렌더와 머티리얼 리소스 초기화
RebuildRenderData고정 렌더 데이터 재생성, 대상 머티리얼 갱신
ApplyPreset프리셋을 액터로 복사, 런타임 상태 재구성
Create / Dissolve Storm형성, 소멸 시작
ShowMatureStorm / HideStormImmediately애니메이션 없이 바로 전환
PlayLightningSequence라이트닝 시퀀스 재생
PlayProfileSequence / Reverse물린 프로파일 에셋의 키 시퀀스 재생
PauseProfileSequence / StopProfileSequence시퀀스 재생을 멈추거나 끝냅니다
SetProfileSequenceTime / Looping시퀀스를 스크럽하거나 양끝에서 반복
SetStormMotionEnabled셰이더 모션 on/off
Pause / Resume / ResetStormMotion모션 시간 제어
← Presets Components →
Reference

Components

Five objects divide the work: binding, lightning, flow, profiles, and the world-level rule.

Storm Material Binder

UStormMaterialBinderComponent publishes the registered storm’s render data to the cloud material. BindingBackend selects how.


Binding backends
BackendHow values reach the materialThe cloud material must
Global MPC (default)Written into the plugin’s Material Parameter Collection and its shared render-target anchors. The cloud’s material is never reassigned.Contain MF_Storm_Global, which reads that collection.
Dynamic Material InstanceWritten as parameters on a dynamic instance the binder creates and assigns to the cloud.Expose the 53 contract parameters — 8 textures, 20 scalars, 25 vectors.
The Global MPC backend
The Dynamic Material Instance backend

M_StormMinimalSetup is built for the Global MPC backend and M_VolumetricSuperStorm for the Dynamic Material Instance backend. They are not interchangeable: M_StormMinimalSetup exposes none of the contract parameters, so selecting it as BaseCloudMaterial is refused.

Target selection

Under the Dynamic Material Instance backend, TargetCloudReference is the preferred target. When it is unset, automatic selection succeeds only when the world contains exactly one Volumetric Cloud component. An ambiguous world is rejected rather than selecting an arbitrary cloud.

Material ownership

The Global MPC backend leaves the cloud’s material untouched.

Under the Dynamic Material Instance backend the binder stores the material active before binding, creates a dynamic instance owned by the component, assigns it to the cloud, and restores the previous material when the storm unregisters or is destroyed. A parent that fails the contract check is refused with a log error and no instance is created. External material changes can be adopted as the new parent while editing when bTrackTargetCloudMaterialChange is enabled.

Properties
PropertyPurpose
BindingBackendSelects Global MPC or Dynamic Material Instance. Defaults to Global MPC
TargetCloudReferenceExplicit cloud component target. Dynamic Material Instance only
BaseCloudMaterialParent material. It must implement the storm material contract. Dynamic Material Instance only
bTrackTargetCloudMaterialChangeEditor-only tracking of external target material changes. Dynamic Material Instance only

The three properties below BindingBackend are hidden in the Details panel under the default backend.

Update paths
FunctionUploads
PushStormRenderDataTextures plus all static and frame parameters
PushStormDataThe subset named by an EStormRenderUpdateScope: Full, Frame for transform, motion, lifecycle and time-dependent values, or Profile for the bottom, top and anvil profile textures
ApplyVolumetricCloudMaterialCreates or recreates the dynamic material and uploads the current state
UpdateVolumetricCloudMaterialReuses the current dynamic instance and refreshes its state
ReleaseVolumetricCloudMaterialRestores the material that was active before binding

Storm Lightning Component

UStormLightningComponent evaluates the lightning cue sequence, updates the material pulse, resolves ground-strike locations — the point is drawn from the authored ring, then leaned by Strike Tilt and resolved again under the leaned point, so bolts do not drop plumb — and publishes start, cue, strike, pulse and finish events. Motion and lightning use the same resolved storm identifier.

Storm Flow Map Component

UStormFlowMapComponent owns the lower, middle and upper painted flow layers, their live render targets, and the persistent flow-map asset. Painting the upper layer marks the storm shape bake dirty because the shape compute pass samples that layer.

Storm Vertical Profile Tool Component

UStormVerticalProfileToolComponent owns live bottom, top and anvil profile render targets. Profile transitions blend all three surfaces in one render graph and then update only the profile texture bindings; they do not resubmit or rebake the storm shape.

Storm Render World Subsystem

UStormRenderWorldSubsystem enforces the one-storm-per-world rule and owns the two shape render targets. It caches sampled curve lookup tables with their bake hash so each curve is sampled once per full update.

← Storm actor Core parameters →
Reference

Components

바인딩, 라이트닝, 플로우, 프로파일, 그리고 월드 규칙. 역할이 다섯으로 나뉩니다.

Storm Material Binder

UStormMaterialBinderComponent가 등록된 폭풍의 렌더 데이터를 클라우드 머티리얼로 보냅니다. 어떤 방식으로 보낼지는 BindingBackend가 정합니다.

바인딩 백엔드
백엔드값이 전달되는 방식클라우드 머티리얼 조건
Global MPC (기본)플러그인의 Material Parameter Collection과 공유 렌더 타깃 앵커에 씁니다. 클라우드 머티리얼은 건드리지 않습니다.MF_Storm_Global이 들어 있어야 합니다. 그 컬렉션을 읽는 함수입니다.
Dynamic Material Instance바인더가 만들어 클라우드에 지정한 다이내믹 인스턴스의 파라미터로 씁니다.계약 파라미터 53개를 노출해야 합니다. 텍스처 8, 스칼라 20, 벡터 25.
Global MPC 백엔드
Global MPC 백엔드
Dynamic Material Instance 백엔드

M_StormMinimalSetup은 Global MPC용, M_VolumetricSuperStorm은 Dynamic Material Instance용입니다. 서로 바꿔 쓸 수 없습니다. M_StormMinimalSetup은 계약 파라미터를 하나도 노출하지 않으니 BaseCloudMaterial로 고르면 거부됩니다.

대상 선택

Dynamic Material Instance 백엔드에서는 TargetCloudReference가 우선입니다. 비어 있으면 자동으로 찾는데, 월드에 Volumetric Cloud가 딱 하나일 때만 성공합니다. 여러 개면 아무거나 고르지 않고 거부합니다.

머티리얼 소유권

Global MPC 백엔드는 클라우드 머티리얼을 그대로 둡니다.

Dynamic Material Instance에서는 바인더가 바인딩 전 머티리얼을 기억해 두고, 자기가 소유하는 다이내믹 인스턴스를 만들어 클라우드에 지정합니다. 폭풍이 빠지거나 파괴되면 원래 머티리얼로 되돌립니다. 계약 검사를 통과하지 못한 부모는 로그 에러와 함께 거부되고 인스턴스도 만들지 않습니다. bTrackTargetCloudMaterialChange를 켜면 편집 중에 외부에서 바뀐 머티리얼을 새 부모로 받아들입니다.

프로퍼티
프로퍼티역할
BindingBackendGlobal MPC와 Dynamic Material Instance 중 선택. 기본은 Global MPC
TargetCloudReference대상 클라우드 컴포넌트 직접 지정. Dynamic Material Instance 전용
BaseCloudMaterial부모 머티리얼. 스톰 머티리얼 계약을 구현해야 합니다. Dynamic Material Instance 전용
bTrackTargetCloudMaterialChange외부 머티리얼 변경 추적. 에디터 전용, Dynamic Material Instance 전용

BindingBackend 아래 세 프로퍼티는 기본 백엔드에서는 Details 패널에 숨어 있습니다.

업데이트 경로
함수올리는 것
PushStormRenderData텍스처와 고정·프레임 파라미터 전부
PushStormDataEStormRenderUpdateScope가 지정한 부분만. Full, 트랜스폼·모션·라이프사이클 등 시간 의존 값인 Frame, 바텀·톱·앤빌 프로파일 텍스처인 Profile
ApplyVolumetricCloudMaterial다이내믹 머티리얼을 새로 만들고 현재 상태 업로드
UpdateVolumetricCloudMaterial기존 인스턴스 유지, 상태만 갱신
ReleaseVolumetricCloudMaterial바인딩 전 머티리얼로 되돌림

Storm Lightning Component

UStormLightningComponent는 큐 시퀀스를 계산하고 머티리얼 펄스를 갱신합니다. 지상 낙뢰가 떨어질 위치를 정하고, 시작·큐·낙뢰·펄스·종료 시점마다 이벤트를 냅니다. 모션과 라이트닝은 같은 폭풍 ID를 씁니다.

Storm Flow Map Component

UStormFlowMapComponent는 하단·중단·상단 레이어와 렌더 타깃, 연결된 에셋을 들고 있습니다. 셰이프 컴퓨트 패스가 상단 레이어를 읽기 때문에, 그 레이어를 그리면 셰이프 베이크가 dirty가 됩니다.

Storm Vertical Profile Tool Component

UStormVerticalProfileToolComponent은 바텀·톱·앤빌 프로파일 렌더 타깃을 들고 있습니다. 프로파일 전환은 세 면을 렌더 그래프 한 번에 블렌드하고 프로파일 텍스처 바인딩만 갱신합니다. 셰이프는 다시 제출하지도, 다시 굽지도 않습니다.

Storm Render World Subsystem

UStormRenderWorldSubsystem은 월드당 폭풍 하나 규칙을 지키고 셰이프 렌더 타깃 두 장을 들고 있습니다. 샘플한 커브 룩업 테이블은 베이크 해시와 함께 캐시해서, 전체 업데이트 한 번에 커브를 한 번만 읽습니다.

← Storm actor Core parameters →
Reference

Core parameters

Every control the active render, motion, formation and lightning paths actually consume.

Shape and render target

ParameterDefaultRange
Shape Render Target Resolution512512 – 2048
Extent800000, 800000, 2200≥ 1 per axis
Radius400 000≥ 1
Coordinate Scale1.0≥ 0.01 (UI 0.25–4)
Envelope Radius100≥ 0.01
Envelope Falloff10≥ 0
Clockwisefalse
Storm Base Color0.182, 0.189, 0.193
Wind Direction1.0, 0.15, 0.05
Note — Resolution costs memory
At 2048 the two persistent RGBA16F shape targets allocate roughly 64 MiB. Use the lowest resolution that preserves the required radial detail.

Noise coordinate scale

Coordinate Scale scales the storm’s noise coordinates without changing its bounds. Lower values make larger features; higher values make smaller ones that repeat more often. The material applies it to the horizontal, reference-relative storm position before the noise coordinates are built.

ScaledPositionXY =
    (WorldPositionXY - StormReferenceCenterXY) * StormCoordinateScale
NoisePositionXY = MotionOffsetXY + ScaledPositionXY
ValueResult
1.0Preserves the authored noise frequency
0.5Roughly doubles the world-space size of noise features
2.0Roughly halves feature size and doubles repetition
Note — It changes frequency, nothing else
This does not touch Radius, Extent, the shape render-target resolution, or the storm’s world-space footprint. The authored value is clamped to at least 0.01 before it enters render data, and both the full and frame material payloads upload the current value — so a transform or time refresh never falls back to a stale scale.

Radial shape curves

CurvePurpose
Body CoverageDensity support across the main body radius
Anvil FillDensity support across the complete anvil footprint
Bottom SoftnessBottom-profile fade strength
Top/Anvil Profile CoordinateHorizontal lookup coordinate for the Top and Anvil profiles
Layer BottomMinimum normalized cloud-layer height
Layer TopMaximum normalized cloud-layer height

The world subsystem samples the six named float curves into 256-entry lookup tables during a full update. Radial shape curves →

Anvil

ParameterDefaultRange
Anvil Strength0.00 – 1
Anvil Coverage0.350 – 1
Anvil Depth 011.00 – 1
Anvil Height Twist Degrees20−30 – 30
Anvil Height Twist Start0.350 – 0.9

Density and lighting

ParameterDefaultRange
Density0.050 – 1
Density Gamma1.00.001 – 4
HF Strength1.00 – 1
Underside Visibility0.40 – 1
Brim Emissive Colorwhite

Motion

ParameterDefaultRange
Enabledtrue
Preview In Editortrue
Motion Strength1.0≥ 0
Time Scale1.0≥ 0
Ring Count61 – 6
Ring End Radii 010.10, 0.22, 0.36, 0.54, 0.740.01 – 0.99
Ring Angular Speed Degrees3.0, 2.4, 1.8, 1.25, 0.75, 0.35
Ring Skew Degrees140, 96, 60, 34, 16, 0
Boundary Overlap 010.040 – 0.2
Transition ModeResult Blend
Motion Radius Scale1.00 – 2
Radial Feather 010.080 – 0.5
Height Min / Max 010.0 / 0.620 – 1
Height Feather 010.080.001 – 0.5
Radial Shear Gain0.60 – 2

Formation and lightning

ParameterDefaultRange
Create Animation Duration13.0 s≥ 0.1 s
Dissolve Animation Duration10.0 s≥ 0.1 s
Lightning Repeat Delay2.0 s0.1 – 10
Ground Strike Probability1.00 – 1
Core Peak (HDR)4.0≥ 0
Fill / Leak Intensity0.006 / 0.10≥ 0
Auto Play / Looptrue / true

Every sequence draws one strike point from a ring around the flash centre. The material flash and the ground bolt both read that point, so the glow sits over the bolt. The draw happens even when no bolt is produced, and it is seeded from the storm identifier — a given storm repeats the same points across runs.

ParameterDefaultRangeControls
Flash Center (Normalized)0, 0, 0.2046Strike-point anchor. The ring offset is added to X/Y in storm radii; Z is the flash height in cloud-layer height
Strike Radius Min0.00 – 1Inner edge of the ring, as a fraction of the storm radius
Strike Radius Max1.00 – 1Outer edge of the ring. Equal values pin every strike to one radius
Root Height Offset0.0−1 – 1Raises the bolt root above the flash centre, in cloud-layer height
Strike Tilt0.250 – 1Leans the touchdown away from directly below the root, as a share of the drop

The bolt root is held inside the storm’s own vertical band at its radius, so it never starts below the cloud base or above the top no matter how the offset is set. Bolts run from that root to traced ground; where nothing is loaded to hit, they fall back to world Z 0.

Every ground query keeps the root’s own X/Y, so a bolt with no tilt drops geometrically plumb — which reads as artificial. Strike Tilt leans the touchdown by that share of the drop, in a direction drawn per strike: 0.25 moves it 250 m sideways over a 1 km drop. The ground under the leaned point is resolved separately, so the bolt still ends on real terrain, and where nothing is found there the strike falls back to its plumb result.

Note — Probability gates the bolt, not the flash
Ground Strike Probability decides whether a sequence also produces a bolt. The flash plays either way.
← Components Blueprint API →
Reference

Core parameters

렌더, 모션, 형성, 라이트닝이 실제로 읽는 값만 모았습니다.

셰이프, 렌더 타깃

파라미터기본값범위
Shape Render Target Resolution512512 – 2048
Extent800000, 800000, 2200축마다 1 이상
Radius400 000≥ 1
Coordinate Scale1.0≥ 0.01 (UI 0.25–4)
Envelope Radius100≥ 0.01
Envelope Falloff10≥ 0
Clockwisefalse
Storm Base Color0.182, 0.189, 0.193
Wind Direction1.0, 0.15, 0.05
참고 — 해상도만큼 메모리를 먹습니다
2048로 올리면 RGBA16F 셰이프 타깃 두 장이 64 MiB 정도를 계속 물고 있습니다. 방사 디테일이 뭉개지지 않는 선에서 최대한 낮게 쓰세요.

노이즈 좌표 스케일

Coordinate Scale은 폭풍의 경계를 그대로 두고 노이즈 좌표만 스케일합니다. 값이 낮으면 특징이 커지고, 높으면 작아지면서 더 자주 반복됩니다. 머티리얼이 노이즈 좌표를 만들기 전에, 기준점 상대 수평 위치에 이 값을 곱합니다.

ScaledPositionXY =
    (WorldPositionXY - StormReferenceCenterXY) * StormCoordinateScale
NoisePositionXY = MotionOffsetXY + ScaledPositionXY
결과
1.0저작한 노이즈 주파수를 유지
0.5노이즈 특징의 월드 크기가 대략 두 배
2.0특징 크기가 대략 절반, 반복은 두 배
참고 — 바뀌는 건 주파수뿐입니다
RadiusExtent, 셰이프 렌더 타깃 해상도, 폭풍의 월드 발자국은 건드리지 않습니다. 저작한 값은 렌더 데이터에 들어가기 전에 최소 0.01로 잠기고, 전체 페이로드와 프레임 페이로드가 모두 현재 값을 올립니다. 트랜스폼이나 시간 갱신이 예전 스케일로 되돌아가지 않습니다.

방사 커브

커브역할
Body Coverage본체 반경 전체의 밀도 지지
Anvil Fill앤빌 발자국 전체의 밀도 지지
Bottom Softness바텀 프로파일 페이드 세기
Top/Anvil Profile CoordinateTop·Anvil 프로파일의 가로 룩업 좌표
Layer Bottom정규화된 구름 레이어 높이 최소
Layer Top정규화된 구름 레이어 높이 최대

전체 업데이트가 돌 때 월드 서브시스템이 커브 여섯 개를 256칸 룩업 테이블로 샘플합니다. 방사 커브 자세히 →

앤빌

파라미터기본값범위
Anvil Strength0.00 – 1
Anvil Coverage0.350 – 1
Anvil Depth 011.00 – 1
Anvil Height Twist Degrees20−30 – 30
Anvil Height Twist Start0.350 – 0.9

밀도, 라이팅

파라미터기본값범위
Density0.050 – 1
Density Gamma1.00.001 – 4
HF Strength1.00 – 1
Underside Visibility0.40 – 1
Brim Emissive Color흰색

모션

파라미터기본값범위
Enabledtrue
Preview In Editortrue
Motion Strength1.0≥ 0
Time Scale1.0≥ 0
Ring Count61 – 6
Ring End Radii 010.10, 0.22, 0.36, 0.54, 0.740.01 – 0.99
Ring Angular Speed Degrees3.0, 2.4, 1.8, 1.25, 0.75, 0.35
Ring Skew Degrees140, 96, 60, 34, 16, 0
Boundary Overlap 010.040 – 0.2
Transition ModeResult Blend
Motion Radius Scale1.00 – 2
Radial Feather 010.080 – 0.5
Height Min / Max 010.0 / 0.620 – 1
Height Feather 010.080.001 – 0.5
Radial Shear Gain0.60 – 2

형성, 라이트닝

파라미터기본값범위
Create Animation Duration13.0 s≥ 0.1 s
Dissolve Animation Duration10.0 s≥ 0.1 s
Lightning Repeat Delay2.0 s0.1 – 10
Ground Strike Probability1.00 – 1
Core Peak (HDR)4.0≥ 0
Fill / Leak Intensity0.006 / 0.10≥ 0
Auto Play / Looptrue / true

시퀀스마다 플래시 중심 주변의 링에서 낙뢰 지점 하나를 뽑습니다. 머티리얼 플래시와 지상 볼트가 같은 지점을 읽으니 발광이 볼트 위에 놓입니다. 볼트가 나오지 않아도 뽑기는 일어나고, 폭풍 식별자로 시드를 잡으니 같은 폭풍은 실행마다 같은 지점을 반복합니다.

파라미터기본값범위역할
Flash Center (Normalized)0, 0, 0.2046낙뢰 지점의 기준. 링 오프셋이 폭풍 반경 단위로 X·Y에 더해지고, Z는 구름 레이어 높이 기준 플래시 높이
Strike Radius Min0.00 – 1링의 안쪽 경계. 폭풍 반경에 대한 비율
Strike Radius Max1.00 – 1링의 바깥 경계. 두 값을 같게 두면 모든 낙뢰가 한 반경에 고정됩니다
Root Height Offset0.0−1 – 1볼트 뿌리를 플래시 중심보다 올립니다. 구름 레이어 높이 단위
Strike Tilt0.250 – 1낙뢰 지점을 뿌리 바로 아래에서 옆으로 기울입니다. 낙차에 대한 비율

볼트 뿌리는 해당 반경에서 폭풍 자체의 수직 밴드 안에 유지됩니다. 오프셋을 어떻게 잡아도 구름 바닥 아래나 천장 위에서 시작하지 않습니다. 볼트는 그 뿌리에서 트레이스된 지면까지 이어지고, 맞을 게 로드되지 않았으면 월드 Z 0으로 떨어집니다.

지면을 찾을 때는 뿌리의 X·Y를 그대로 씁니다. 그래서 기울기가 0이면 볼트가 수직으로 떨어지는데, 이게 부자연스럽게 보입니다. Strike Tilt가 낙차에 대한 비율만큼 낙뢰 지점을 옆으로 기울입니다. 방향은 낙뢰마다 새로 뽑고, 0.25면 1km 낙차에서 250m 옆으로 갑니다. 기울인 지점 아래 지면은 따로 찾으니 볼트는 여전히 실제 지형에 닿고, 거기서 아무것도 못 찾으면 수직으로 떨어진 결과로 되돌아갑니다.

참고 — 확률이 막는 건 볼트고 플래시가 아닙니다
Ground Strike Probability는 시퀀스가 볼트까지 낼지를 정합니다. 플래시는 어느 쪽이든 재생됩니다.
← Components Blueprint API →
Reference

Blueprint API

The nodes and events exposed on the actor and its components.

Preset and render

NodePurpose
Apply PresetCopies a Storm Preset into the actor and performs a full rebuild
Prepare Storm ResourcesRegisters the actor as the world’s storm and initializes resources
Rebuild Render DataRebuilds static and frame render state
Get Storm Render DataReturns a Blueprint-safe copy of the current render data
Get Stable Storm IdReturns the resolved deterministic seed shared by motion and lightning

Components

NodeReturns
Get Material BinderThe Storm Material Binder component
Get Vertical Profile ToolThe Vertical Profile Tool component
Get Flow Map ComponentThe Flow Map component
Get Lightning ComponentThe Lightning component

Formation

NodePurpose
Create StormStarts formation
Dissolve StormStarts dissolution
Show Mature StormImmediately switches to the mature state
Hide Storm ImmediatelyImmediately switches to the hidden state
Set / Get Formation Animation DurationChanges or reads formation duration
Set / Get Dissolution Animation DurationChanges or reads dissolution duration

Motion

NodePurpose
Set Storm Motion EnabledEnables or disables motion evaluation
Pause / Resume Storm MotionPauses or resumes motion time
Reset Storm MotionResets motion time and ring phases
Set Storm Motion TimeSets deterministic motion time

Profile sequence

A vertical profile asset holds a sequence of keys; these nodes play it. The same set is available on the Storm Vertical Profile Tool component.

NodePurpose
Play Profile SequencePlays forward. Restart begins from the first key
Play Profile Sequence ReversePlays backward
Pause Profile SequenceHolds playback at the current time
Stop Profile SequenceStops playback and returns to the selected key
Set Profile Sequence TimeScrubs to a time in seconds
Set Profile Sequence LoopingRepeats the sequence when it reaches an end
Get Profile Sequence Time / DurationRead playback position and total length
Is Profile Sequence Playing / In ReverseReport the play state and direction
Is Profile Sequence Preview ActiveReports whether a preview is driving the profile
Can Play Profile SequenceReports whether the bound asset has a playable sequence

Lightning

NodePurpose
Play Lightning SequenceStarts the configured sequence
Stop LightningStops the sequence and clears the material state
Is Lightning Sequence PlayingReports the current play state
Set Lightning SequenceReplaces the sequence. Playback picks it up on the next sequence
Set Lightning Repeat DelaySets the delay between automatically repeated sequences
Set Ground Strike ProbabilitySets the chance that a sequence also produces a ground strike
Warning — Writing the property is not enough
Setting Lightning Sequence on the actor stores the value but never reaches the lightning component. Use Set Lightning Sequence so the change is pushed. Lightning Repeat Delay and Ground Strike Probability are read-only in Blueprint and are set through their functions.

Material binder

NodePurpose
Resolve Target CloudResolves the explicit target or the only cloud in the world
Push Storm Render DataUploads complete storm material state
Apply Volumetric Cloud MaterialCreates or recreates the dynamic instance and uploads state
Update Volumetric Cloud MaterialRefreshes the existing dynamic instance
Get Dynamic Cloud MaterialReturns the active binder-owned instance
Apply Lightning Material StateUploads a complete lightning material payload
Set Lightning PulseUpdates the lightning pulse scalar
Clear Lightning Material StateClears all lightning material values

Events

EventFires when
On Storm Formation CompletedFormation reaches the mature state
On Storm Dissolution CompletedDissolution reaches the hidden state
On Lightning StartedA sequence begins, with the lightning context
On Lightning Pulse UpdatedFires every frame while a sequence plays. Lightning component only
On Ground StrikeA ground strike resolves, with start and end world positions
On Custom Lightning CueAn authored cue id is reached
On Lightning FinishedThe sequence completes
← Core parameters Limitations →
Reference

Blueprint API

액터와 컴포넌트에서 쓸 수 있는 노드와 이벤트입니다.

프리셋과 렌더

노드역할
Apply PresetStorm Preset을 액터로 복사하고 전체 재구성
Prepare Storm Resources액터를 월드 폭풍으로 등록, 리소스 초기화
Rebuild Render Data고정·프레임 렌더 상태 재구성
Get Storm Render Data현재 렌더 데이터를 블루프린트용으로 복사해 반환
Get Stable Storm Id모션과 라이트닝이 같이 쓰는 시드 반환

컴포넌트 접근

노드반환
Get Material BinderStorm Material Binder 컴포넌트
Get Vertical Profile ToolVertical Profile Tool 컴포넌트
Get Flow Map ComponentFlow Map 컴포넌트
Get Lightning ComponentLightning 컴포넌트

형성

노드역할
Create Storm형성 시작
Dissolve Storm소멸 시작
Show Mature Storm성숙 상태로 바로 전환
Hide Storm Immediately숨김 상태로 바로 전환
Set / Get Formation Animation Duration형성 시간 설정, 조회
Set / Get Dissolution Animation Duration소멸 시간 설정, 조회

모션

노드역할
Set Storm Motion Enabled모션 계산 on/off
Pause / Resume Storm Motion모션 시간 정지, 재개
Reset Storm Motion모션 시간, 링 위상 초기화
Set Storm Motion Time모션 시간 직접 지정. 항상 같은 결과가 나옵니다

프로파일 시퀀스

프로파일 에셋은 키 시퀀스를 들고 있고, 이 노드들이 그걸 재생합니다. 같은 세트가 Storm Vertical Profile Tool 컴포넌트에도 있습니다.

노드역할
Play Profile Sequence정방향 재생. Restart를 켜면 첫 키에서 시작
Play Profile Sequence Reverse역방향 재생
Pause Profile Sequence현재 시간에서 멈춤
Stop Profile Sequence재생을 끝내고 선택된 키로 복귀
Set Profile Sequence Time초 단위로 스크럽
Set Profile Sequence Looping끝에 닿으면 반복
Get Profile Sequence Time / Duration재생 위치와 전체 길이 조회
Is Profile Sequence Playing / In Reverse재생 상태와 방향
Is Profile Sequence Preview Active프리뷰가 프로파일을 구동 중인지
Can Play Profile Sequence물린 에셋에 재생 가능한 시퀀스가 있는지

라이트닝

노드역할
Play Lightning Sequence시퀀스 재생
Stop Lightning재생 정지, 머티리얼 상태 초기화
Is Lightning Sequence Playing재생 중인지 여부
Set Lightning Sequence시퀀스를 교체합니다. 다음 시퀀스부터 반영됩니다
Set Lightning Repeat Delay자동 반복 간격 설정
Set Ground Strike Probability시퀀스가 지상 낙뢰까지 낼 확률 설정
주의 — 프로퍼티만 써서는 반영되지 않습니다
액터의 Lightning Sequence에 값을 넣으면 저장은 되지만 라이트닝 컴포넌트까지 가지 않습니다. Set Lightning Sequence를 쓰세요. Lightning Repeat DelayGround Strike Probability는 블루프린트에서 읽기 전용이라 각각의 함수로 설정합니다.

머티리얼 바인더

노드역할
Resolve Target Cloud지정된 대상을 찾고, 없으면 월드에 하나뿐인 클라우드를 찾음
Push Storm Render Data폭풍 머티리얼 상태 전체 업로드
Apply Volumetric Cloud Material다이내믹 인스턴스 새로 만들고 상태 업로드
Update Volumetric Cloud Material기존 다이내믹 인스턴스 갱신
Get Dynamic Cloud Material바인더가 들고 있는 인스턴스 반환
Apply Lightning Material State라이트닝 머티리얼 값 전체 업로드
Set Lightning Pulse라이트닝 펄스 값 갱신
Clear Lightning Material State라이트닝 머티리얼 값 초기화

이벤트

이벤트발생 시점
On Storm Formation Completed형성이 끝나고 성숙 상태가 될 때
On Storm Dissolution Completed소멸이 끝나고 숨김 상태가 될 때
On Lightning Started시퀀스가 시작될 때. 라이트닝 정보가 같이 넘어옵니다
On Lightning Pulse Updated시퀀스가 도는 동안 매 프레임. 라이트닝 컴포넌트에만 있습니다
On Ground Strike지상 낙뢰 위치가 정해질 때. 시작점과 끝점 월드 좌표가 같이 옵니다
On Custom Lightning Cue심어둔 큐에 도달할 때
On Lightning Finished시퀀스가 끝날 때
← Core parameters Limitations →
Notes

Limitations

What the renderer deliberately does not do.

Windows, DirectX 12 and SM6 only

The plugin is built and supported on Windows 64-bit with DirectX 12 and Shader Model 6. The compute passes and the shipped cloud material target that feature set; DirectX 11 and SM5 are not supported.

One storm per world

The renderer intentionally supports one registered storm actor in each world. The world subsystem rejects an additional actor instead of sharing or replacing shape render targets. Use separate worlds or streamed world instances when two independent storms must render simultaneously.

This rule counts actor instances, not classes. BP_VolumetricSuperStorm derives from the native storm actor, so placing both the Blueprint and the native actor puts two storm actors in the world and the second one is rejected.

The bolt VFX is a sample, and no audio ships

What the plugin drives is the timing: the lightning component evaluates the cue sequence, resolves ground strikes, drives the material pulse, and raises start, cue, strike, pulse and finish Blueprint events.

A sample Niagara bolt, NS_StormLightning, ships under Materials/VFX/Particle with its material MT_Lightning. It is not assigned by defaultBP_VolumetricSuperStorm carries a Niagara component and an On Ground Strike handler that positions it, but the component’s Asset field is empty until you fill it. Assign the sample or your own system there.

The sample is authored around a short beam. A storm bolt runs from the cloud base to the ground, which is kilometers at typical cloud altitudes, so branch offsets and ribbon width authored in world units read as too small at that span. Expect to retune it, or drive your own.

No sound assets ship. Bind thunder to the same events.

The Volumetric Cloud target

The plugin renders through Unreal’s native Volumetric Cloud component.

This applies to the Dynamic Material Instance binding backend. Set TargetCloudReference explicitly when the world contains more than one cloud; automatic targeting succeeds only when exactly one candidate exists. The binder replaces the target cloud’s material with a dynamic instance while the storm is active, and restores the previous material when the storm unregisters or is destroyed.

The default Global MPC backend never reassigns a cloud material. It writes to a shared Material Parameter Collection instead, so every cloud whose material contains MF_Storm_Global responds to the storm.

Cloud-layer ownership

Vertical placement is defined by the Volumetric Cloud component’s layer bottom altitude and layer height. Storm profiles and shape heights use normalized layer space, from zero at the layer bottom to one at the layer top. Moving the storm actor vertically does not move the cloud layer — change the layer settings to change absolute altitude or thickness.

Native renderer constraints

Tracing distance, quality, platform support and project-level r.VolumetricCloud.* settings come from Unreal’s cloud renderer. These can change appearance and performance between editor, PIE and packaged builds.

Persistent render-target cost

The subsystem owns two RGBA16F shape targets — roughly 64 MiB together at the maximum supported 2048 resolution. Flow maps and profile targets add to that, so high resolutions should be reserved for shots that need the extra detail.

← Blueprint API Troubleshooting →
Notes

Limitations

일부러 지원하지 않는 것들이 있습니다.

Windows, DirectX 12, SM6 전용

Windows 64-bit에 DX12, SM6 조합만 빌드하고 지원합니다. 컴퓨트 패스와 배포 클라우드 머티리얼이 그 기능 집합을 기준으로 만들어졌습니다. DX11과 SM5는 지원하지 않습니다.

월드당 폭풍 하나

월드마다 폭풍 액터 하나만 등록됩니다. 일부러 이렇게 만들었습니다. 두 번째 액터는 셰이프 렌더 타깃을 나눠 쓰거나 기존 걸 교체하는 대신 그냥 거부됩니다. 독립된 폭풍 두 개를 동시에 띄워야 하면 월드를 나누거나 스트리밍 월드 인스턴스를 쓰세요.

이 규칙은 클래스가 아니라 액터 인스턴스를 셉니다. BP_VolumetricSuperStorm은 네이티브 스톰 액터를 상속하므로, 블루프린트와 네이티브 액터를 둘 다 놓으면 스톰이 두 개가 되고 두 번째가 거부됩니다.

볼트 VFX는 샘플이고 사운드는 없습니다

플러그인이 구동하는 건 타이밍입니다. 라이트닝 컴포넌트가 큐 시퀀스를 계산하고, 지상 낙뢰 위치를 정하고, 머티리얼 펄스를 돌리고, 시작·큐·낙뢰·펄스·종료 이벤트를 블루프린트로 올립니다.

샘플 Niagara 볼트 NS_StormLightningMaterials/VFX/Particle 아래에 머티리얼 MT_Lightning과 함께 들어 있습니다. 기본으로 물려 있지 않습니다. BP_VolumetricSuperStorm에 Niagara 컴포넌트와 위치를 잡아주는 On Ground Strike 핸들러가 있지만, 컴포넌트의 Asset 칸은 직접 채우기 전까지 비어 있습니다. 샘플이든 직접 만든 시스템이든 거기에 넣으세요.

샘플은 짧은 빔을 기준으로 만들어졌습니다. 폭풍의 볼트는 구름 바닥에서 지면까지 이어지고 일반적인 구름 고도에서는 킬로미터 단위입니다. 월드 단위로 잡힌 가지 오프셋과 리본 폭이 그 길이에서는 너무 작게 읽힙니다. 다시 잡거나 직접 만들어 쓰셔야 합니다.

사운드 에셋은 없습니다. 천둥은 같은 이벤트에 물리세요.

대상 클라우드

언리얼 네이티브 Volumetric Cloud 컴포넌트로 그립니다.

여기서 말하는 건 Dynamic Material Instance 백엔드입니다. 월드에 클라우드가 둘 이상이면 TargetCloudReference를 직접 지정하세요. 자동으로 찾는 건 후보가 딱 하나일 때만 됩니다. 폭풍이 살아 있는 동안 바인더가 대상 머티리얼을 다이내믹 인스턴스로 바꿔두고, 폭풍이 빠지거나 파괴되면 원래대로 돌려놓습니다.

기본값인 Global MPC 백엔드는 클라우드 머티리얼을 아예 건드리지 않습니다. 공유 Material Parameter Collection에 쓰기 때문에, MF_Storm_Global이 들어 있는 머티리얼을 쓰는 모든 클라우드가 폭풍에 반응합니다.

수직 위치는 구름 레이어가 정합니다

폭풍이 어느 높이에 뜨는지는 Volumetric Cloud 컴포넌트의 레이어 바닥 고도와 두께가 결정합니다. 프로파일과 셰이프 높이는 바닥 0, 천장 1 기준입니다. 액터를 위아래로 옮겨도 구름 레이어는 따라오지 않습니다. 절대 고도나 두께를 바꾸려면 클라우드 레이어 설정을 만지세요.

언리얼 렌더러 쪽 제약

트레이싱 거리, 품질, 플랫폼 지원, r.VolumetricCloud.* 설정은 언리얼 클라우드 렌더러 쪽입니다. 이 값들 때문에 에디터, PIE, 패키징 빌드에서 결과와 성능이 달라질 수 있습니다.

상주하는 렌더 타깃 비용

서브시스템이 RGBA16F 셰이프 타깃 두 장을 계속 들고 있습니다. 2048에서 둘 합쳐 64 MiB 정도입니다. 여기에 플로우맵과 프로파일 타깃까지 붙으니, 높은 해상도는 디테일이 꼭 필요한 샷에만 쓰세요.

← Blueprint API Troubleshooting →
Notes

Troubleshooting

The failures that actually happen, and what to check first.

The storm is invisible

·The project runs on DirectX 12 with SM6.
·The level contains a Volumetric Cloud component.
·The storm actor is the only registered storm in the world.
·The cloud material matches the binder’s BindingBackend. Under the default Global MPC backend the material must contain MF_Storm_GlobalM_StormMinimalSetup does. Under Dynamic Material Instance it must expose the 53 contract parameters — M_VolumetricSuperStorm does.
·Under Dynamic Material Instance only: TargetCloudReference identifies the intended cloud when several exist, and BaseCloudMaterial is set.
·The cloud has valid layer altitude and layer height settings.

The binder logs an error when the target is ambiguous, when the material contract is incomplete, or when the Global MPC backend cannot find its internal collection and render-target assets.

Warning — Mismatching the backend and the material is the most common cause
The two shipped materials are not interchangeable: M_StormMinimalSetup exposes none of the contract parameters, so the binder refuses it as a BaseCloudMaterial.

Nothing responds to any setting

The most common cause is two storm actors in the level. BP_VolumetricSuperStorm is a Blueprint subclass of the native storm actor, so placing both puts two storm actors in the world — only the first registers, and the one you are editing may be the rejected second.

Search the World Outliner for every actor deriving from the storm actor and keep one.

The lightning has no bolt and no sound

The cloud still flashes — that is the material pulse, and it runs on its own. What is missing is the bolt, and it is missing because nothing is assigned to draw one.

BP_VolumetricSuperStorm has a Niagara component and an On Ground Strike handler that moves it and writes User.BeamStart and User.BeamEnd, but the component ships with an empty Asset field. Select the component and set Asset to the bundled sample, NS_StormLightning under Materials/VFX/Particle, or to your own system. A system driven this way must expose User.BeamStart and User.BeamEnd as Position parameters.

No audio ships. Bind thunder to the same events. If the bolt appears but reads as a thin line, the sample is authored around a short beam and needs retuning for a kilometers-long storm bolt.

A bolt runs far past the ground, or ends in mid-air

The strike point landed where nothing could be traced. Ground strikes trace down for collision or a Landscape; with nothing below, they fall back to world Z 0, which is rarely the visible surface on elevated or streamed terrain.

Storms are usually wider than the ground under them, so strikes drawn near the outer radius fall off it. Lower Strike Radius Max under Lightning > Placement until strikes stay over terrain. In World Partition levels also confirm the Landscape below the storm is actually loaded — an unloaded proxy traces as empty.

A second storm does not render

Intentional. The world subsystem accepts one storm actor and rejects an additional one rather than sharing shape render targets.

The cloud material changes back when the storm is removed

Intentional. The binder restores the material that was active before it created its dynamic instance.

Profile edits made during PIE disappear

PIE owns separate transient profile render targets. Save profile changes to a profile asset in the editor world when they must persist.

A profile sequence fades toward empty density

Verify that every key in the sequence holds valid bottom, top and anvil profile surfaces. A black or missing surface produces an empty density response as playback reaches that key.

Shape edits appear delayed

A static shape edit updates the bake input and is processed by the world subsystem on its next tick. Profile, motion, lifecycle and lightning updates do not wait for a shape rebake.

Note — Measuring it
Set VolumetricSuperStorm.Stats to a non-zero value to draw the storm-state overlay — four-decimal timings for the subsystem tick, render-data submit and shape bake, plus the bake count.
← Limitations Changelog →
Notes

Troubleshooting

자주 겪는 문제들입니다. 먼저 볼 곳을 정리했습니다.

폭풍이 안 보입니다

·프로젝트가 DX12 + SM6로 돌고 있는지
·레벨에 Volumetric Cloud 컴포넌트가 있는지
·월드에 등록된 폭풍이 이 액터 하나뿐인지
·클라우드 머티리얼이 바인더의 BindingBackend와 맞는지. 기본 Global MPC에서는 머티리얼에 MF_Storm_Global이 있어야 합니다. M_StormMinimalSetup에는 들어 있습니다. Dynamic Material Instance에서는 계약 파라미터 53개를 노출해야 하고, M_VolumetricSuperStorm이 그렇습니다
·Dynamic Material Instance만 해당: 클라우드가 여러 개일 때 TargetCloudReference로 대상을 지정했는지, BaseCloudMaterial이 채워져 있는지
·클라우드의 레이어 고도와 두께가 정상인지

대상이 애매할 때, 머티리얼 계약이 불완전할 때, Global MPC 백엔드가 내부 컬렉션과 렌더 타깃 에셋을 못 찾을 때 바인더가 에러를 찍습니다.

주의 — 백엔드와 머티리얼이 안 맞는 게 가장 흔합니다
배포되는 머티리얼 두 개는 서로 바꿔 쓸 수 없습니다. M_StormMinimalSetup은 계약 파라미터를 하나도 노출하지 않아서 BaseCloudMaterial로 넣으면 바인더가 거부합니다.

어떤 설정도 반응이 없습니다

레벨에 스톰 액터가 두 개인 경우가 가장 많습니다. BP_VolumetricSuperStorm은 네이티브 스톰 액터의 블루프린트 서브클래스라, 둘 다 놓으면 월드에 스톰이 두 개가 됩니다. 먼저 등록된 하나만 살아남는데, 지금 만지고 있는 게 거부된 두 번째일 수 있습니다.

월드 아웃라이너에서 스톰 액터를 상속한 액터를 전부 찾아 하나만 남기세요.

번개에 볼트도 소리도 없습니다

구름은 여전히 번쩍입니다. 그건 머티리얼 펄스고 따로 돕니다. 없는 건 볼트고, 그릴 게 아무것도 물려 있지 않아서입니다.

BP_VolumetricSuperStorm에 Niagara 컴포넌트와 On Ground Strike 핸들러가 있어서 위치를 옮기고 User.BeamStartUser.BeamEnd를 씁니다. 다만 컴포넌트의 Asset 칸이 비어 있는 채로 배포됩니다. 컴포넌트를 선택하고 Asset에 Materials/VFX/Particle 아래 샘플 NS_StormLightning이나 직접 만든 시스템을 넣으세요. 이렇게 구동할 시스템은 User.BeamStartUser.BeamEnd를 Position 파라미터로 노출해야 합니다.

사운드는 없습니다. 천둥은 같은 이벤트에 물리세요. 볼트가 나오는데 가느다란 선처럼 보이면, 샘플이 짧은 빔 기준이라 킬로미터 단위 폭풍 볼트에 맞게 다시 잡아야 합니다.

볼트가 지면을 한참 지나거나 공중에서 끝납니다

낙뢰 지점이 트레이스할 게 없는 곳에 떨어진 겁니다. 지상 낙뢰는 아래로 콜리전이나 랜드스케이프를 찾는데, 밑에 아무것도 없으면 월드 Z 0으로 떨어집니다. 고지대나 스트리밍 지형에서는 그게 보이는 표면인 경우가 거의 없습니다.

폭풍은 보통 그 아래 지면보다 넓어서, 바깥 반경 근처에 뽑힌 낙뢰는 지면 밖으로 나갑니다. Lightning > PlacementStrike Radius Max를 낮춰 낙뢰가 지형 위에 머물게 하세요. 월드 파티션 레벨이라면 폭풍 아래 랜드스케이프가 실제로 로드됐는지도 확인하세요. 언로드된 프록시는 빈 것으로 트레이스됩니다.

Strike Tilt는 그 링보다 더 넓게 퍼뜨립니다. 볼트가 낙차에 비례해 기울기 때문에, 킬로미터 단위 낙차에서는 뽑힌 지점보다 수백 미터 밖에 떨어질 수 있습니다. 반경을 정할 때 이 거리까지 계산에 넣거나 기울기를 낮추세요.

두 번째 폭풍이 안 그려집니다

의도한 동작입니다. 월드 서브시스템은 폭풍 액터 하나만 받고, 셰이프 렌더 타깃을 나눠 쓰는 대신 두 번째를 거부합니다.

폭풍을 지우면 클라우드 머티리얼이 원래대로 돌아갑니다

의도한 동작입니다. 바인더가 다이내믹 인스턴스를 만들기 전에 걸려 있던 머티리얼로 되돌립니다.

PIE에서 그린 프로파일이 사라집니다

PIE는 임시 프로파일 렌더 타깃을 따로 씁니다. 남기려면 에디터 월드에서 프로파일 에셋으로 저장하세요.

시퀀스를 재생하면 밀도가 비어버립니다

시퀀스의 모든 키에 바텀·톱·앤빌 면이 제대로 들어 있는지 보세요. 검거나 빠진 면이 있으면 재생이 그 키에 닿는 순간 밀도가 0으로 나옵니다.

셰이프 수정이 한 프레임 늦게 반영됩니다

셰이프 쪽 고정 값을 바꾸면 베이크 입력만 갱신해 두고, 실제 처리는 월드 서브시스템 다음 틱에 합니다. 프로파일, 모션, 라이프사이클, 라이트닝은 셰이프 리베이크를 기다리지 않습니다.

참고 — 수치로 확인하기
VolumetricSuperStorm.Stats를 0이 아닌 값으로 두면 화면에 폭풍 상태가 뜹니다. 서브시스템 틱, 렌더 데이터 제출, 셰이프 베이크 시간을 소수 네 자리까지, 베이크 횟수도 같이 보여줍니다.
← Limitations Changelog →
Notes

Changelog

Version 1.0.0, released 4 August 2026 for Unreal Engine 5.8.

What counts as a breaking change

The material parameter contract is part of the public surface. Adding, renaming or removing a contract parameter requires a major version, because a cloud material authored against the old contract stops binding.

Added in 1.0.0

AreaWhat landed
Storm actorOne actor orchestrating shape, motion, lightning, formation, vertical profiles and flow maps, binding the target cloud material without manual wiring
Shape authoringRadius, extent, envelope, anvil, density and lighting, plus radial curves for coverage, cloud type and min/max layer height; bakes to two RGBA16F targets at 512–2048
Motion systemUp to six concentric rotation rings with per-ring angular speed and skew, boundary blending, radial and vertical motion masks, and independent low-frequency, high-frequency and curl rotation multipliers
Vertical profile painterPaints bottom, top and anvil profiles in normalized cloud-layer space, with composite preview, undo and asset saving. A profile asset holds up to 16 keys, and Blueprint nodes play, reverse, scrub and loop that sequence at runtime
Wind flow-map editorPaints lower, middle and upper flow layers at 32–2048, in drag-direction or encoded-RGBA mode, with a layer-authority ribbon controlling each layer’s height of influence. Includes a vertical flow component for 2.5D advection
LightningAuthored cue sequences drive material pulses and ground-strike resolution against Landscape height, with repeat delay and strike probability. Start, cue, strike, pulse and finish events are exposed to Blueprint, and cadence, probability and the whole sequence can be retuned at runtime. No bolt VFX ships — the events are the integration point, and BP_VolumetricSuperStorm carries worked examples of the handlers
Formation and dissolutionTimed create and dissolve animations with completion events, plus immediate show and hide
PresetsA Storm Preset asset captures the complete authorable configuration and applies onto any storm actor
Blueprint API75 nodes — 47 callable, 28 pure — plus 7 assignable events, covering preset application, render rebuild, formation, motion control, profile sequence playback, lightning and material binding
Editor integrationStorm actor Details customization, a Wind Flow Map asset editor, a component visualizer for motion ring ranges, and an editor viewport that previews storm motion without entering PIE
ContentM_VolumetricSuperStorm implementing the storm parameter contract, M_StormMinimalSetup for a storm-only sky, supporting material functions, Perlin-Worley and curl noise textures, three vertical profiles, two flow maps, four presets, and the sample bolt NS_StormLightning with its material MT_Lightning

Known limitations

One registered storm actor per world — place either BP_VolumetricSuperStorm or the native actor, not both. Automatic cloud targeting requires exactly one cloud component in the level. Storm heights are normalized to the cloud layer, with absolute altitude and thickness remaining properties of the cloud component. PIE profile edits do not persist. Two RGBA16F shape targets cost roughly 64 MiB at 2048. The bundled bolt VFX NS_StormLightning is a sample: not assigned by default, and authored around a short beam. No audio ships.

← Troubleshooting
Notes

Changelog

1.0.0 — 2026년 8월 4일, 언리얼 엔진 5.8용 첫 공개 릴리스입니다.

호환성이 깨지는 경우

머티리얼 파라미터 계약은 공개 인터페이스로 취급합니다. 여기에 뭘 추가하거나, 이름을 바꾸거나, 빼면 메이저 버전을 올립니다. 예전 기준으로 만든 클라우드 머티리얼이 더 이상 붙지 않기 때문입니다.

1.0.0 추가 내역

영역내용
스톰 액터셰이프, 모션, 라이트닝, 형성, 버티컬 프로파일, 플로우맵을 액터 하나가 관리. 대상 클라우드 머티리얼은 수동 배선 없이 바인딩
셰이프 저작반경, 범위, 엔벨로프, 앤빌, 밀도, 라이팅. 커버리지와 클라우드 타입, 레이어 높이용 방사 커브. 512~2048 RGBA16F 타깃 두 장에 베이크
모션 시스템동심 회전 링 최대 6개. 링마다 각속도와 스큐, 경계 블렌딩, 방사·수직 모션 마스크, 저주파·고주파·컬 회전 배수 개별 지정
버티컬 프로파일 페인터바텀, 톱, 앤빌 프로파일을 정규화 레이어 공간에서 작업. 합성 프리뷰, 언두, 에셋 저장. 에셋 하나에 최대 16개 키가 들어가고, 블루프린트 노드로 재생·역재생·스크럽·반복
플로우맵 에디터하단, 중단, 상단 레이어를 32~2048로 작업. 드래그 방향 또는 RGBA 직접 입력, 레이어별 영향 높이를 정하는 authority 리본. 2.5D 이동용 수직 플로우 성분 포함
라이트닝저작한 큐 시퀀스로 머티리얼 펄스를 돌리고, 랜드스케이프 높이를 읽어 지상 낙뢰 위치 결정. 반복 딜레이와 낙뢰 확률. 시작·큐·낙뢰·펄스·종료 이벤트를 블루프린트로 노출. 주기와 확률, 시퀀스 전체를 런타임에 다시 잡을 수 있습니다. 볼트 VFX는 없고 이벤트가 연결 지점입니다. BP_VolumetricSuperStorm에 핸들러 예시 포함
형성과 소멸시간 기반 생성·소멸 애니메이션과 완료 이벤트. 즉시 표시와 숨김도 지원
프리셋셰이프, 모션, 라이트닝, 형성 설정과 프로파일·플로우맵 참조를 담는 에셋. 어떤 스톰 액터에도 적용
블루프린트 API노드 75개(callable 47, pure 28), 이벤트 7개. 프리셋 적용, 렌더 재구성, 형성, 모션 제어, 프로파일 시퀀스 재생, 라이트닝, 머티리얼 바인딩
에디터 통합스톰 액터 Details 커스터마이즈, Wind Flow Map 에셋 에디터, 모션 링 범위 컴포넌트 비주얼라이저, PIE 없이 도는 뷰포트 모션 프리뷰
콘텐츠M_VolumetricSuperStorm 클라우드 머티리얼, 폭풍만 있는 하늘용 M_StormMinimalSetup, 지원 머티리얼 함수, Perlin-Worley와 컬 노이즈 텍스처, 버티컬 프로파일 3개, 플로우맵 2개, 프리셋 4개, 샘플 볼트 NS_StormLightning과 머티리얼 MT_Lightning

알려진 한계

월드당 폭풍 하나. BP_VolumetricSuperStorm과 네이티브 액터 중 하나만 놓으세요. 클라우드 자동 지정은 레벨에 클라우드 컴포넌트가 하나일 때만 됩니다. 높이는 구름 레이어 기준 0~1이고, 절대 고도와 두께는 클라우드 컴포넌트 쪽 값입니다. PIE에서 그린 프로파일은 남지 않습니다. 2048에서 셰이프 타깃 두 장이 64 MiB 정도를 씁니다. 번들 볼트 VFX NS_StormLightning은 샘플입니다. 기본으로 물려 있지 않고 짧은 빔 기준으로 만들어졌습니다. 사운드는 없습니다.

← Troubleshooting

Demo reel

Real-time capture from the editor viewport — no offline render, no compositing pass. Formation, ring shear, painted flow and the lightning cadence, running on the same path a packaged build takes.

에디터 뷰포트에서 실시간으로 캡처했습니다. 오프라인 렌더도, 합성 작업도 없습니다. 형성과 링 시어, 그려 넣은 플로우, 라이트닝 주기가 패키징 빌드와 같은 경로로 돌고 있습니다.

Real-time · editor viewport · UE 5.8실시간 · 에디터 뷰포트 · UE 5.8
Reel 01 — formation to dissolutionReel 01 — 형성에서 소멸까지 Open on YouTube →YouTube에서 보기 →
Engine엔진Unreal Engine 5.8 · Win64 · DX12 · SM6 Renderer렌더러Native Volumetric Cloud네이티브 Volumetric Cloud Captured캡처Editor viewport, real time에디터 뷰포트, 실시간

Team
GoroGoro

Team GoroGoro came out of Krafton Jungle Game Tech Lab, cohort 3. Volumetric Super Storm is what we built there: the storm we wanted in a level, as one actor, live in the editor viewport, tuned by painting instead of typing numbers into fields.

Krafton Jungle 게임 테크 랩 3기 팀 GOROGORO입니다.
크고 아름다운 폭풍을 만들었습니다.

Gyeonggi, Korea
gorogoro9012@gmail.com
01 박준혁
02 김형준
03 김효범
04 정찬일
Four of us built it.넷이 만들었습니다.

Work with us,
or just take the storm

Say hello — we read everything.메일 주시면 답장드립니다.